Bollard assembly
An Alliance Bollard is a piece of Pool hardware, not part of your Robot. It clamps to the top rail of the Pool frame and hangs a string over the water. Hex Links in the Alliance colour attach to the end of that string, which is what Robots score onto.
One Bollard sits in each corner of the Pool: two Blue and two Red. A complete Pool therefore needs four Bollards, and this page describes how to build one of them.
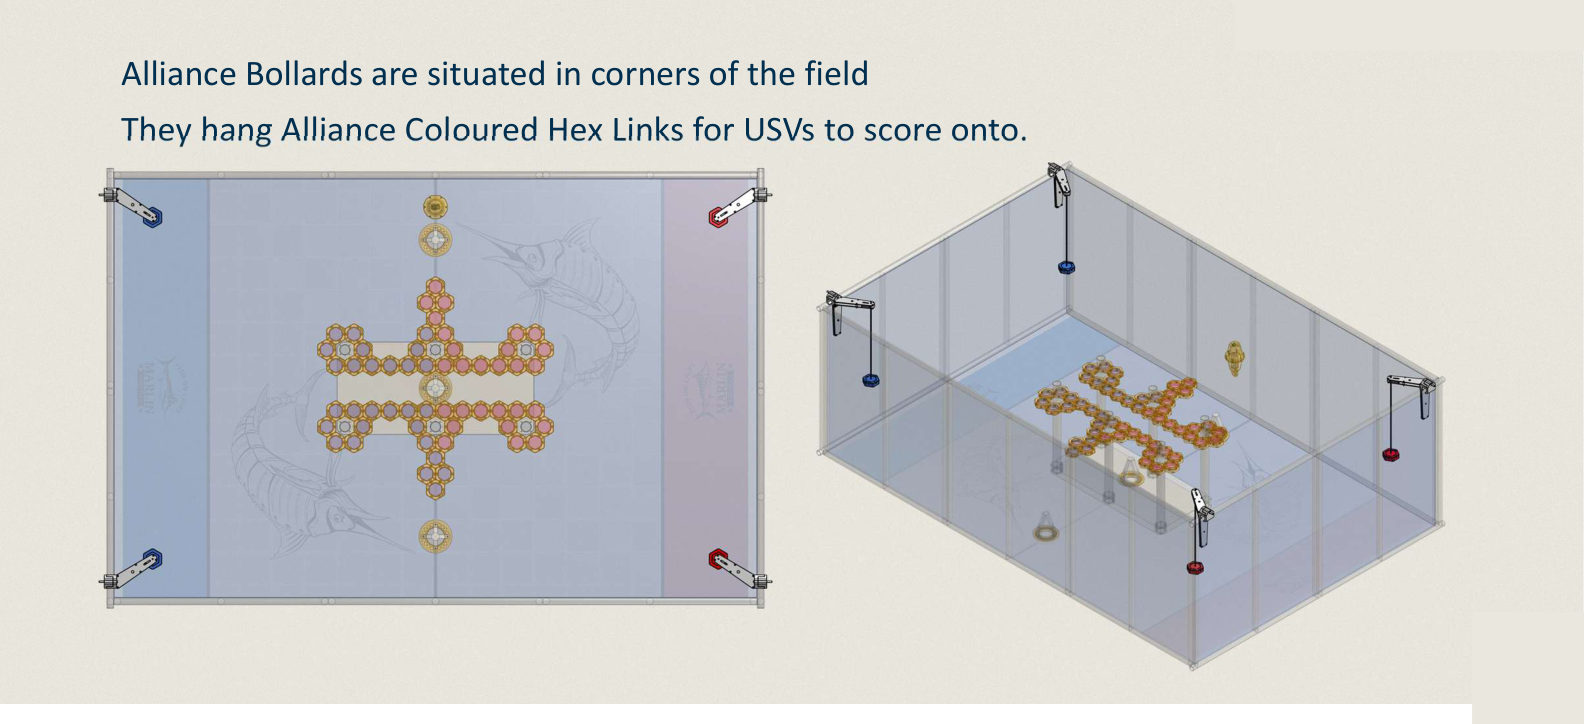
Each Bollard clamps onto the pool frame at the corner, so nothing has to be drilled or permanently attached to the Pool.
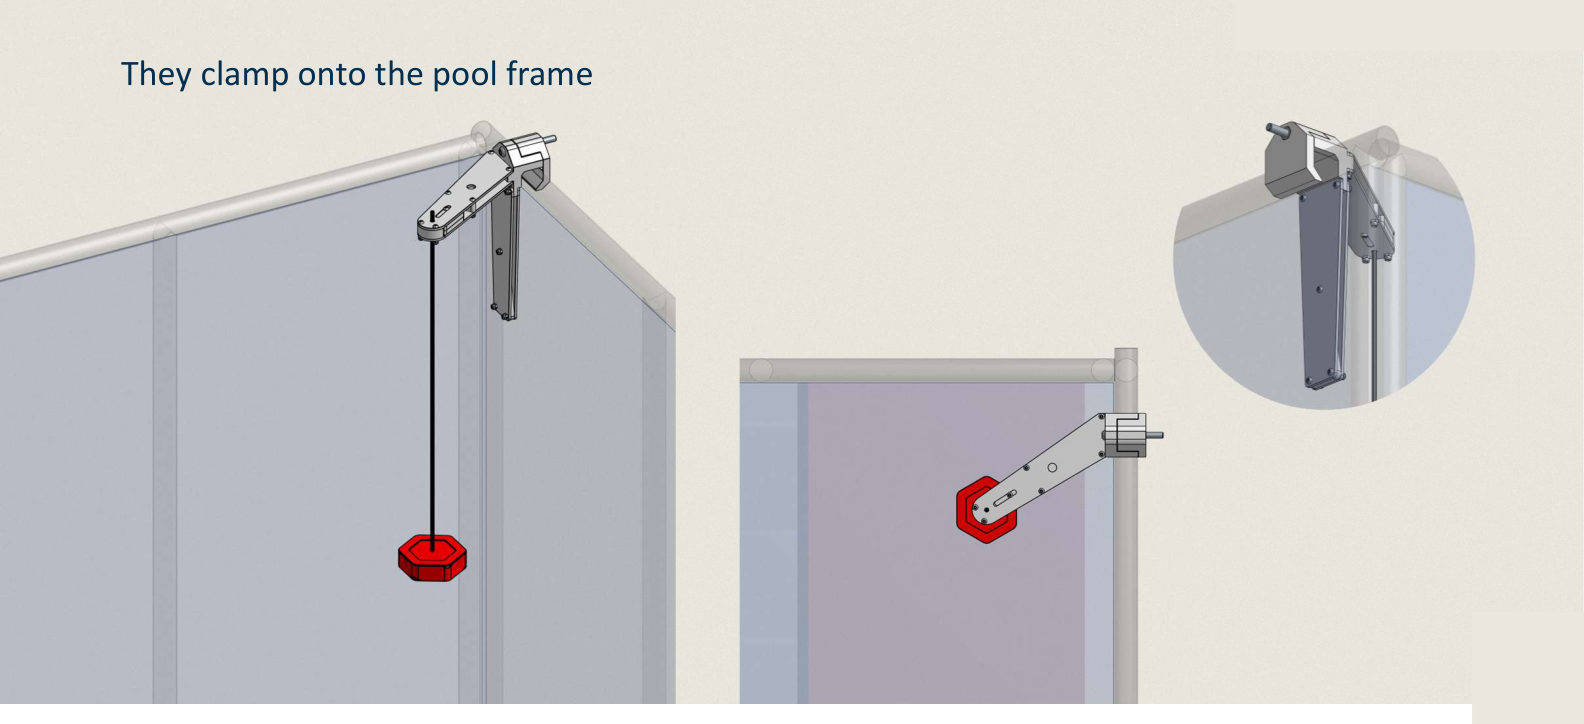
What you are building
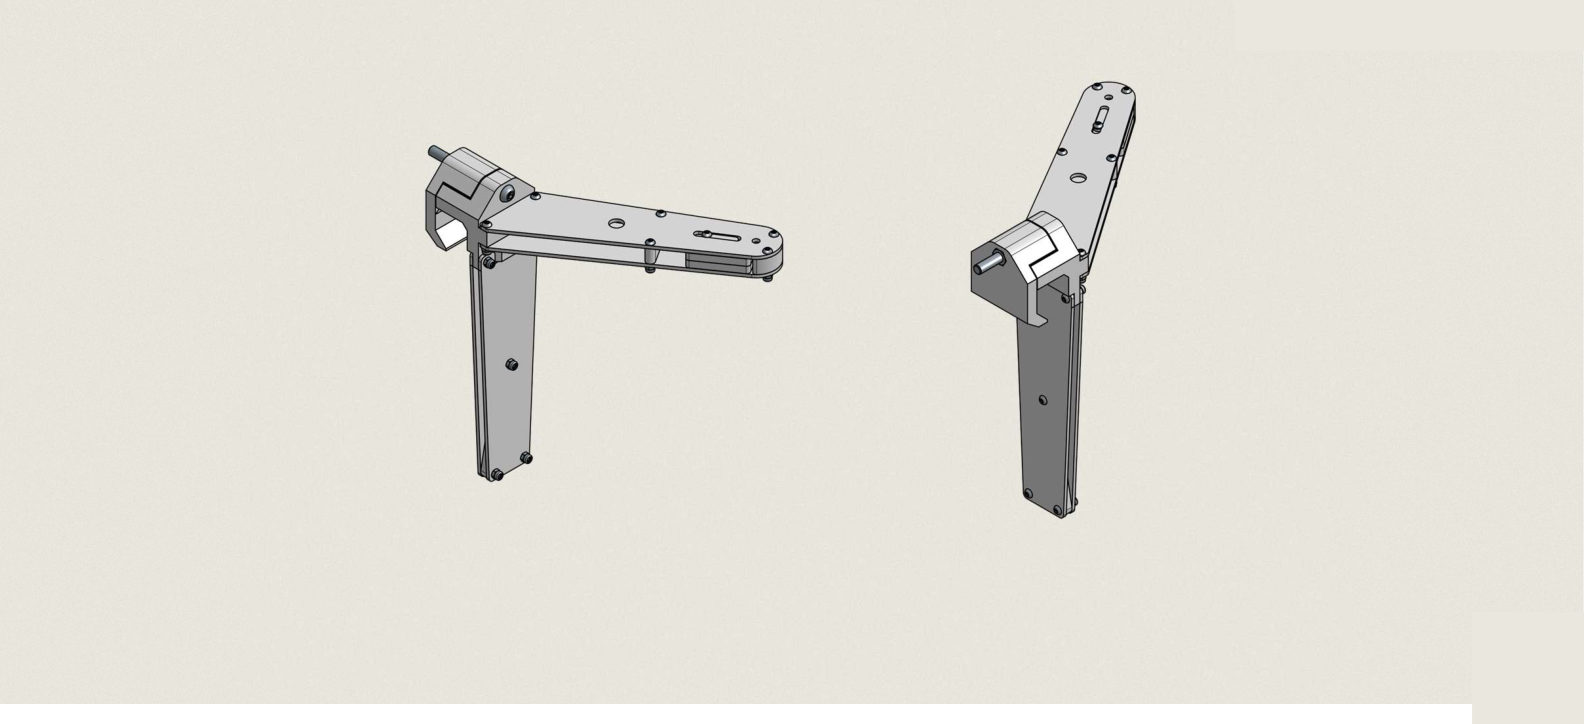
A Bollard is made of four sub-assemblies:
| Part | What it does |
|---|---|
| String clamp | Grips the string between two small plates. Sliding it along the arm sets how far the Hex Link hangs |
| Diving board | The horizontal arm that reaches out over the water and carries the string clamp |
| Support board | The vertical leg that braces the arm against the Pool wall |
| Frame clamp | The M8 screw and jaw that lock the whole Bollard onto the Pool frame |
Parts and tools
Fasteners for one Bollard. Multiply by four for a full Pool.
| Fastener | Quantity |
|---|---|
| M3×8 screw | 4 |
| M3 nut | 4 |
| M4×16 screw | 5 |
| M4×20 screw | 1 |
| M4×25 screw | 6 |
| M4 nut | 1 |
| M4 nylock nut | 11 |
| M8×80 screw | 1 |
| M8 nut | 1 |
You also need the machined plates and blocks for each sub-assembly, a length of string, hex keys for M3, M4, and M8, and spanners to hold the nuts.
Nylock nuts are not plain nuts
Most M4 nuts in this build are nylock (nylon insert) nuts. They resist vibrating loose in a wet environment. The one plain M4 nut belongs inside the string clamp in step 1, where a nylock nut will not fit. Do not swap them.
1. Assemble the string clamp
The string clamp is two small plates that close onto each other. The plain M4 nut is captured inside, and later takes the screw that tightens the clamp.
- Drop the 1× M4 nut into its pocket in the lower plate.
- Place the upper plate on top, slotted face up.
- Pass 4× M3×8 screws down through both plates.
- Fit 4× M3 nuts underneath and tighten.
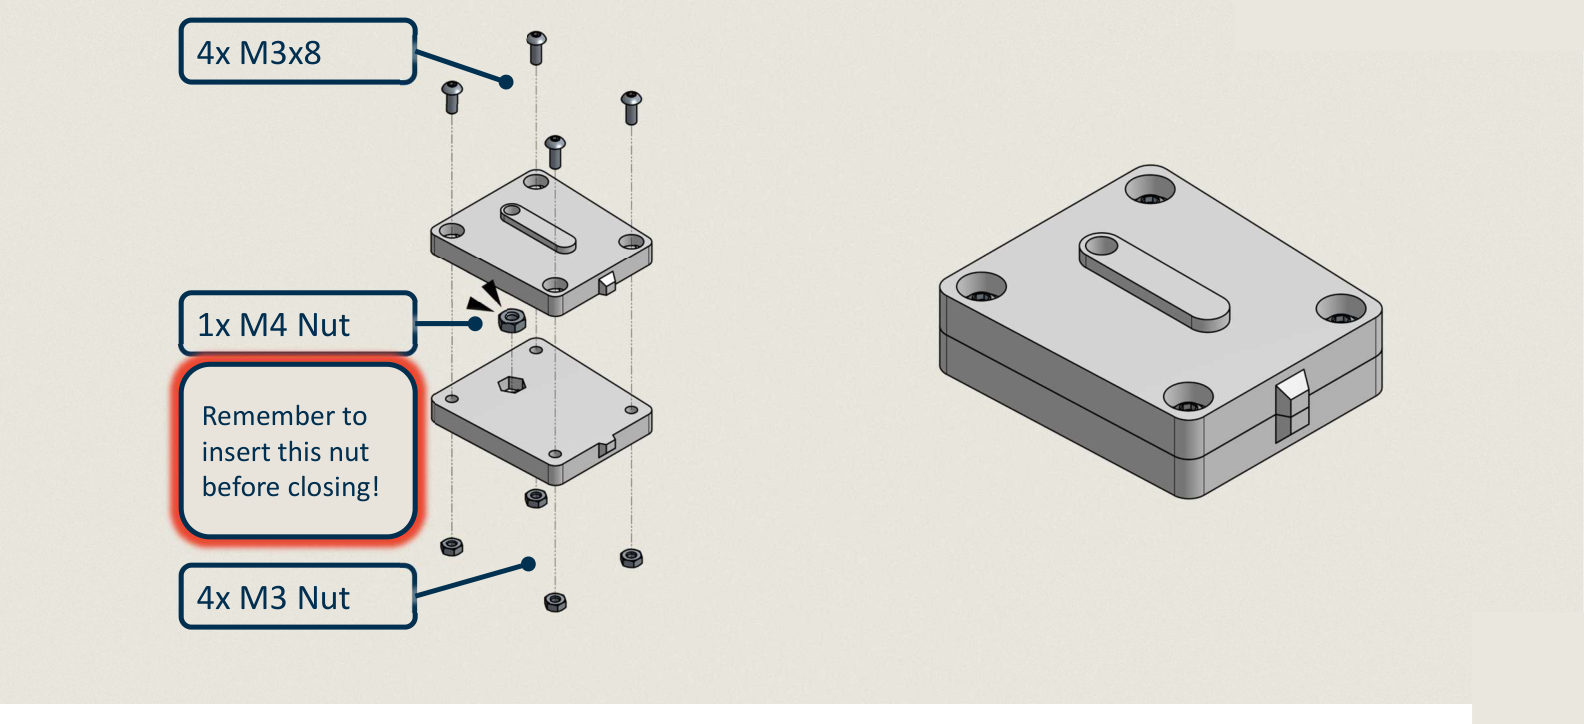
Insert the M4 nut before closing the clamp
Once the two plates are screwed together, the pocket is sealed. If you forget the M4 nut you have to take the clamp apart again.
2. Assemble the diving board
The diving board is the horizontal arm. The string clamp from step 1 goes inside it, between the two long plates.
- Lay down the long plate with the notch facing below. The notch marks the underside of the arm.
- Place the string clamp and its spacer between the plates, lining the clamp slot up with the slot in the plates.
- Add the second long plate on top.
- Pass 4× M4×25 screws through the outer holes and 1× M4×20 through the slot into the M4 nut in the string clamp.
- Fit 4× M4 nylock nuts on the M4×25 screws and tighten.
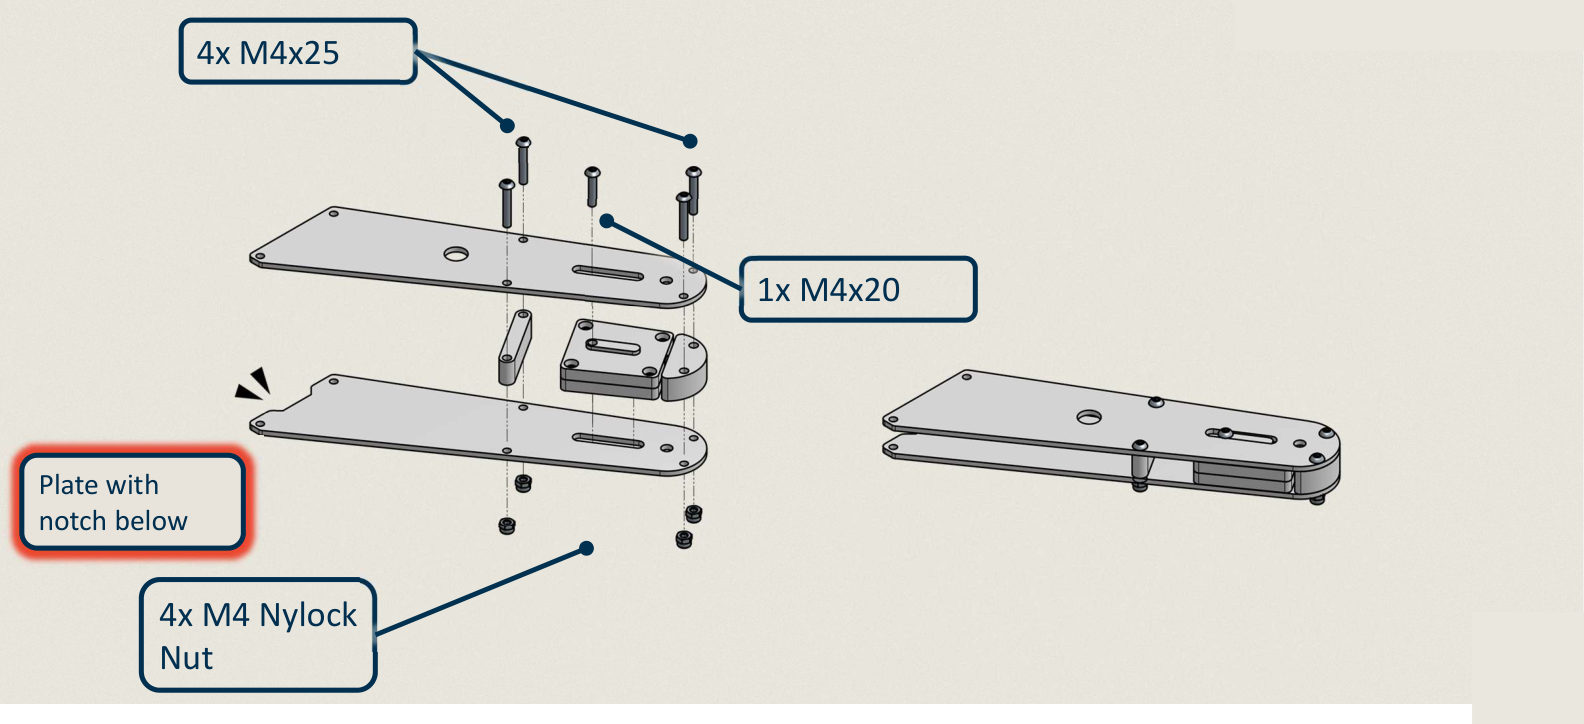
Leave the M4×20 screw slightly loose for now. It is the screw you use later to set the string height.
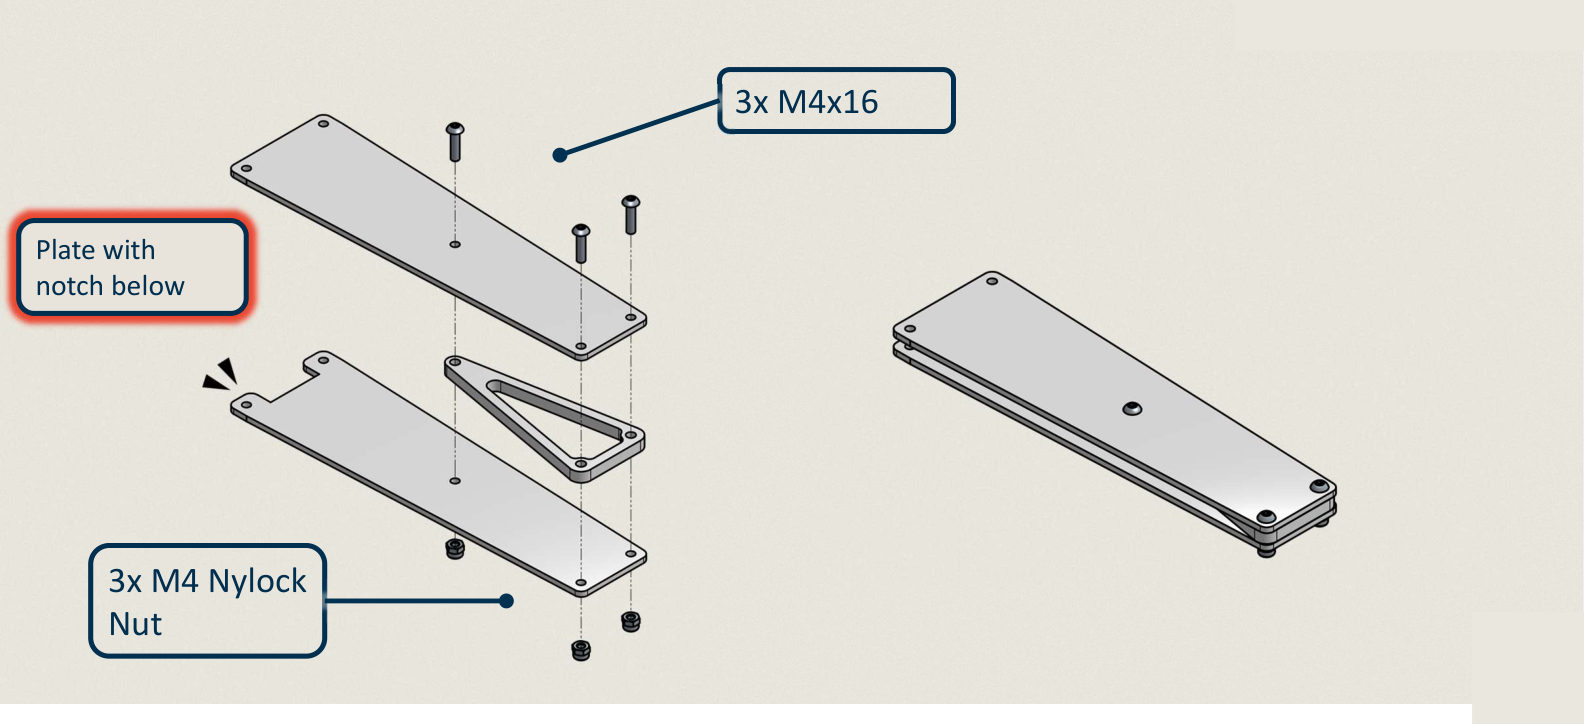
3. Assemble the support board
The support board is the vertical leg. It is built the same way: two plates with a triangular spacer between them.
- Lay down the plate with the notch facing below.
- Place the triangular spacer on it.
- Add the second plate on top.
- Pass 3× M4×16 screws through and fit 3× M4 nylock nuts underneath.
4. Mount the diving board
The clamp block is the part that will grip the Pool frame. The diving board slides into it.
- Slide the diving board into the clamp block, notched plate facing down.
- Pass 2× M4×25 screws up through the joint.
- Fit 2× M4 nylock nuts and tighten.
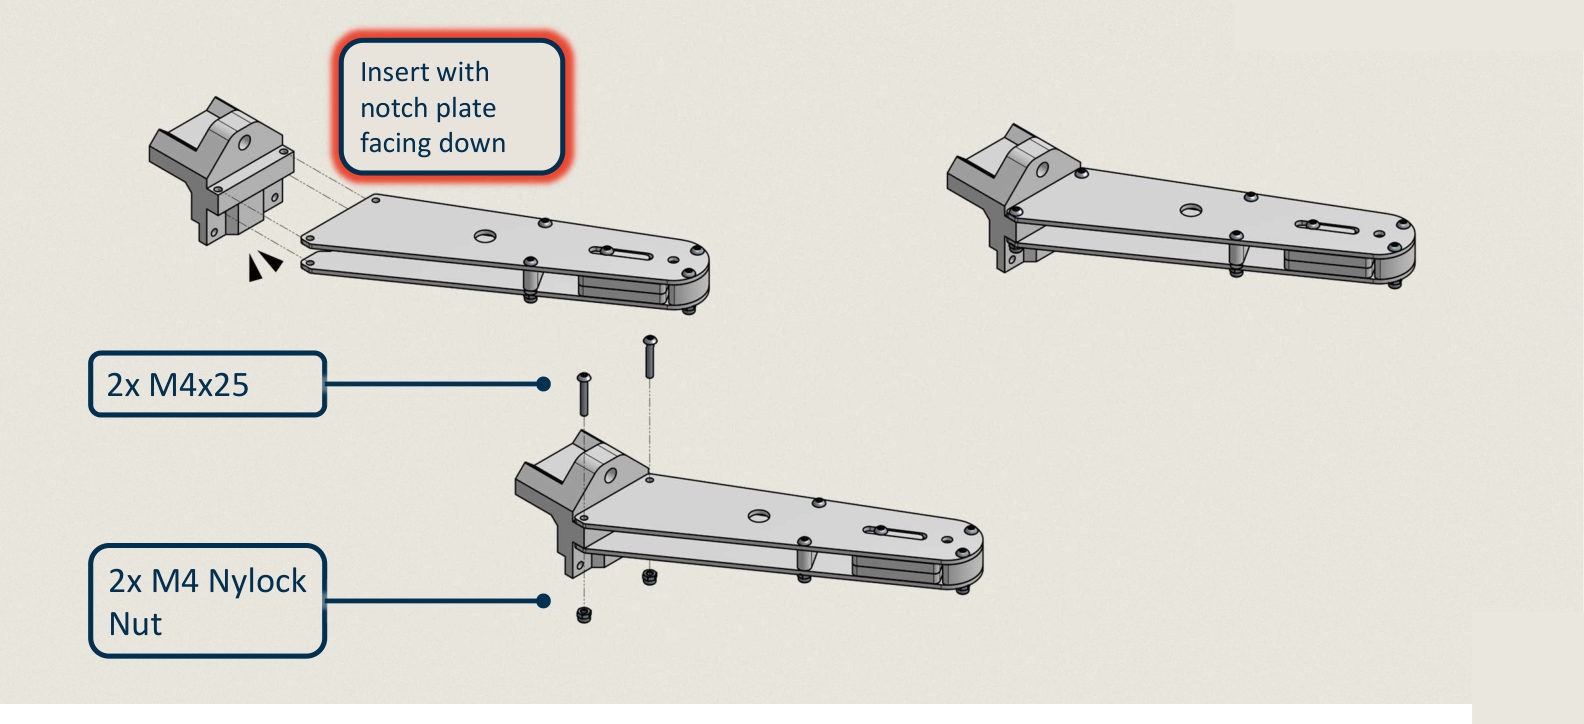
If the diving board will not slide in, check the orientation. The notch only clears the block one way round.
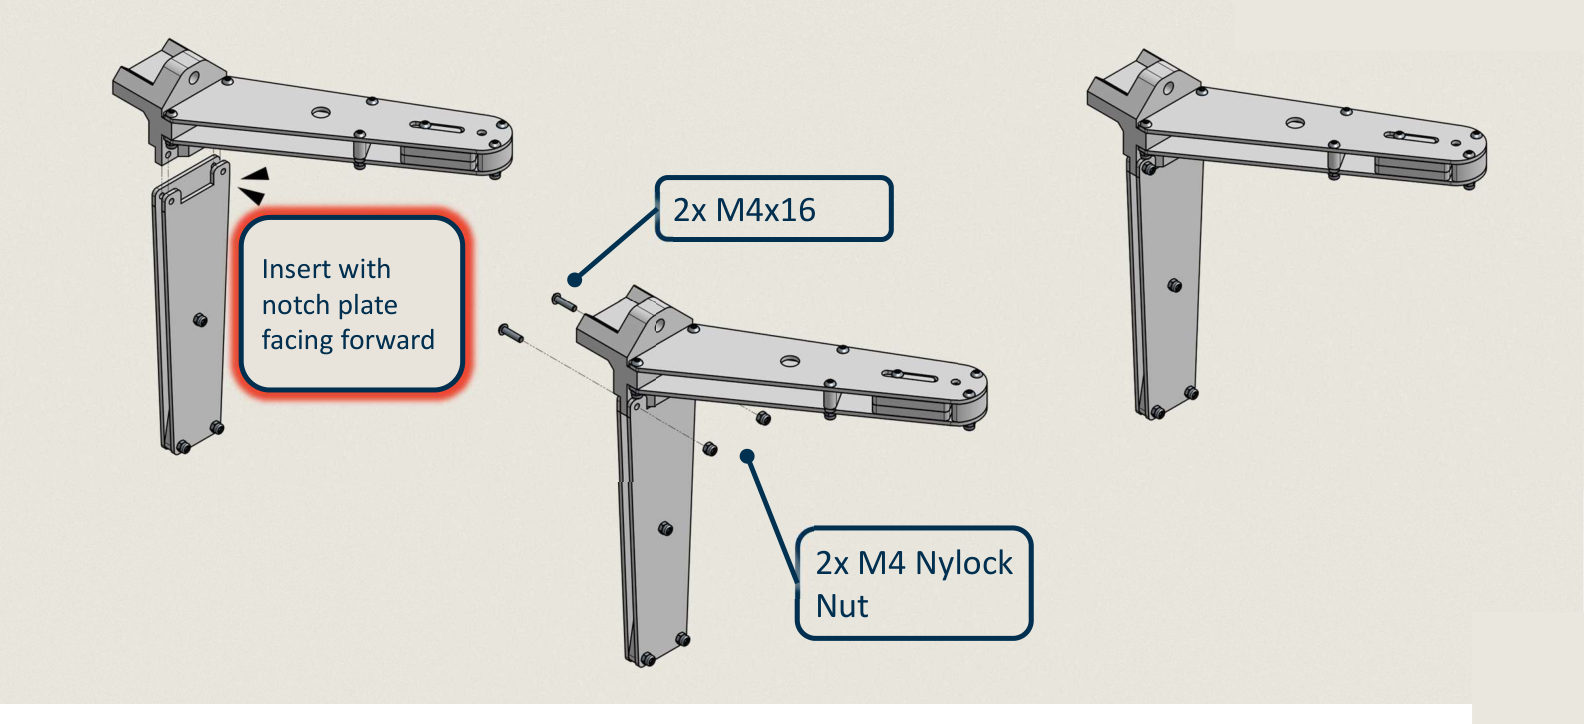
5. Mount the support board
- Slide the support board up into the clamp block below the arm, notched plate facing forward.
- Pass 2× M4×16 screws through the joint.
- Fit 2× M4 nylock nuts and tighten.
The Bollard now has its finished shape: a horizontal arm with a vertical leg under the clamp end.
6. Fit the frame clamp
The last two parts turn the block into a clamp that closes onto the Pool frame.
- Place the clamp jaw over the top of the block.
- Pass the 1× M8×80 screw through the block and into the jaw.
- Fit the 1× M8 nut and run it up until the jaw is held but the clamp still opens far enough to go over the frame rail.
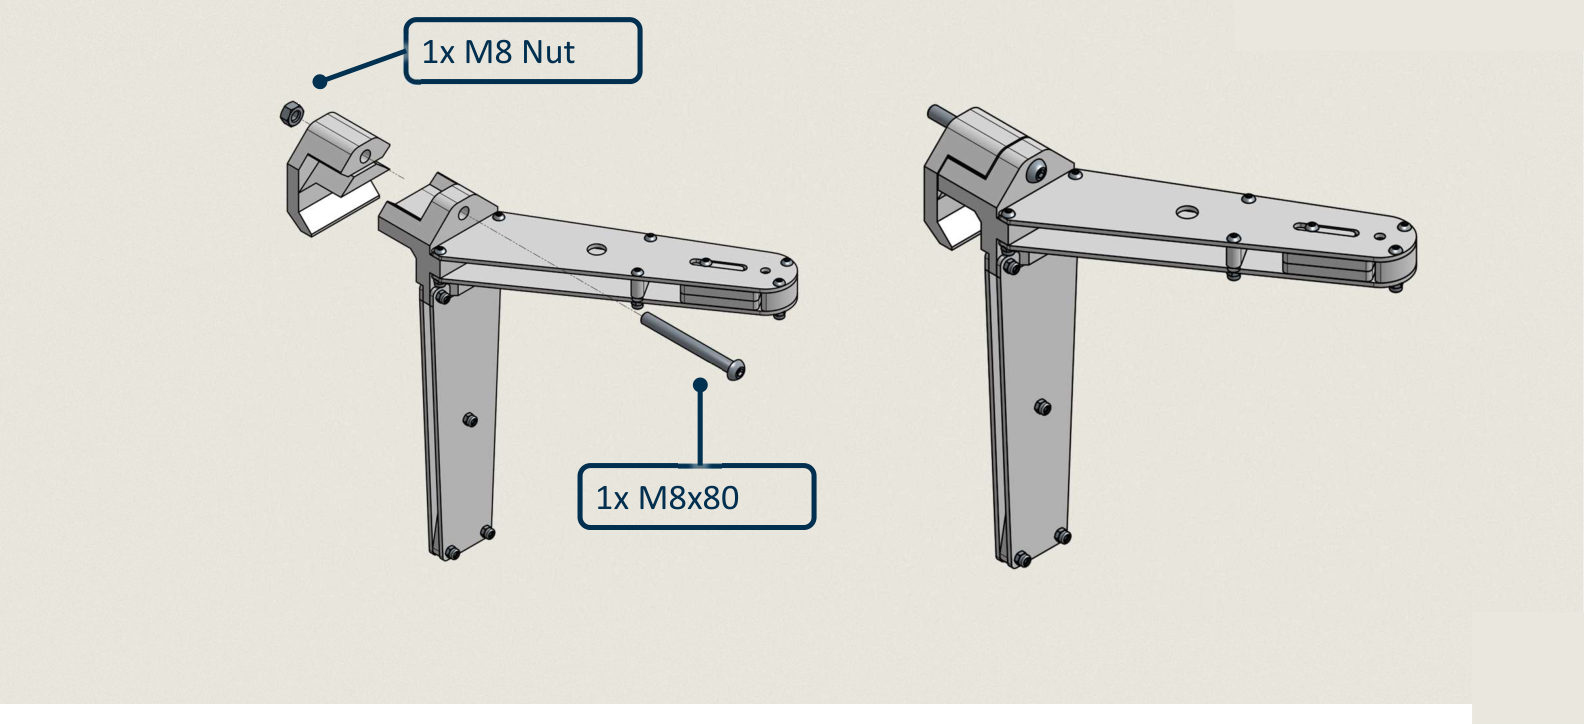
The Bollard is now built.
Install it on the Pool
- Open the clamp far enough to pass over the top rail at a corner of the Pool.
- Position the Bollard so the arm reaches out over the water and the support board rests flat against the wall panel.
- Tighten the M8 clamp until the Bollard does not rotate or slide when you push the end of the arm.
Repeat for the other three corners, matching the Alliance colours to the correct sides of the Pool.
Set the string height
The string clamp inside the arm is what sets how far the Hex Link hangs below the Bollard.
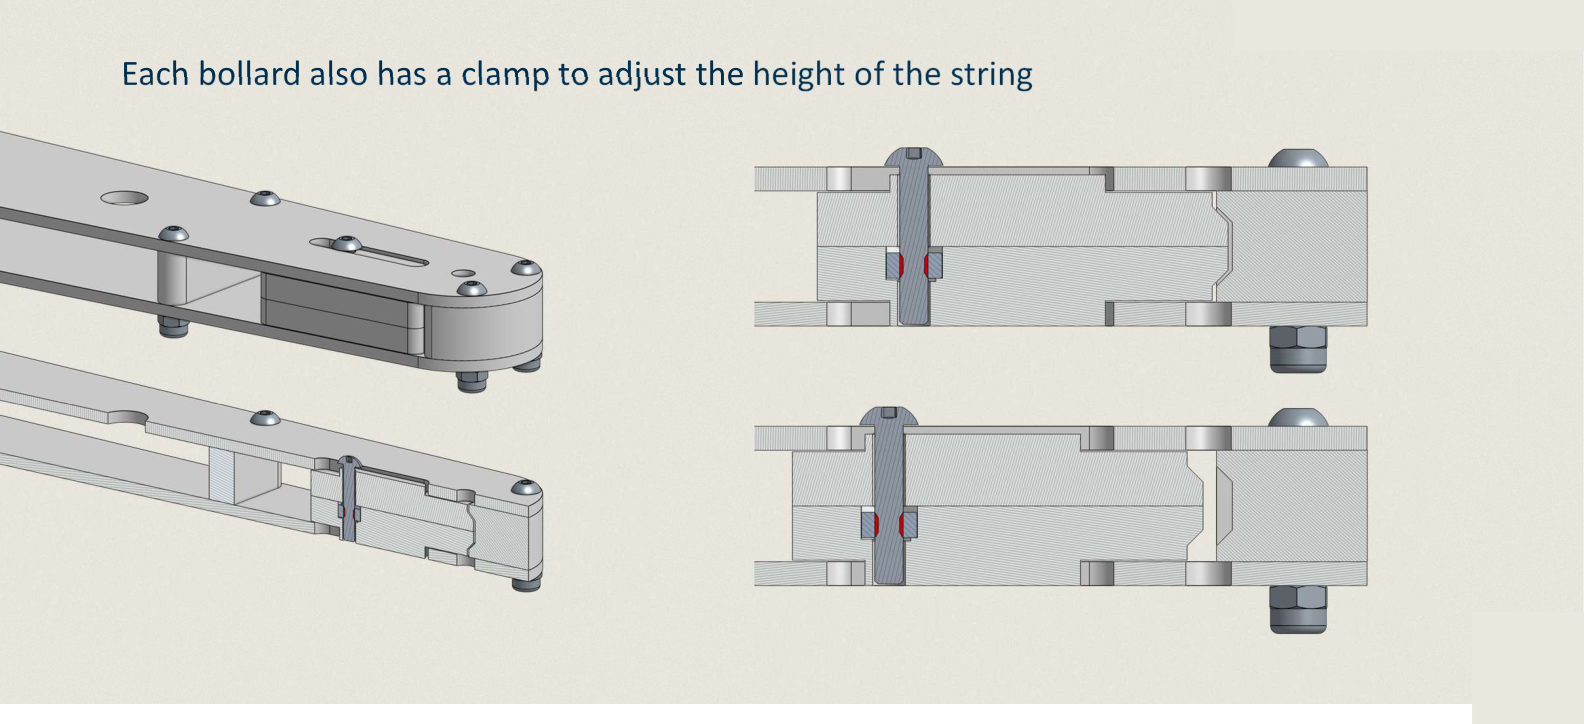
- Loosen the M4×20 screw. The clamp plates open and the string can slide.
- Pull the string through until the hanging length is right.
- Tighten the M4×20 screw again to pinch the string.
- Pull down firmly on the string to confirm it does not slip.
Check the height before every event
A string that has crept even a little changes how easily Robots can reach a Hex Link. Check all four Bollards during Pool setup, not after Matches have started. See Pool management for the rest of the Pool checklist.