

Kit Build
You have met every part in the box. This page assembles them into the starter Robot: a floating frame on four Hulls, driven by two Thrusters, with a T Flipper on the front for pushing Hex Links around. It will not win a Match on its own, but it gets your team on the water quickly, and every part of it can be moved, replaced, or thrown away once you have your own ideas.
If a part name below is unfamiliar, look it up in Kit Intro.
Build it in this order. Each stage finishes a sub-assembly that a later stage bolts onto the frame:
- Thruster Hulls — two of them
- T Flipper
- Main assembly — the frame that joins everything
- Sensors and cables
- Robot Brain battery
Before you start
Section titled “Before you start”The kit includes one double-ended Spanner: 7 mm for M4 nuts, 5.5 mm for M3 nuts. Use the Allen Key Set for the screw heads, and pick the size that fits properly — a loose key will round out the socket.
Wherever a step pairs a screw with a nylock nut, hold the nut with the wrench and turn the screw. Nylock nuts have a nylon insert that grips the thread, so they feel stiff for the last few turns. That is normal, and it is what stops the Robot shaking itself apart in the water.
Screws are named M<thread diameter> x <length>, both in millimetres, with the
length measured from under the head. An M4 × 20 and an M4 × 30 drop into the
same hole but reach very different depths, so check the number on the bag
before you reach for one.
1. Thruster Hulls
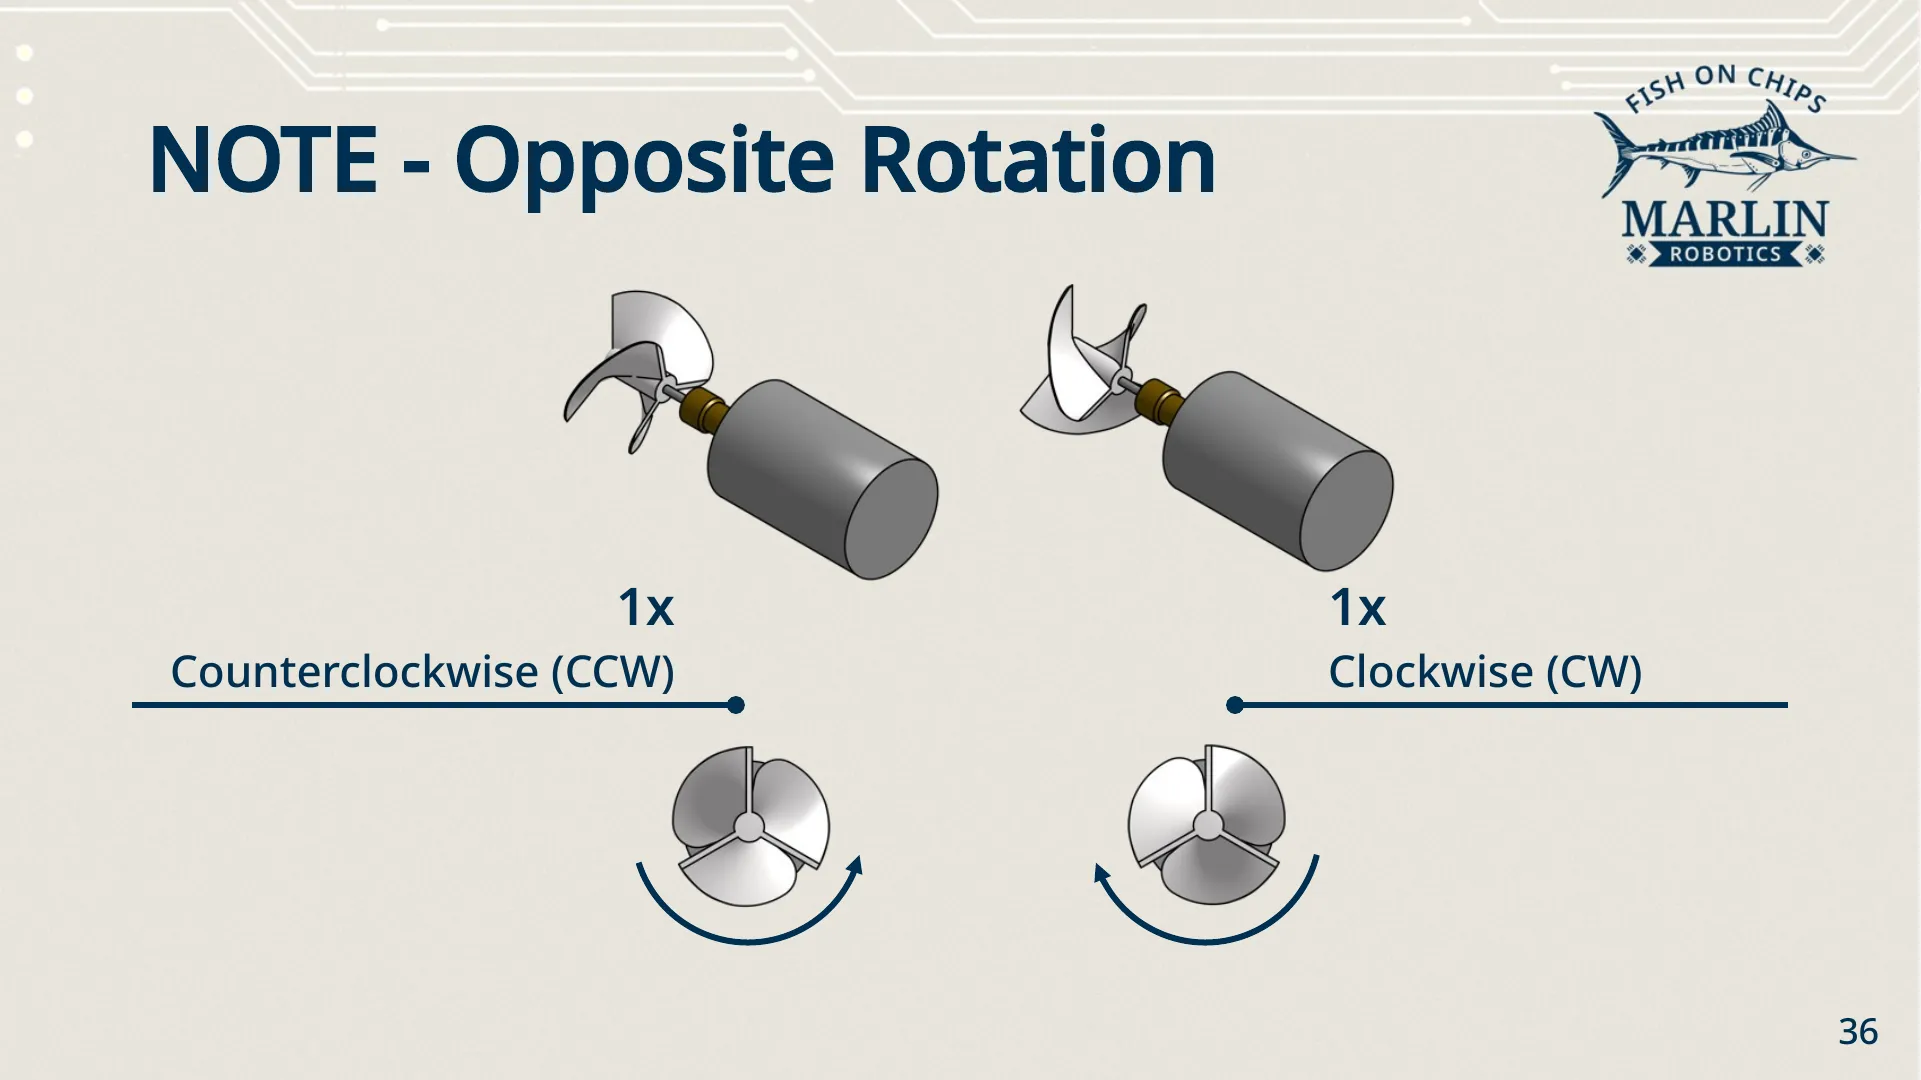
Section titled “1. Thruster Hulls”Build two of these. They are identical except for the direction their propellers turn.
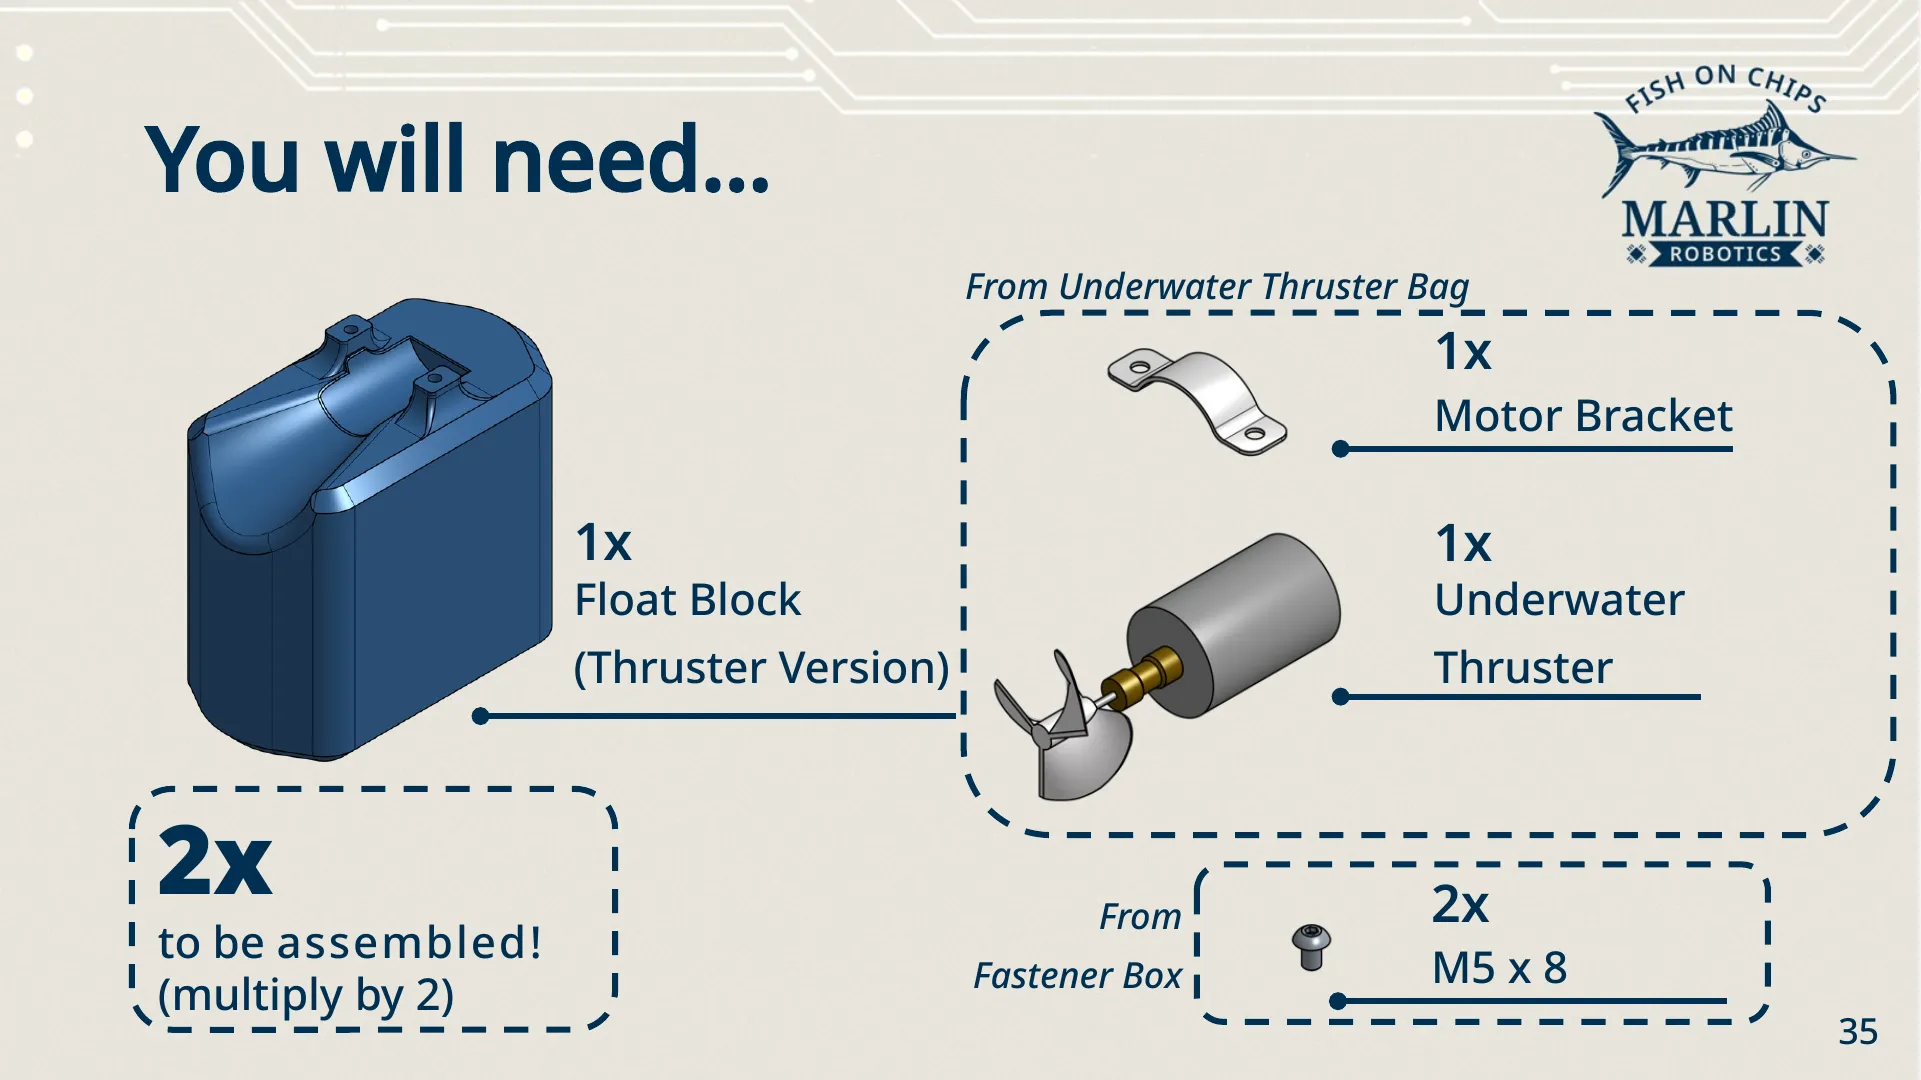
Parts (per hull)
Section titled “Parts (per hull)”| Part | Quantity | From |
|---|---|---|
| Thruster Hull (Float Block, thruster version) | 1 | — |
| Thruster | 1 | Thruster Bag |
| Motor Bracket | 1 | Thruster Bag |
| M5 × 8 screw | 2 | Fastener Set |
- Take a Thruster Hull and set it the right way up, recess on top.
- Lay the Thruster into the recess with the propeller facing out. Push it back so it sits flush against the back of the mount — if it creeps forward, the bracket will not clamp it squarely.
- Put the Motor Bracket over the Thruster body and fix it with 2× M5 × 8.
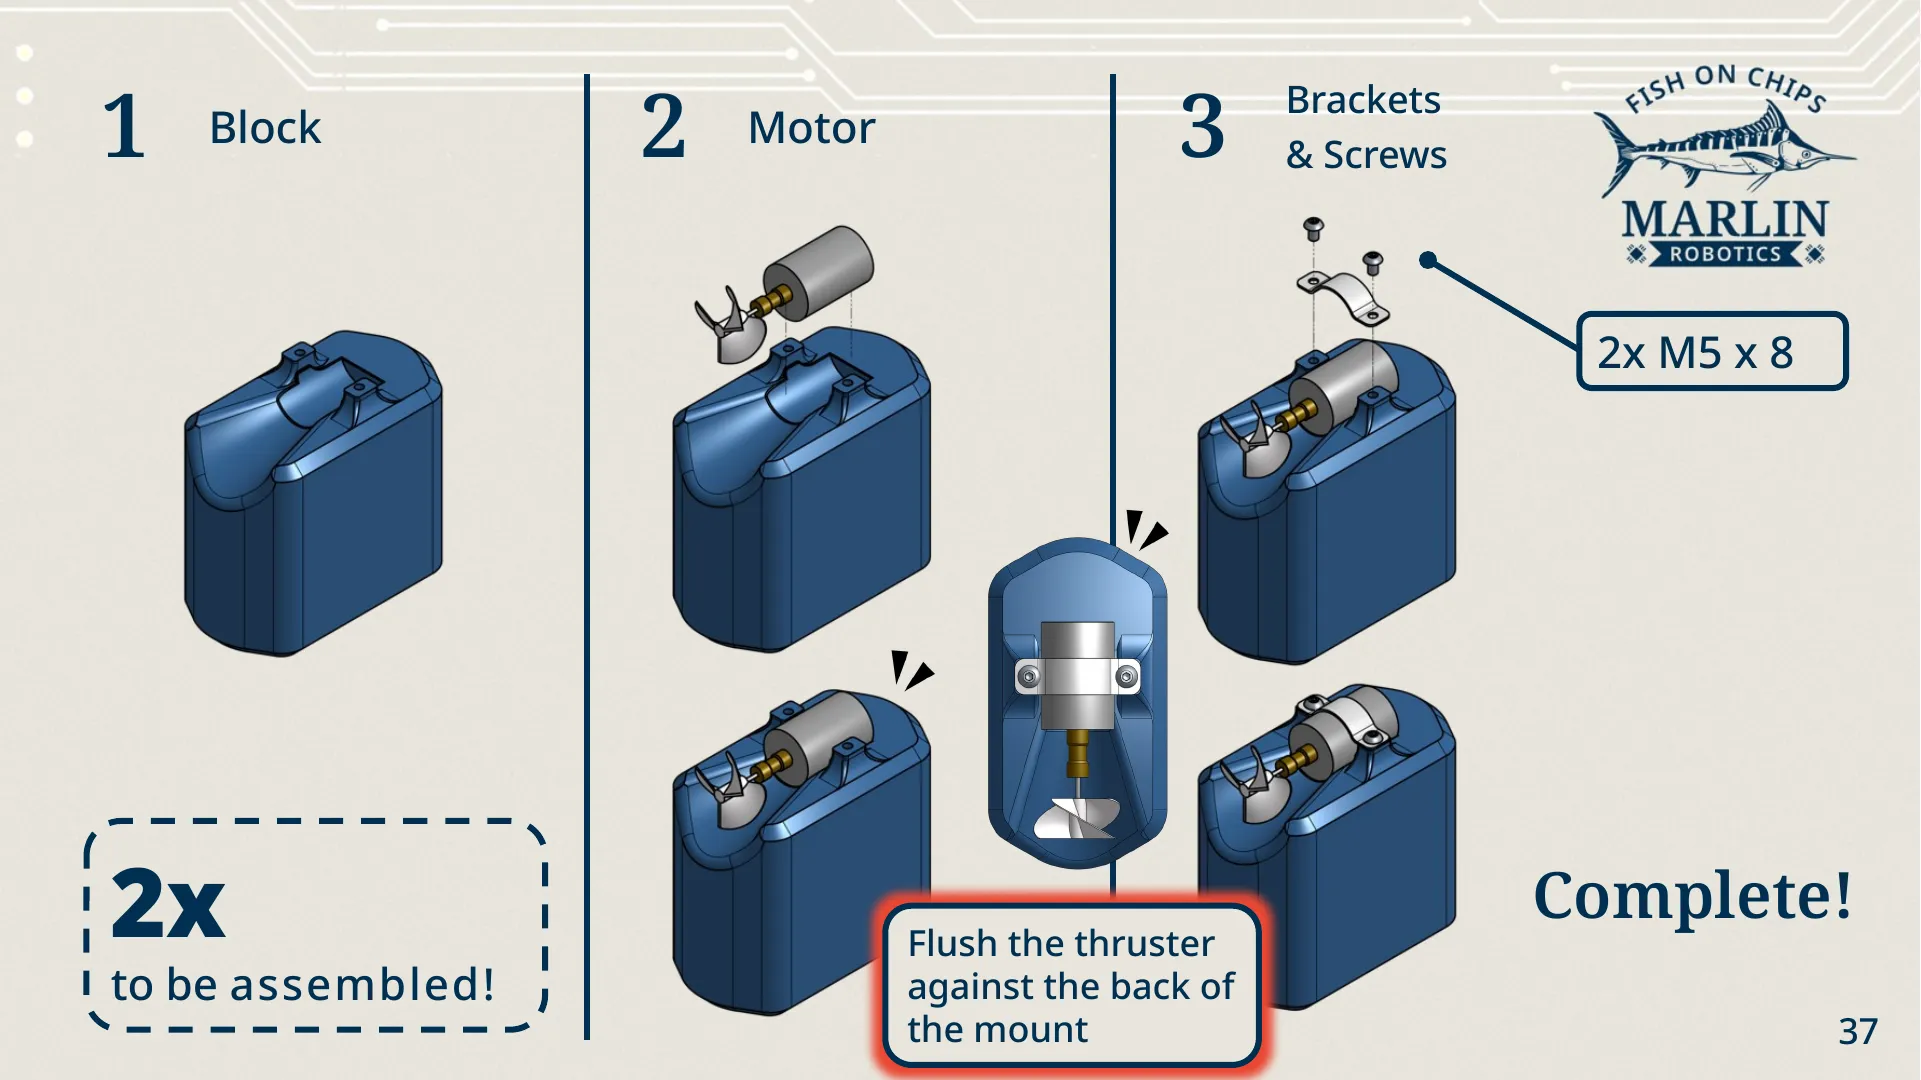
You should have: two finished Thruster Hulls, one CW and one CCW. Keep track of which is which — it matters in step 3.
2. T Flipper
Section titled “2. T Flipper”The T Flipper is the starter Robot’s arm. A Servo tilts a crossbar up and down to break up scored Hex Links, flip them to your Alliance colour, or shove them around.
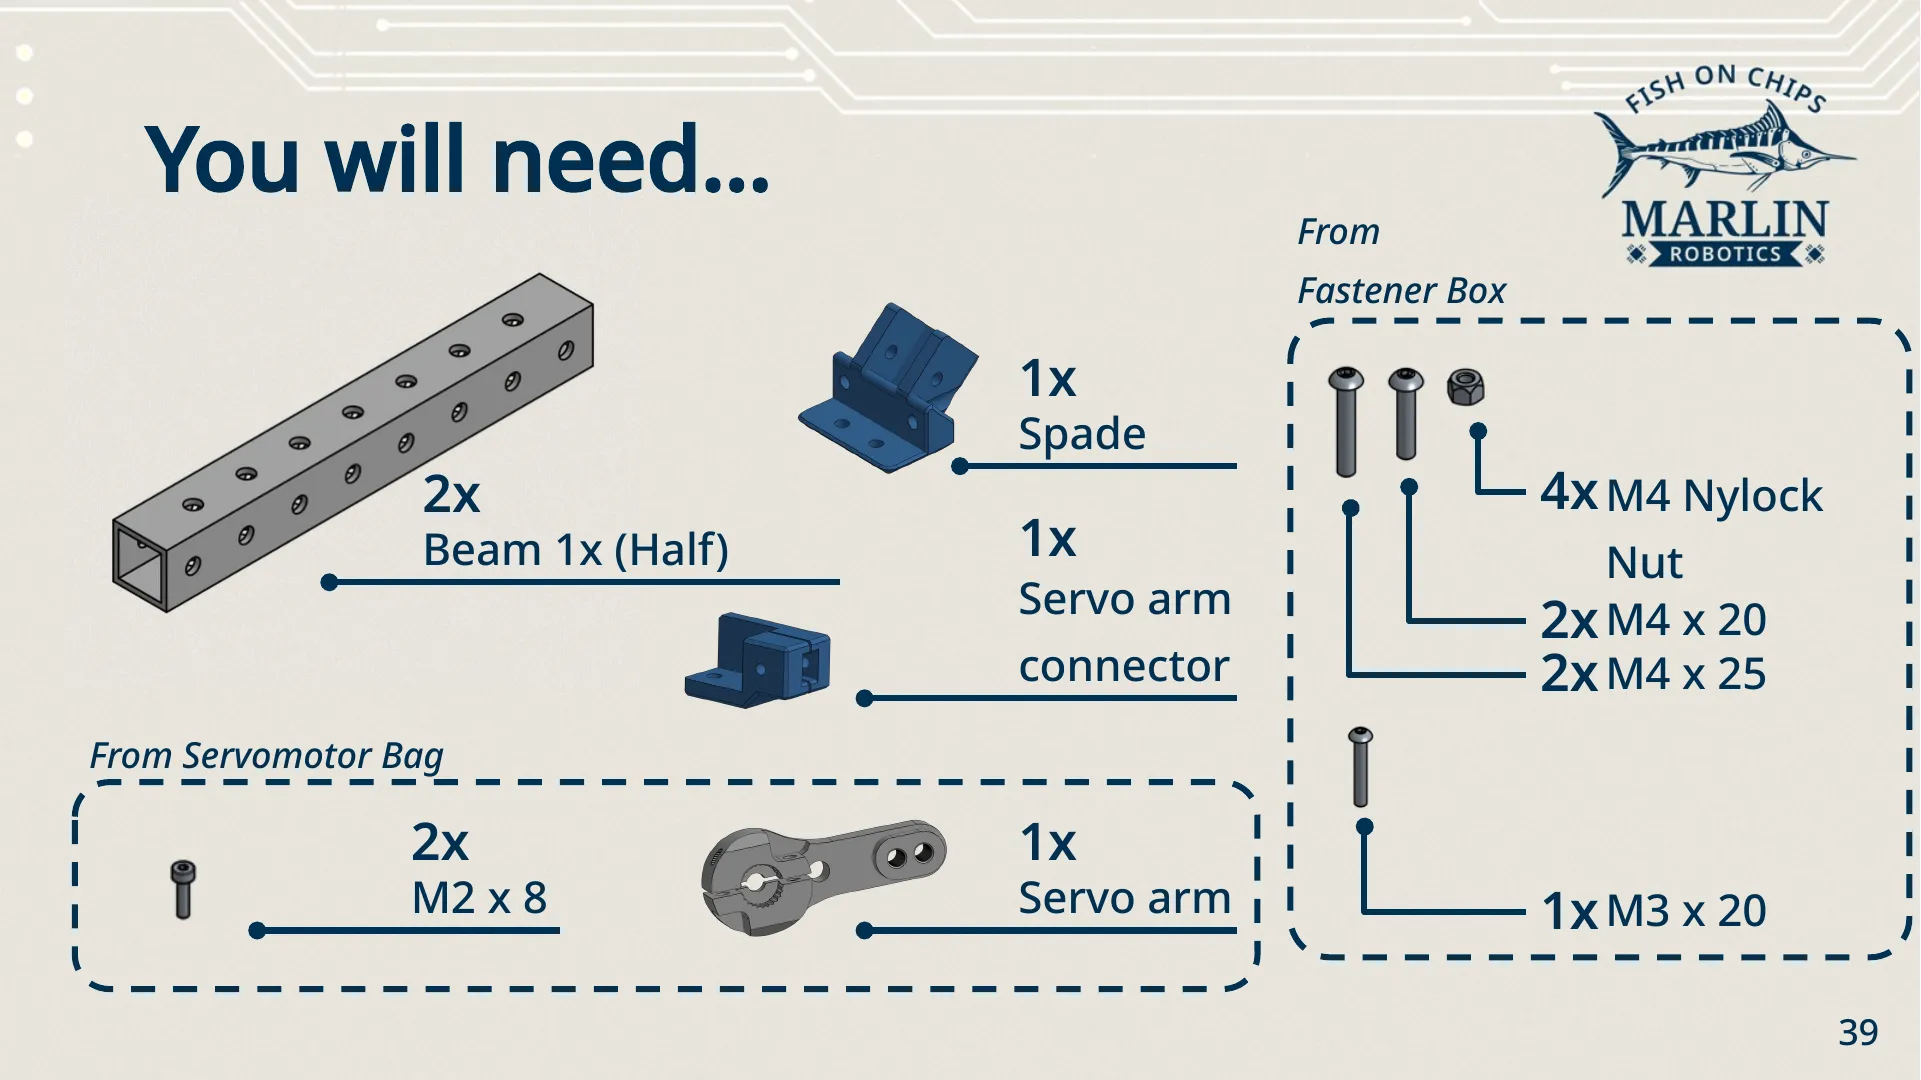
| Part | Quantity | From |
|---|---|---|
| Beam 1x (half) | 2 | — |
| Flipper T Mount | 1 | — |
| Servo-Extrusion Adapter | 1 | — |
| Servo Arm | 1 | Servo Bag |
| M2 × 8 screw | 2 | Servo Bag |
| M4 × 25 screw | 2 | Fastener Set |
| M4 × 20 screw | 2 | Fastener Set |
| M4 nylock nut | 4 | Fastener Set |
| M3 × 20 screw | 1 | Fastener Set |
Crossbar and spade
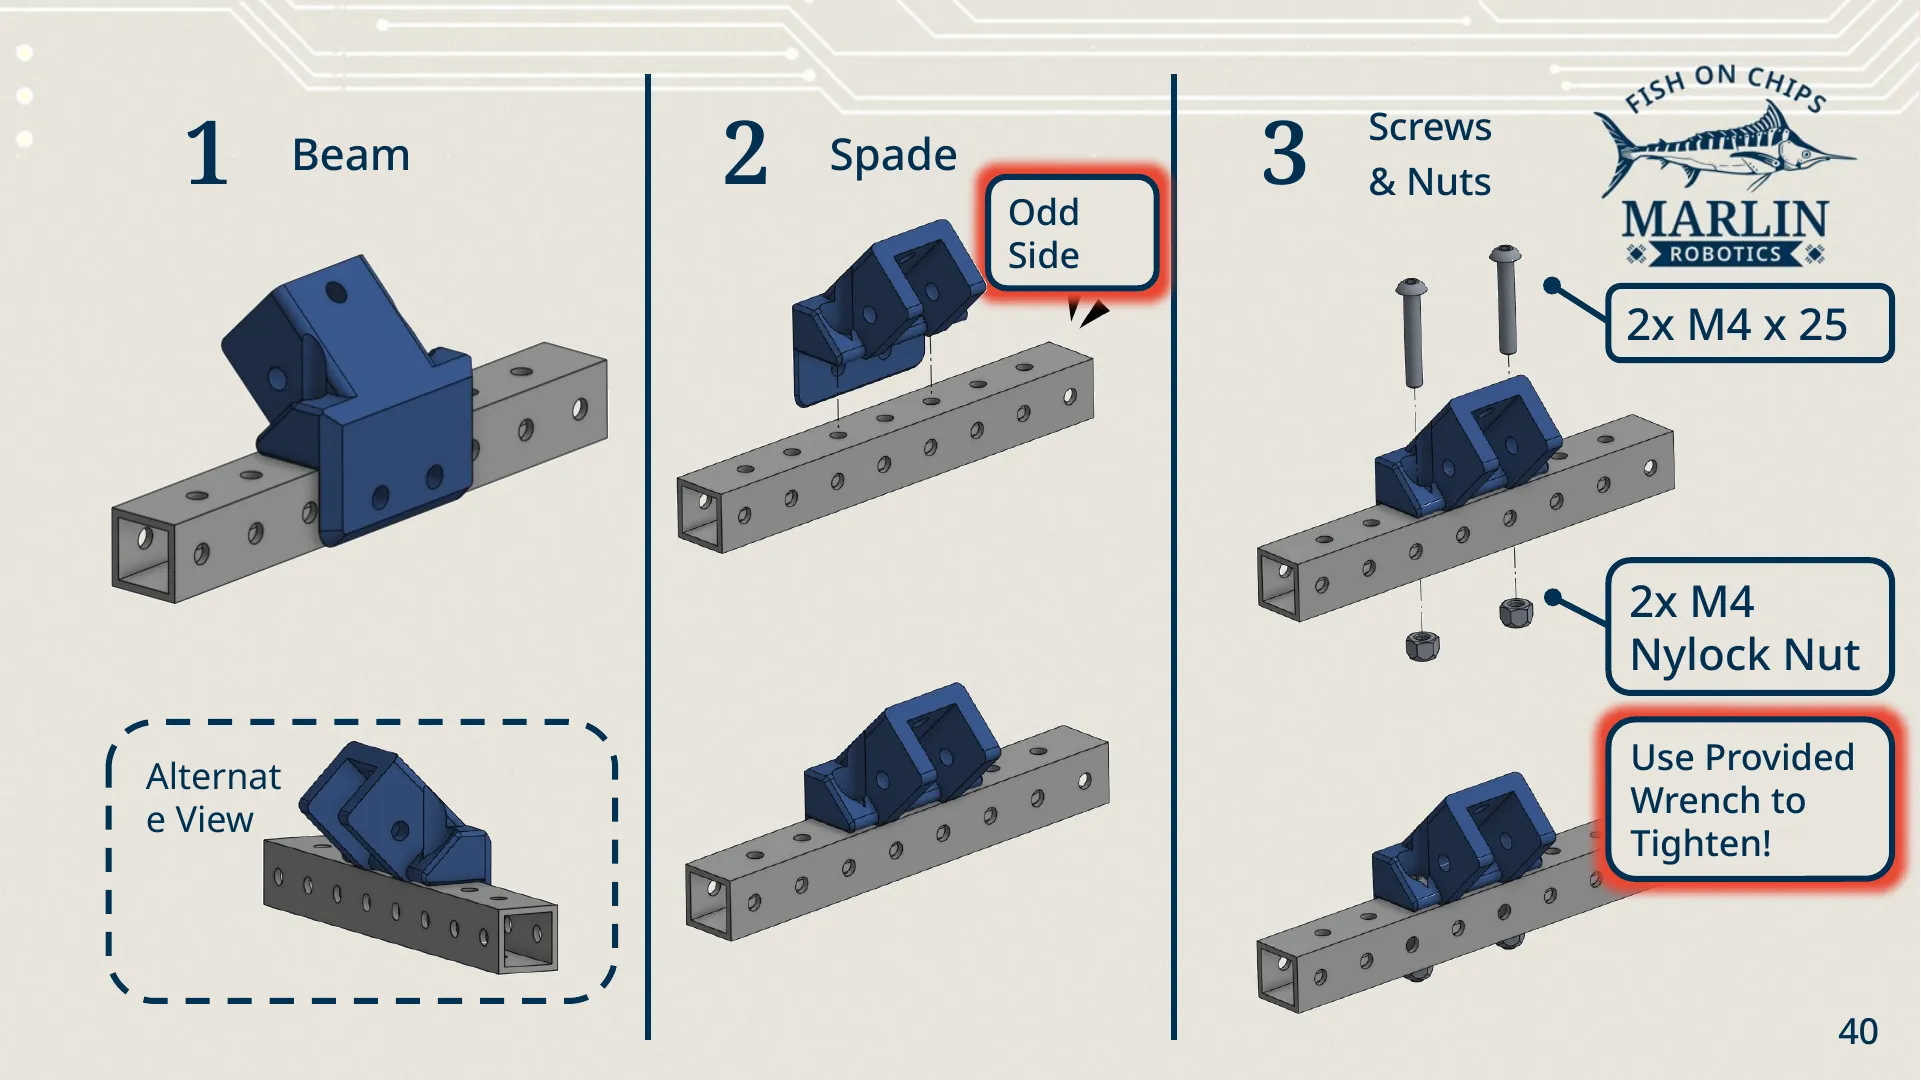
Section titled “Crossbar and spade”- Beam. Lay one half-length 1x beam flat.
- Spade. Sit the Flipper T Mount across the middle of it, on the beam’s odd side.
- Screws and nuts. Fix it with 2× M4 × 25 and 2× M4 nylock nuts. Tighten with the provided wrench.
Upright
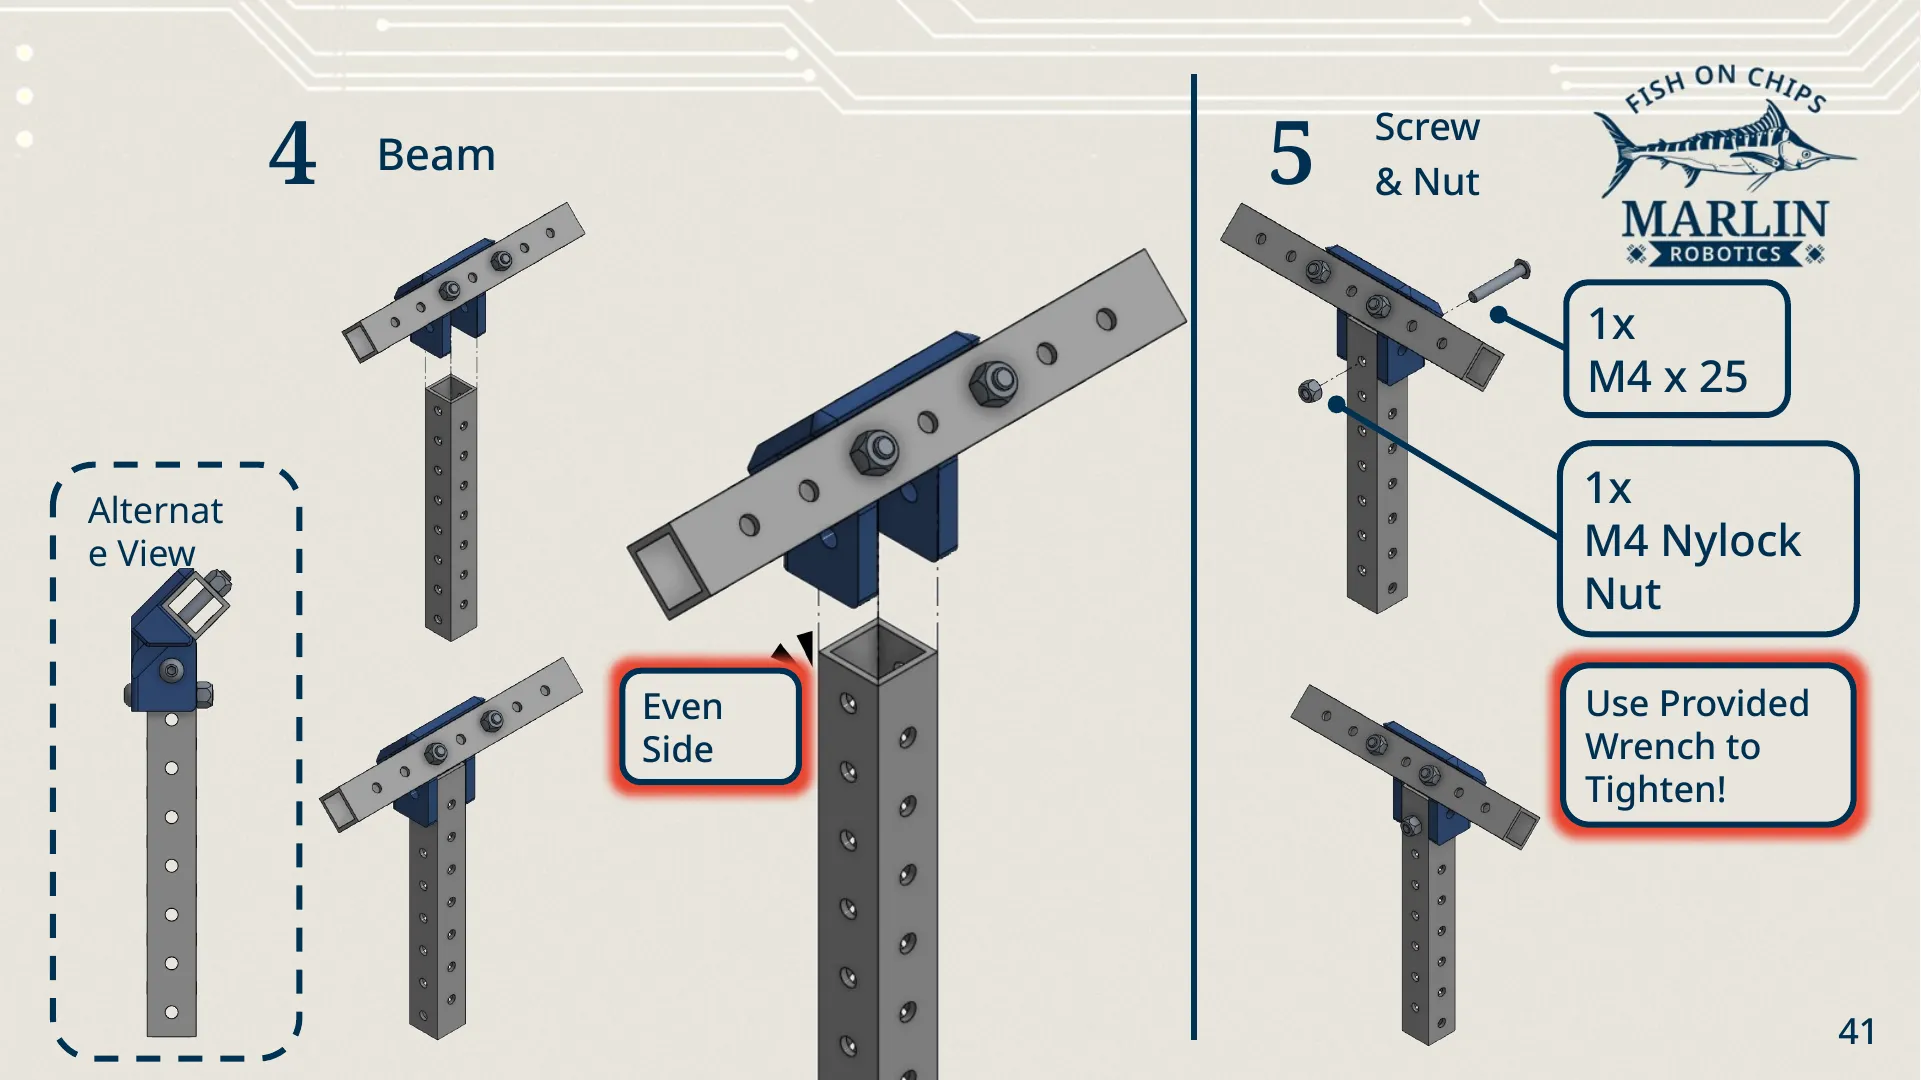
Section titled “Upright”- Beam. Stand the second half-length 1x beam upright and slide its end into the Flipper T Mount, even side facing out.
- Screw and nut. Fix it with 1× M4 × 25 and 1× M4 nylock nut.
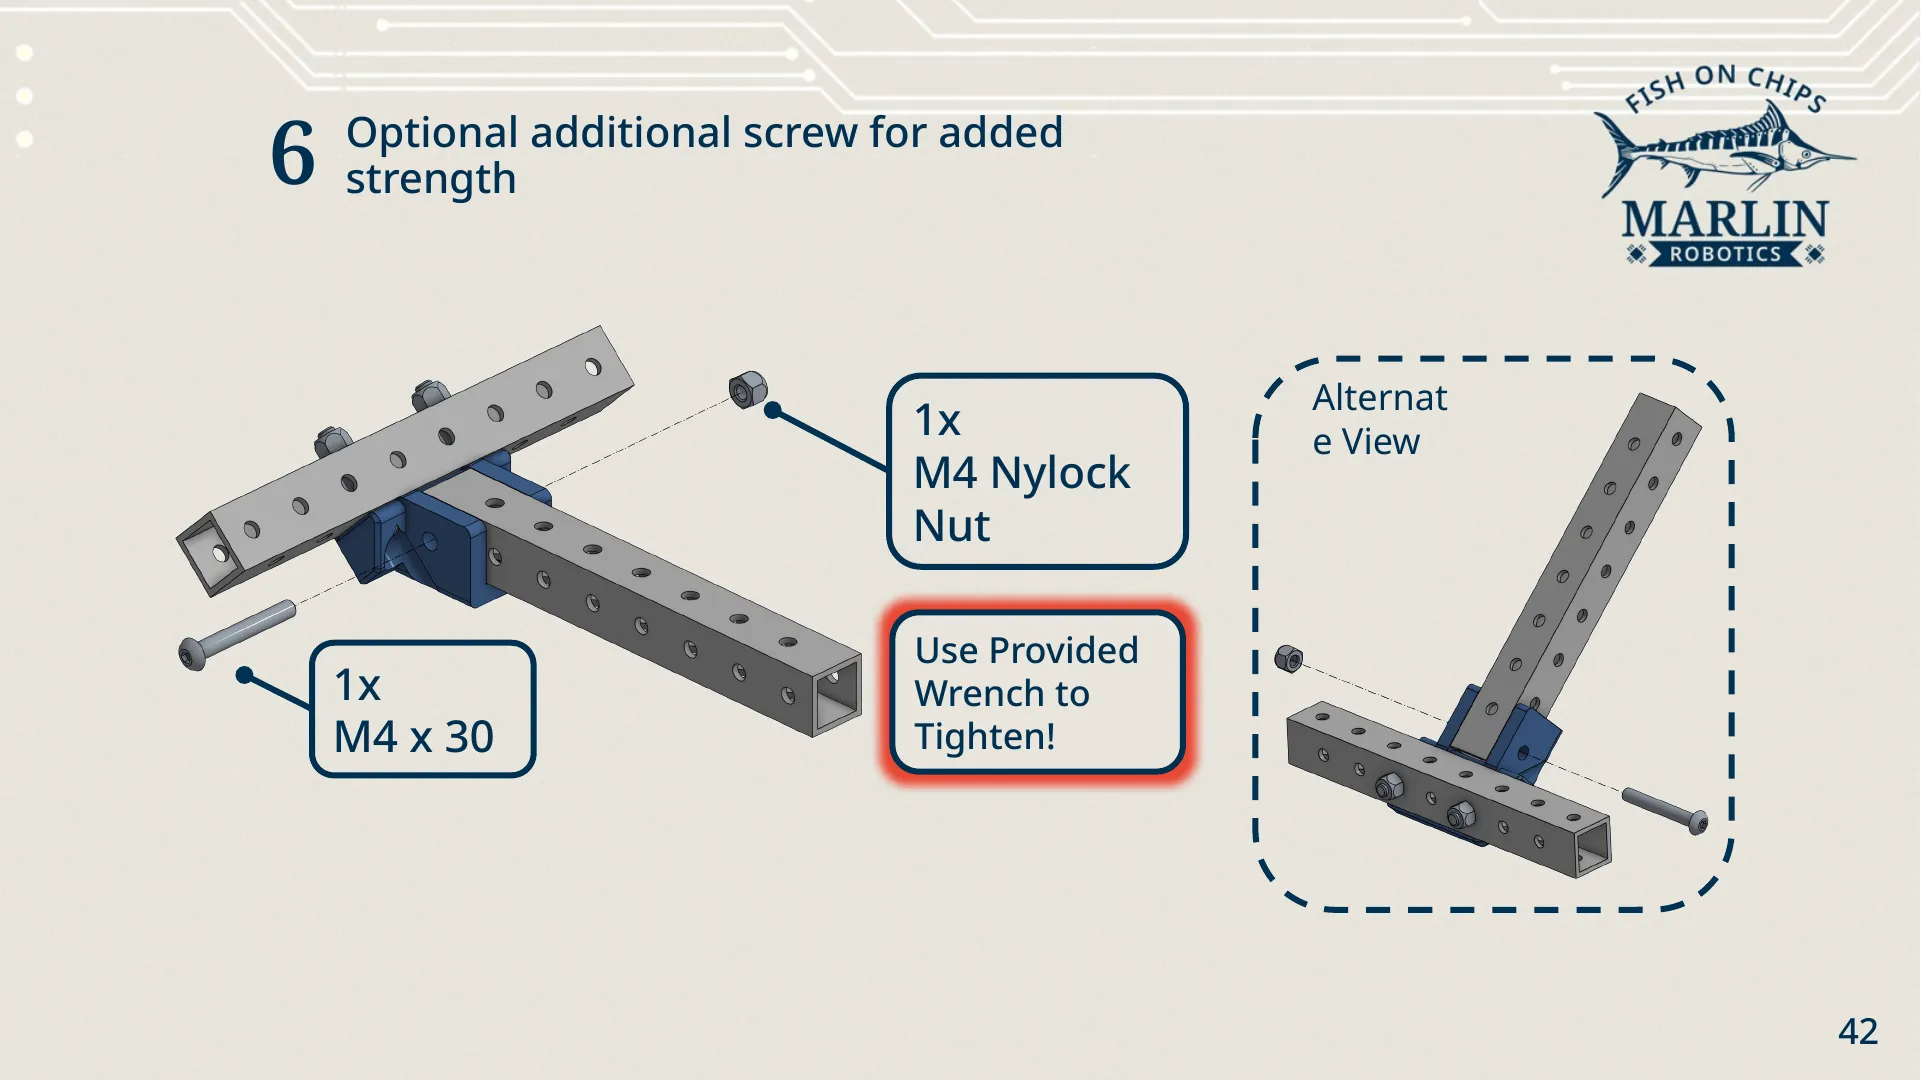
- Optional. Add 1× M4 × 30 and 1× M4 nylock nut through the second hole of the same joint for extra strength.
Servo-Extrusion Adapter
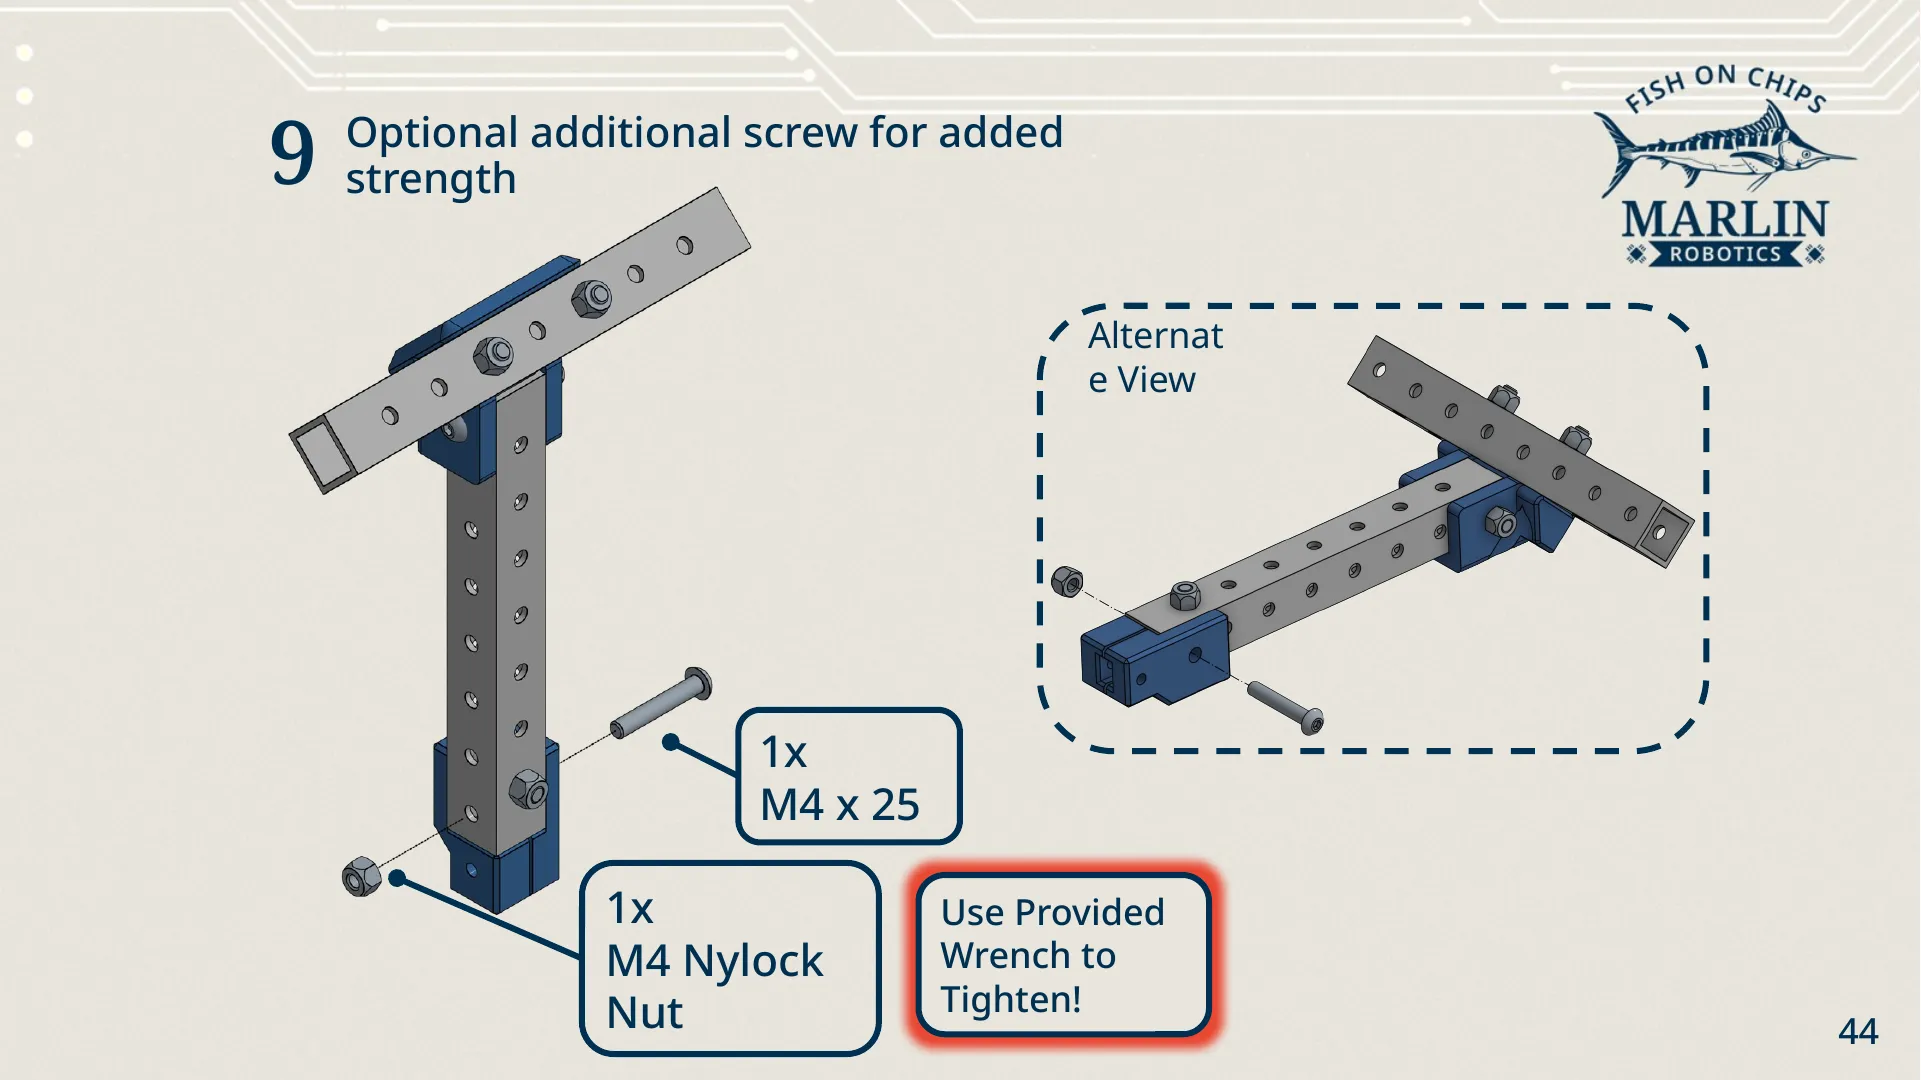
Section titled “Servo-Extrusion Adapter”- Servo-Extrusion Adapter. Push the connector onto the bottom end of the upright beam, over the beam’s even side.
- Screw and nut. Fix it with 1× M4 × 20 and 1× M4 nylock nut.
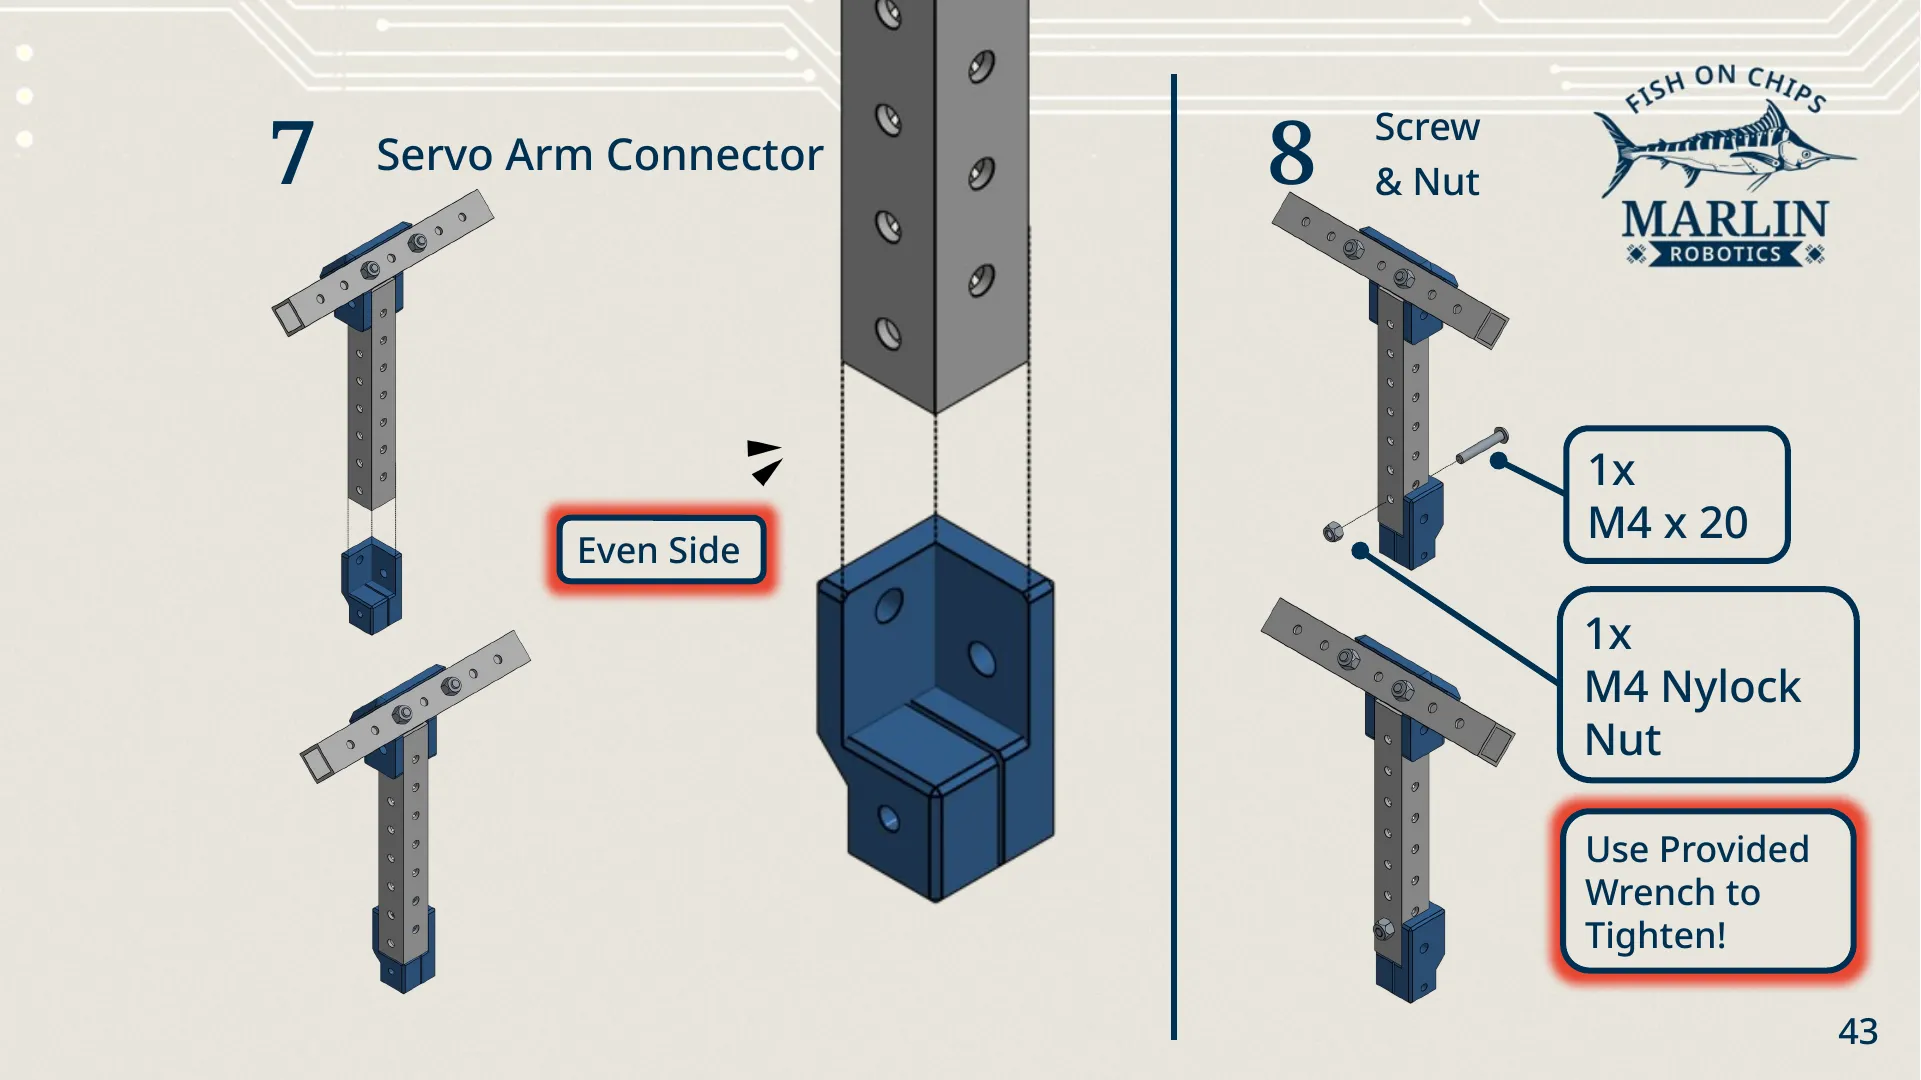
- Optional. Add 1× M4 × 25 and 1× M4 nylock nut through the connector’s second hole.
Servo Arm
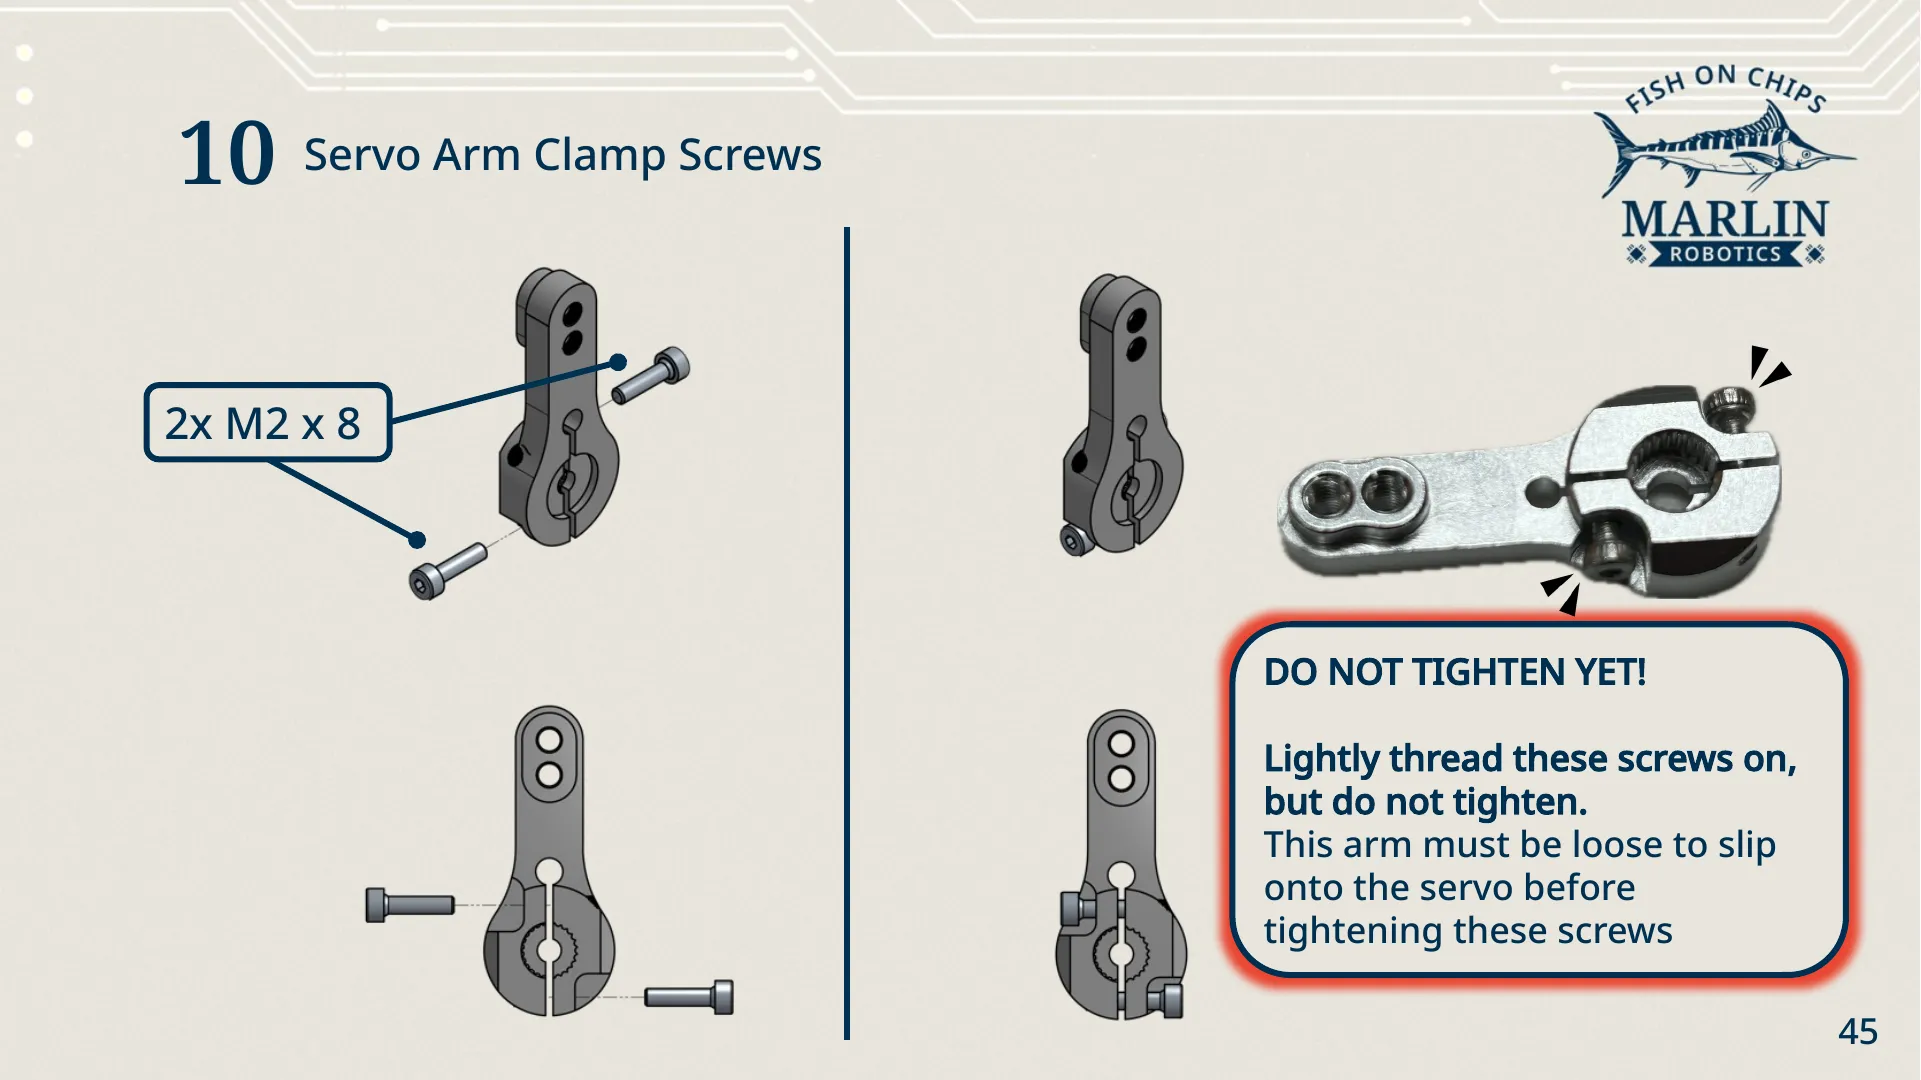
Section titled “Servo Arm”-
Clamp screws. Thread the 2× M2 × 8 into the Servo Arm’s clamp.
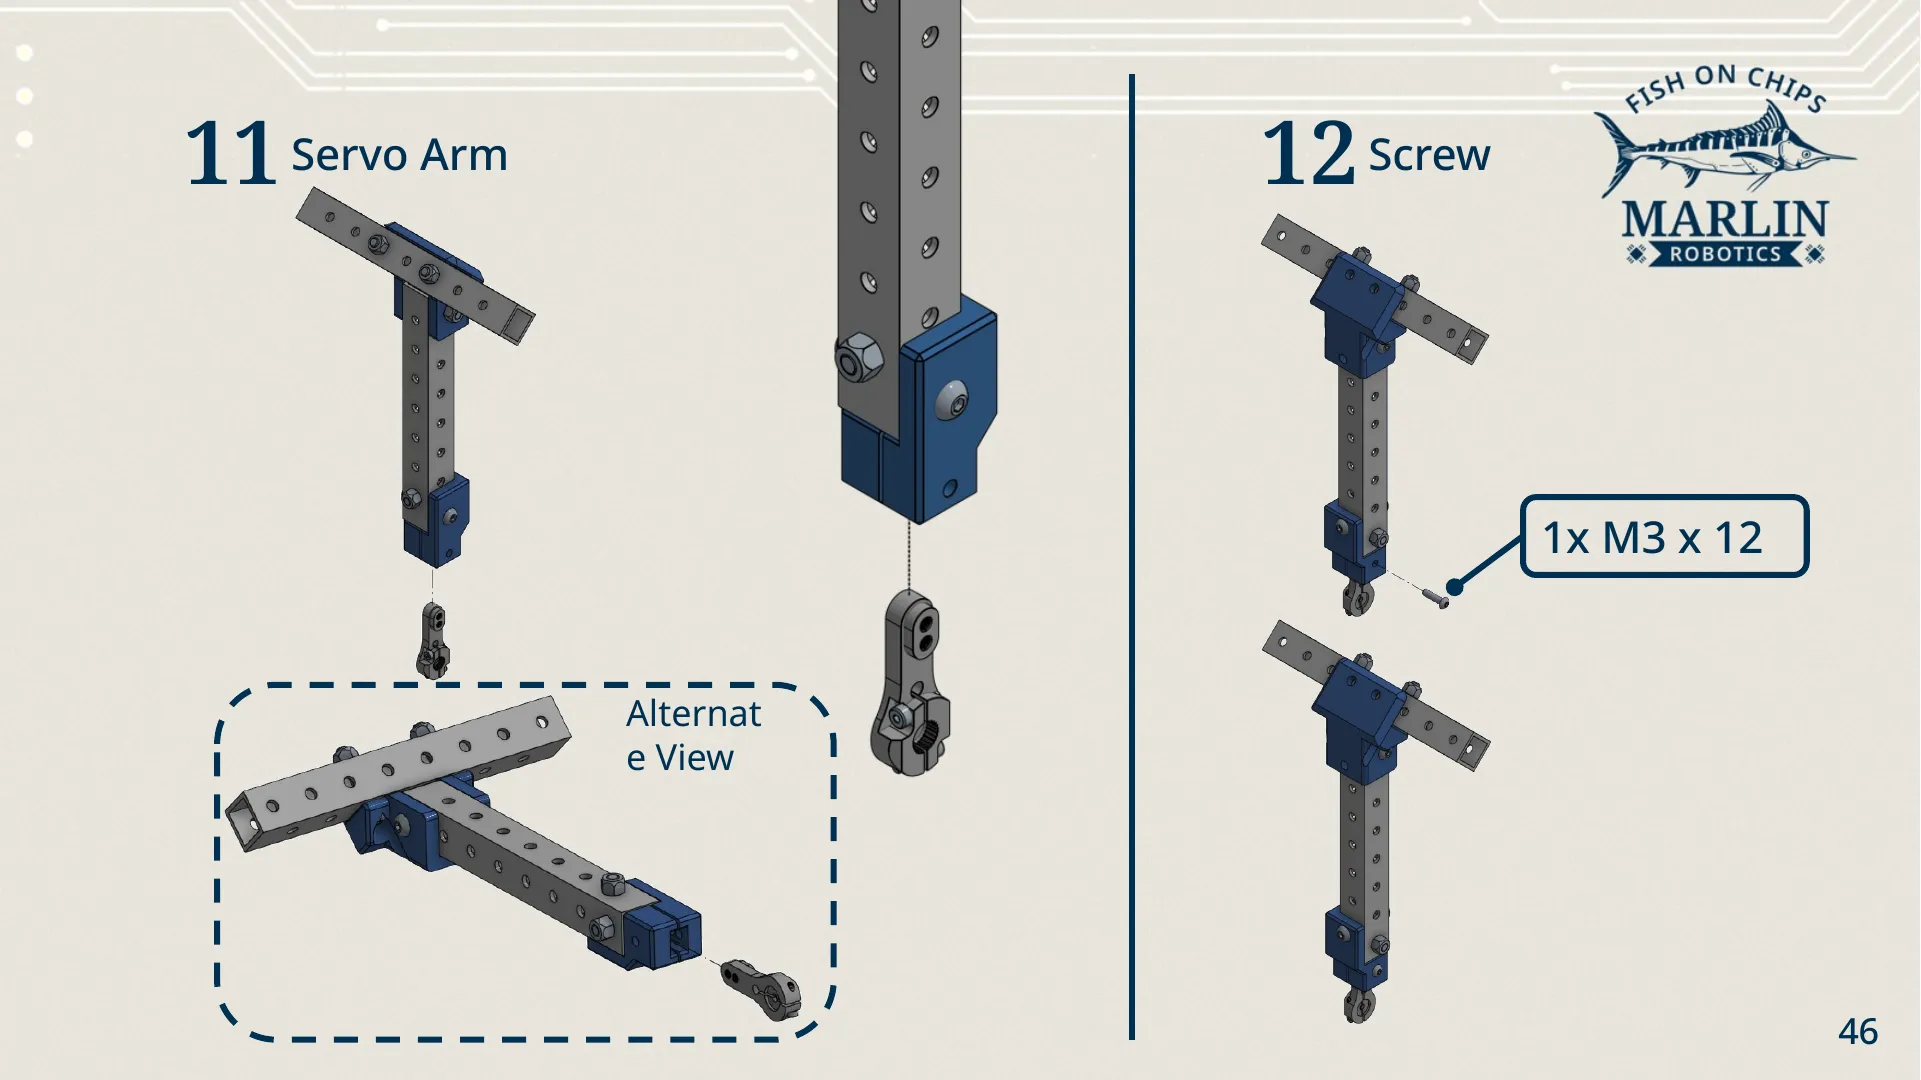
- Servo Arm. Offer the Servo Arm up to the bottom of the Servo-Extrusion Adapter.
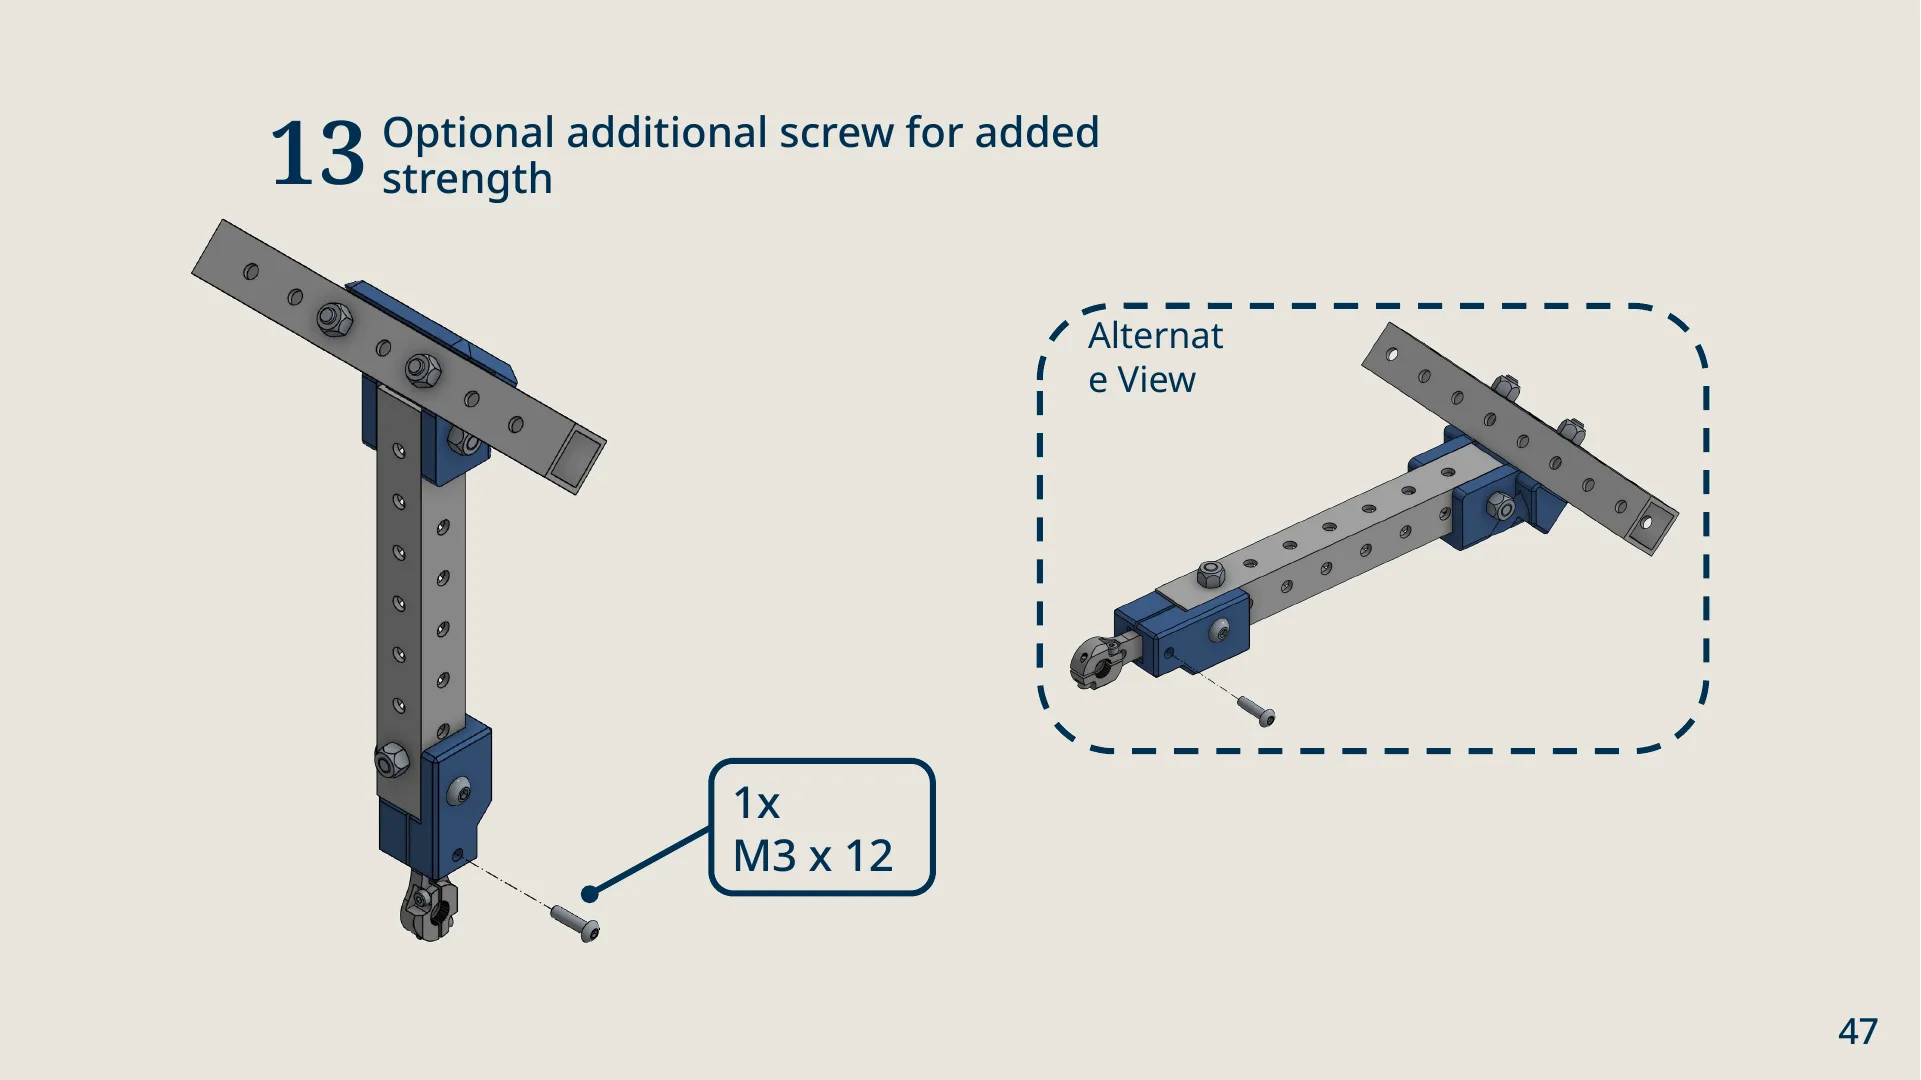
- Screw. Fix it with 1× M3 × 12.
- Optional. Add 1× M3 × 12 through the connector’s second hole.
3. Main assembly
Section titled “3. Main assembly”This is where the sub-assemblies become a Robot.
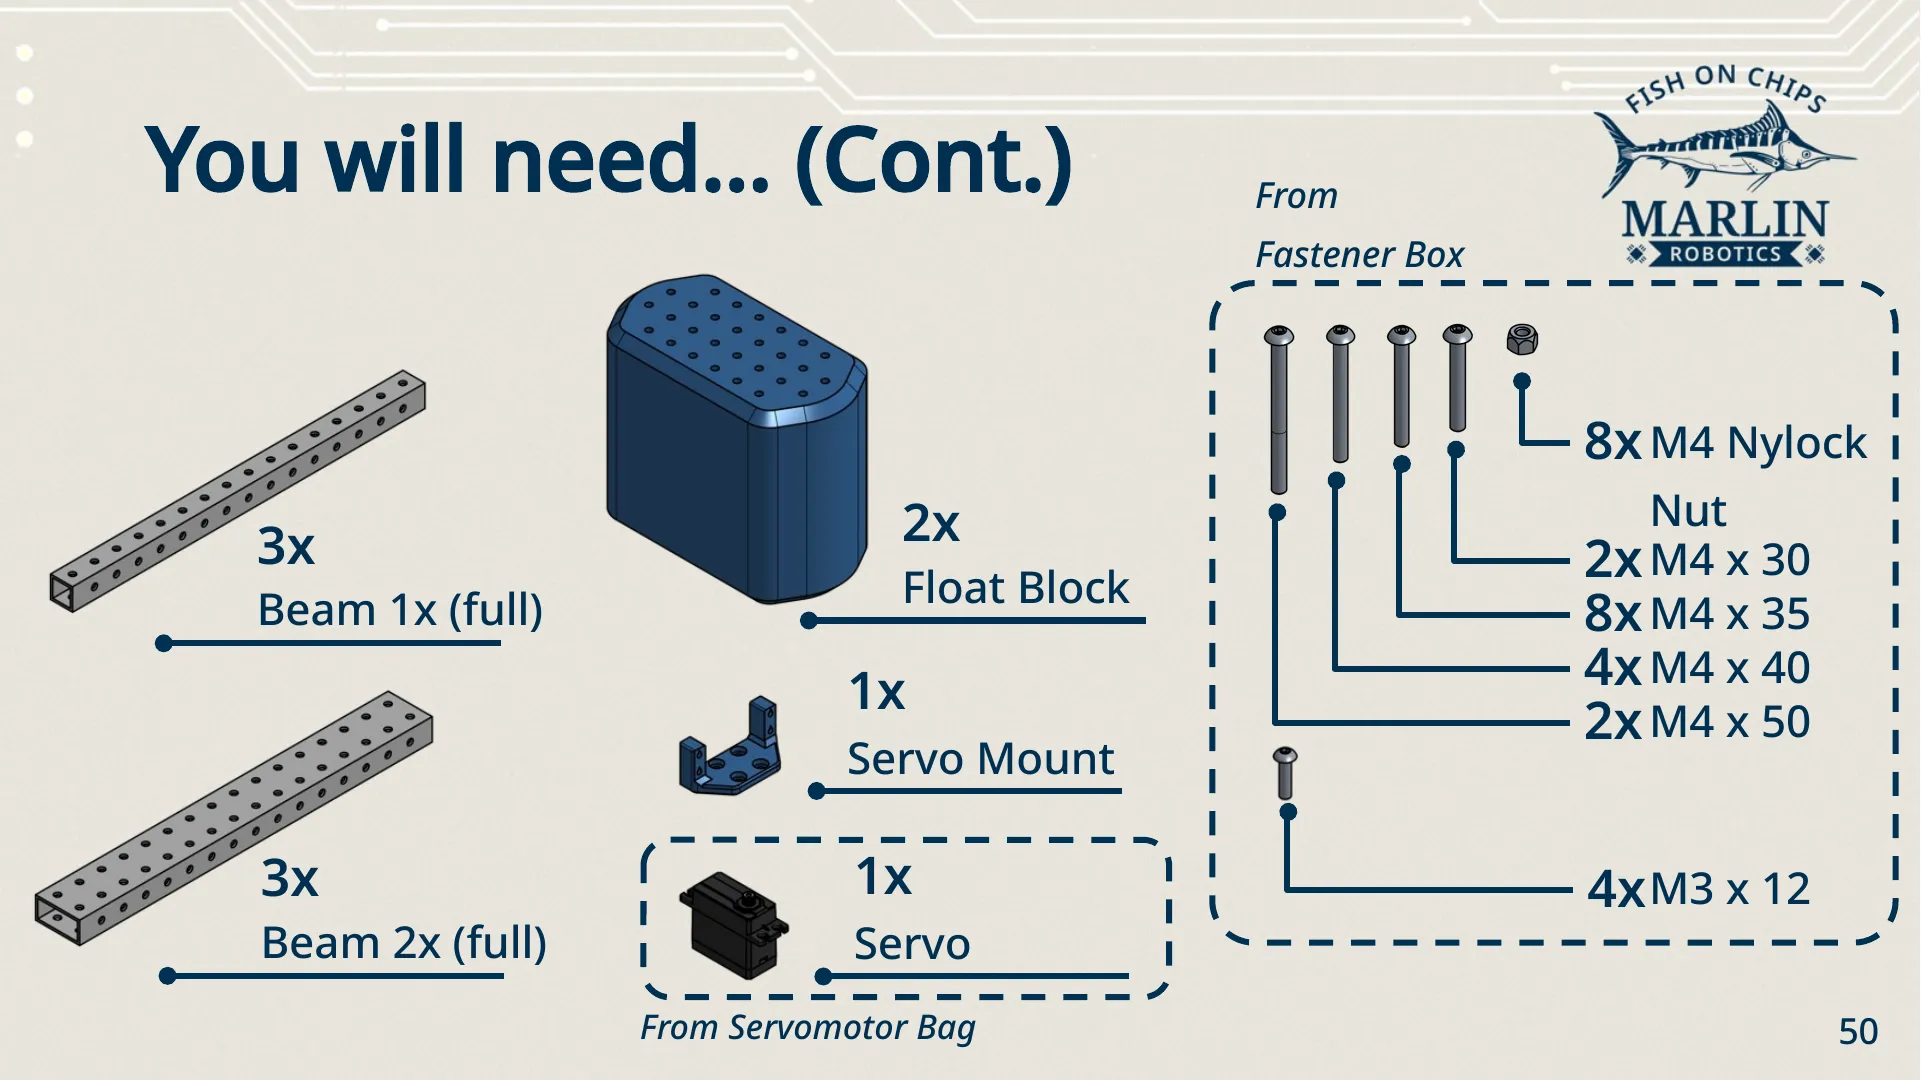
| Part | Quantity | From |
|---|---|---|
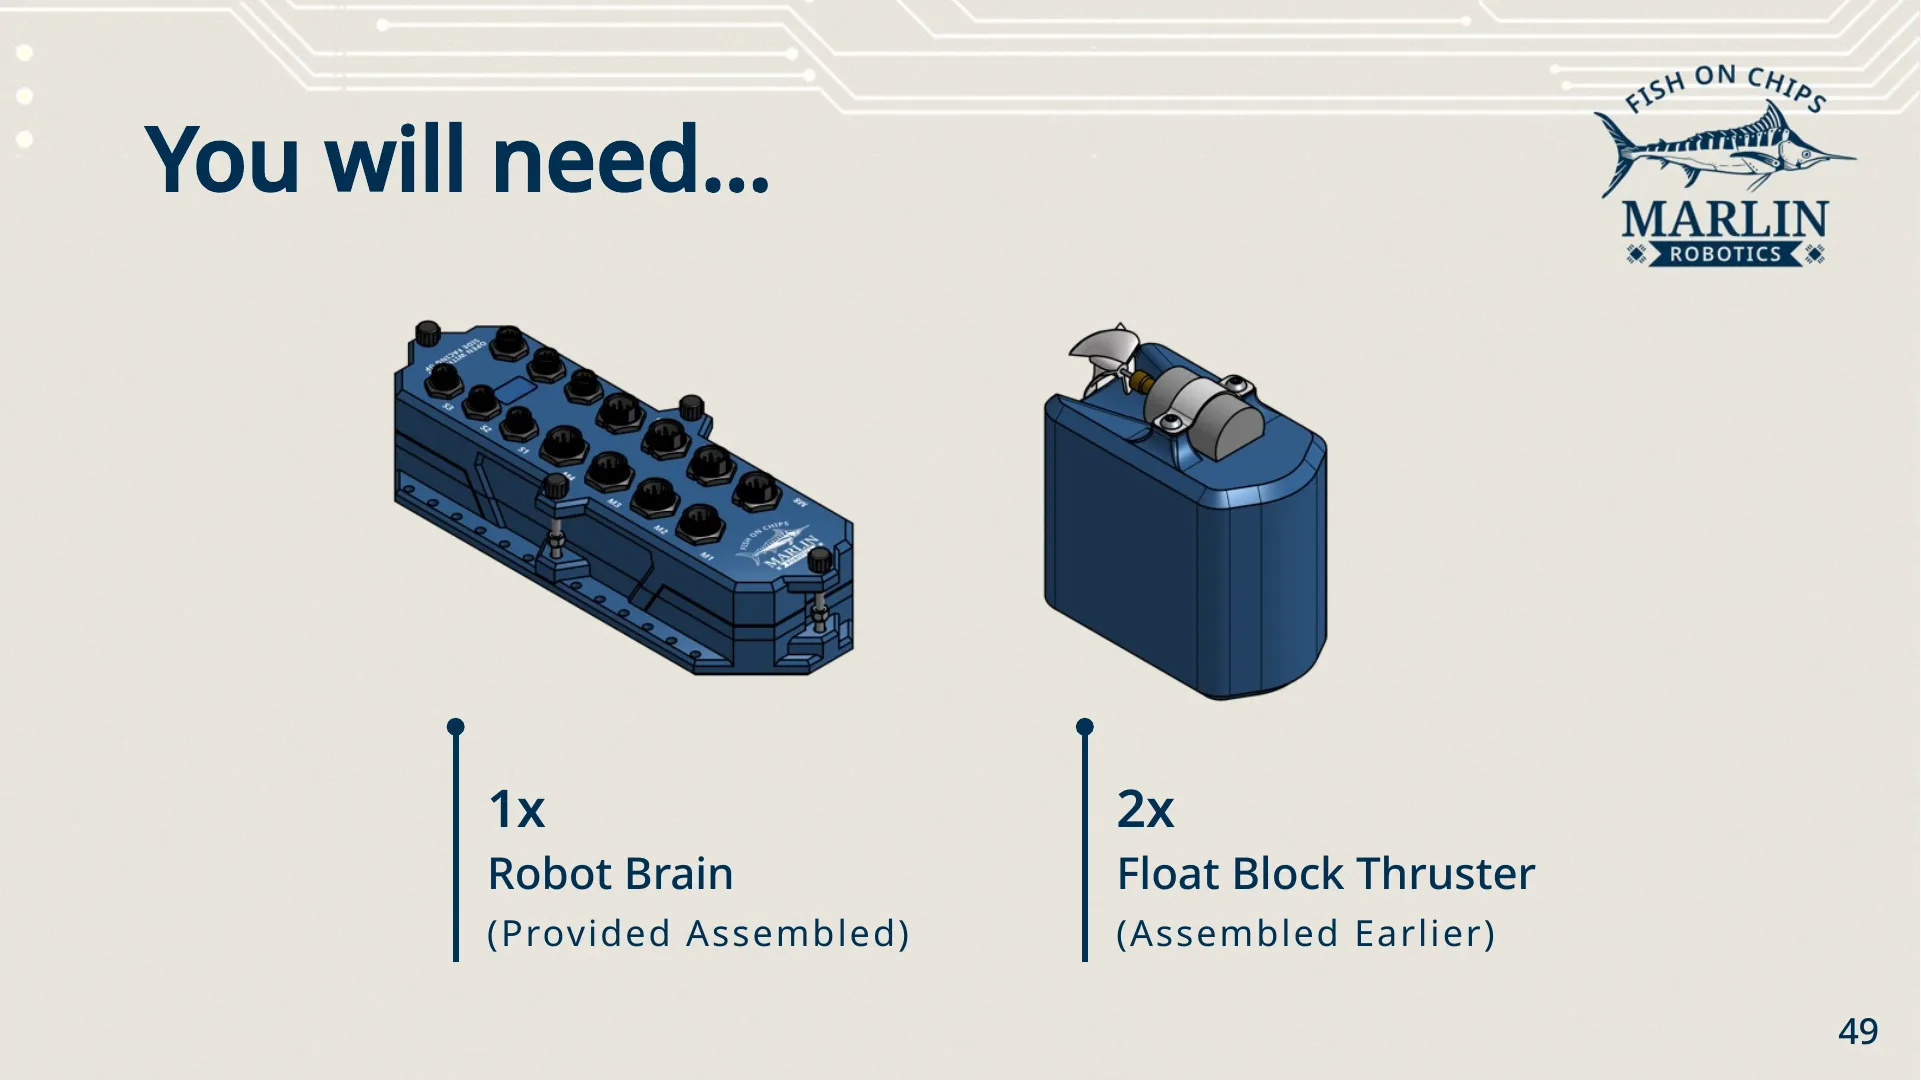
| Robot Brain | 1 | provided assembled |
| Thruster Hull | 2 | assembled in step 1 |
| Hull (plain Float Block) | 2 | — |
| Beam 1x (full) | 3 | — |
| Beam 2x (full) | 3 | — |
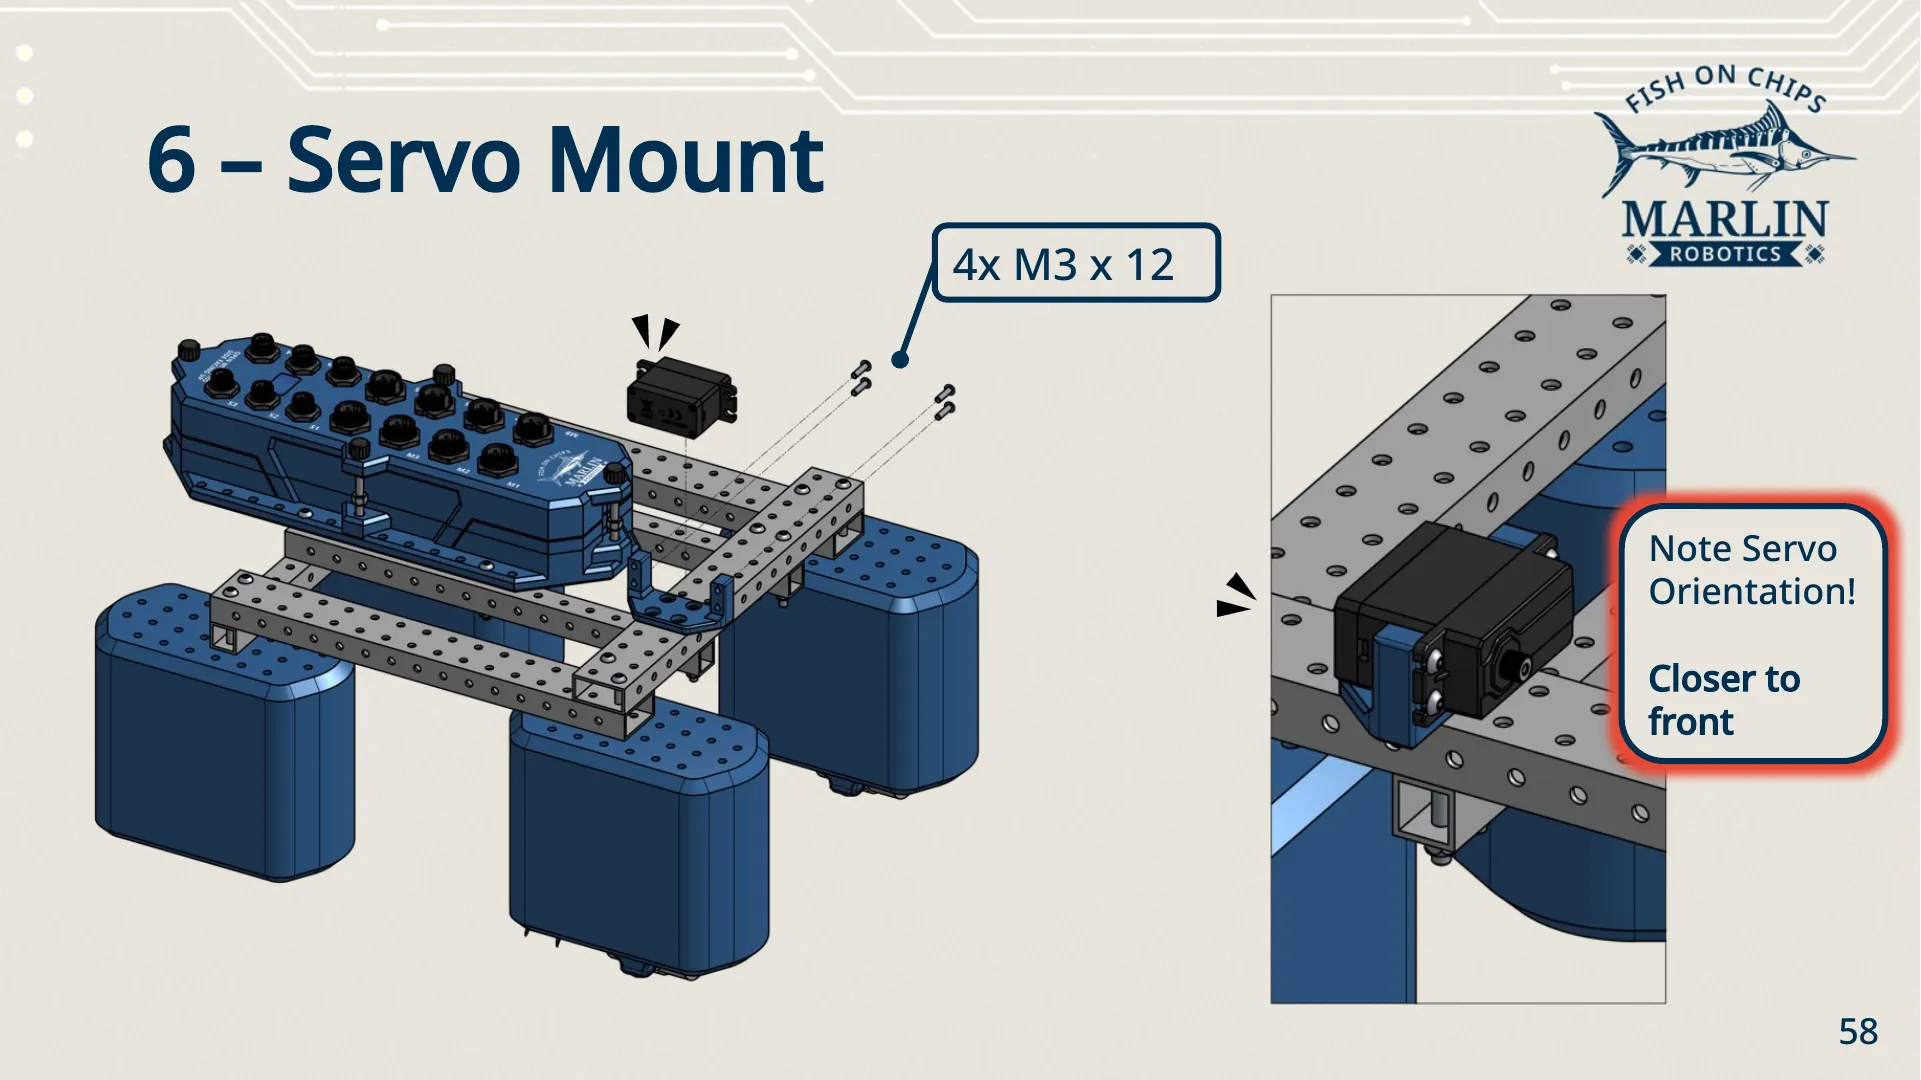
| Servo Mount | 1 | — |
| Servo | 1 | Servo Bag |
| M4 × 50 screw | 2 | Fastener Set |
| M4 × 40 screw | 4 | Fastener Set |
| M4 × 35 screw | 8 | Fastener Set |
| M4 × 30 screw | 2 | Fastener Set |
| M4 nylock nut | 8 | Fastener Set |
| M3 × 12 screw | 4 | Fastener Set |
Front beam
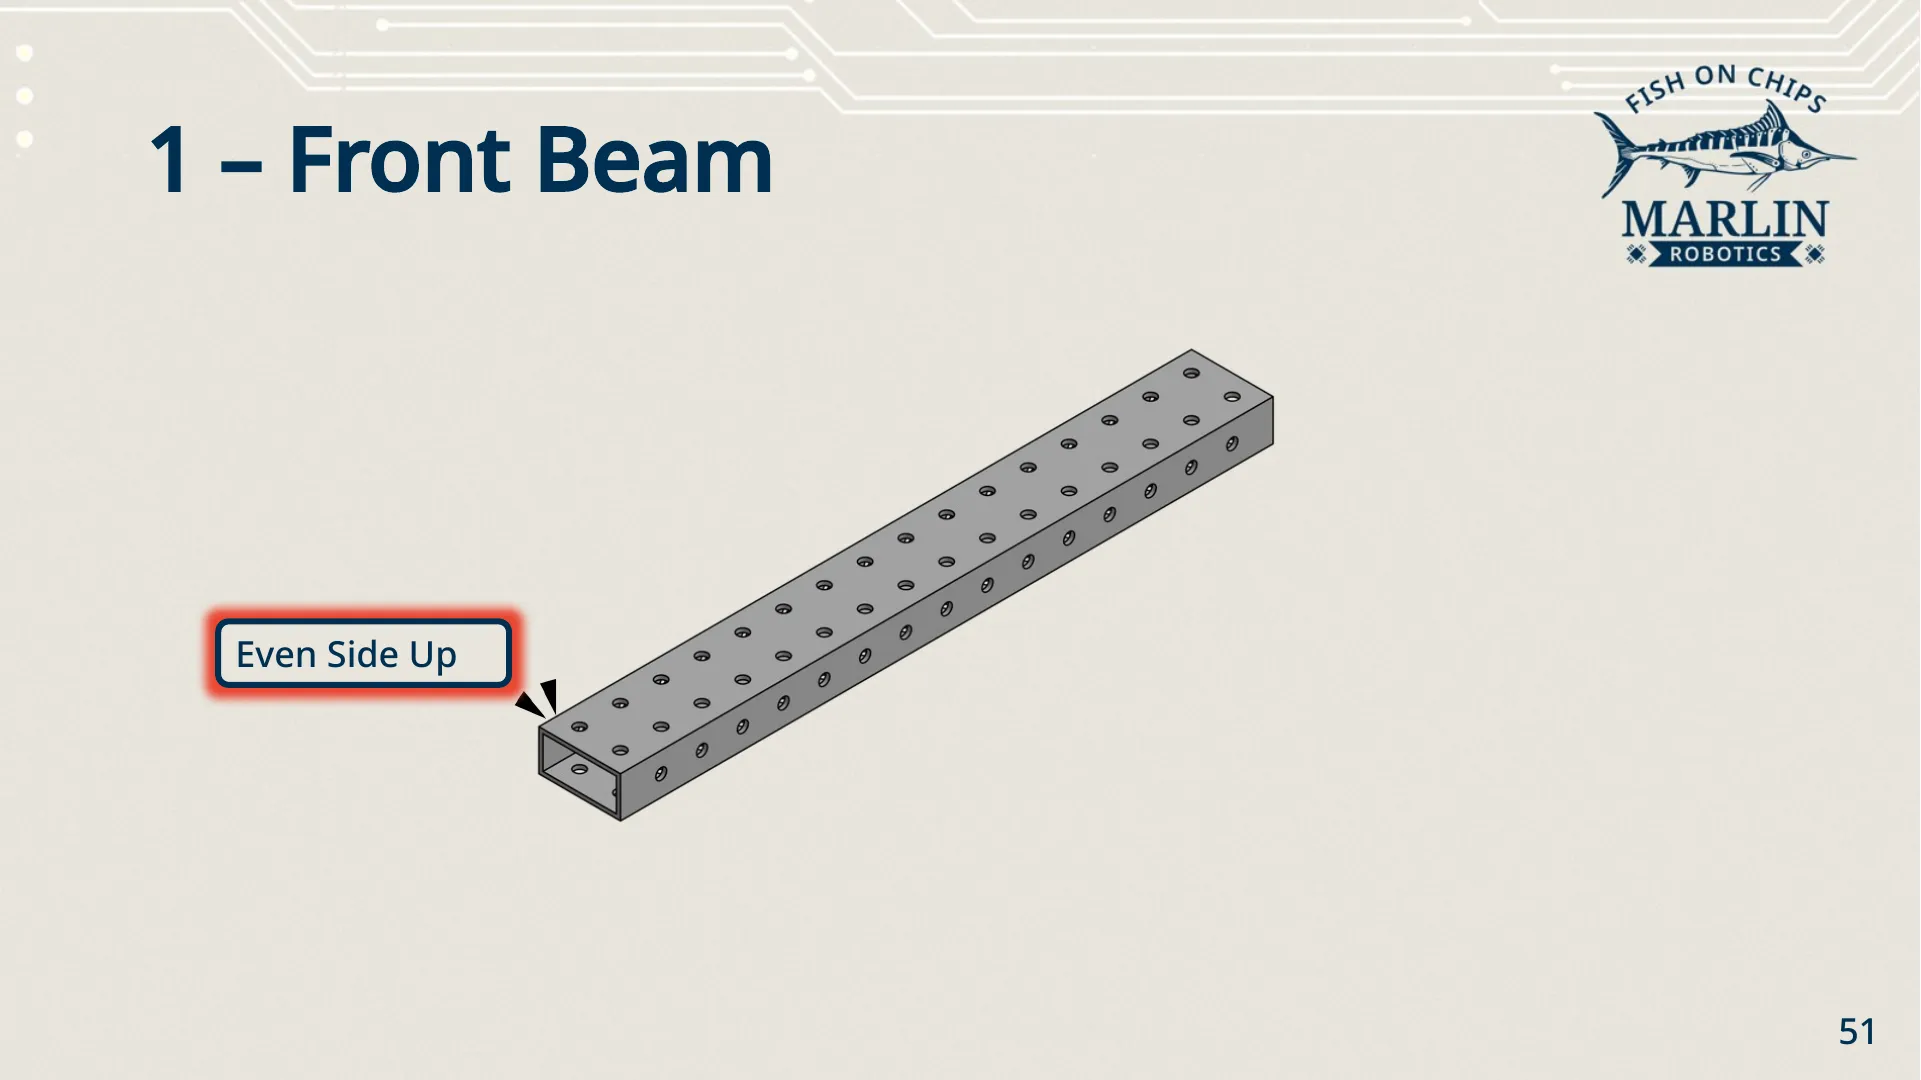
Section titled “Front beam”Lay one 2x full beam down across the front of the build, even side up. Everything else is positioned from this beam, so get its orientation right before you go on.
Centre beams
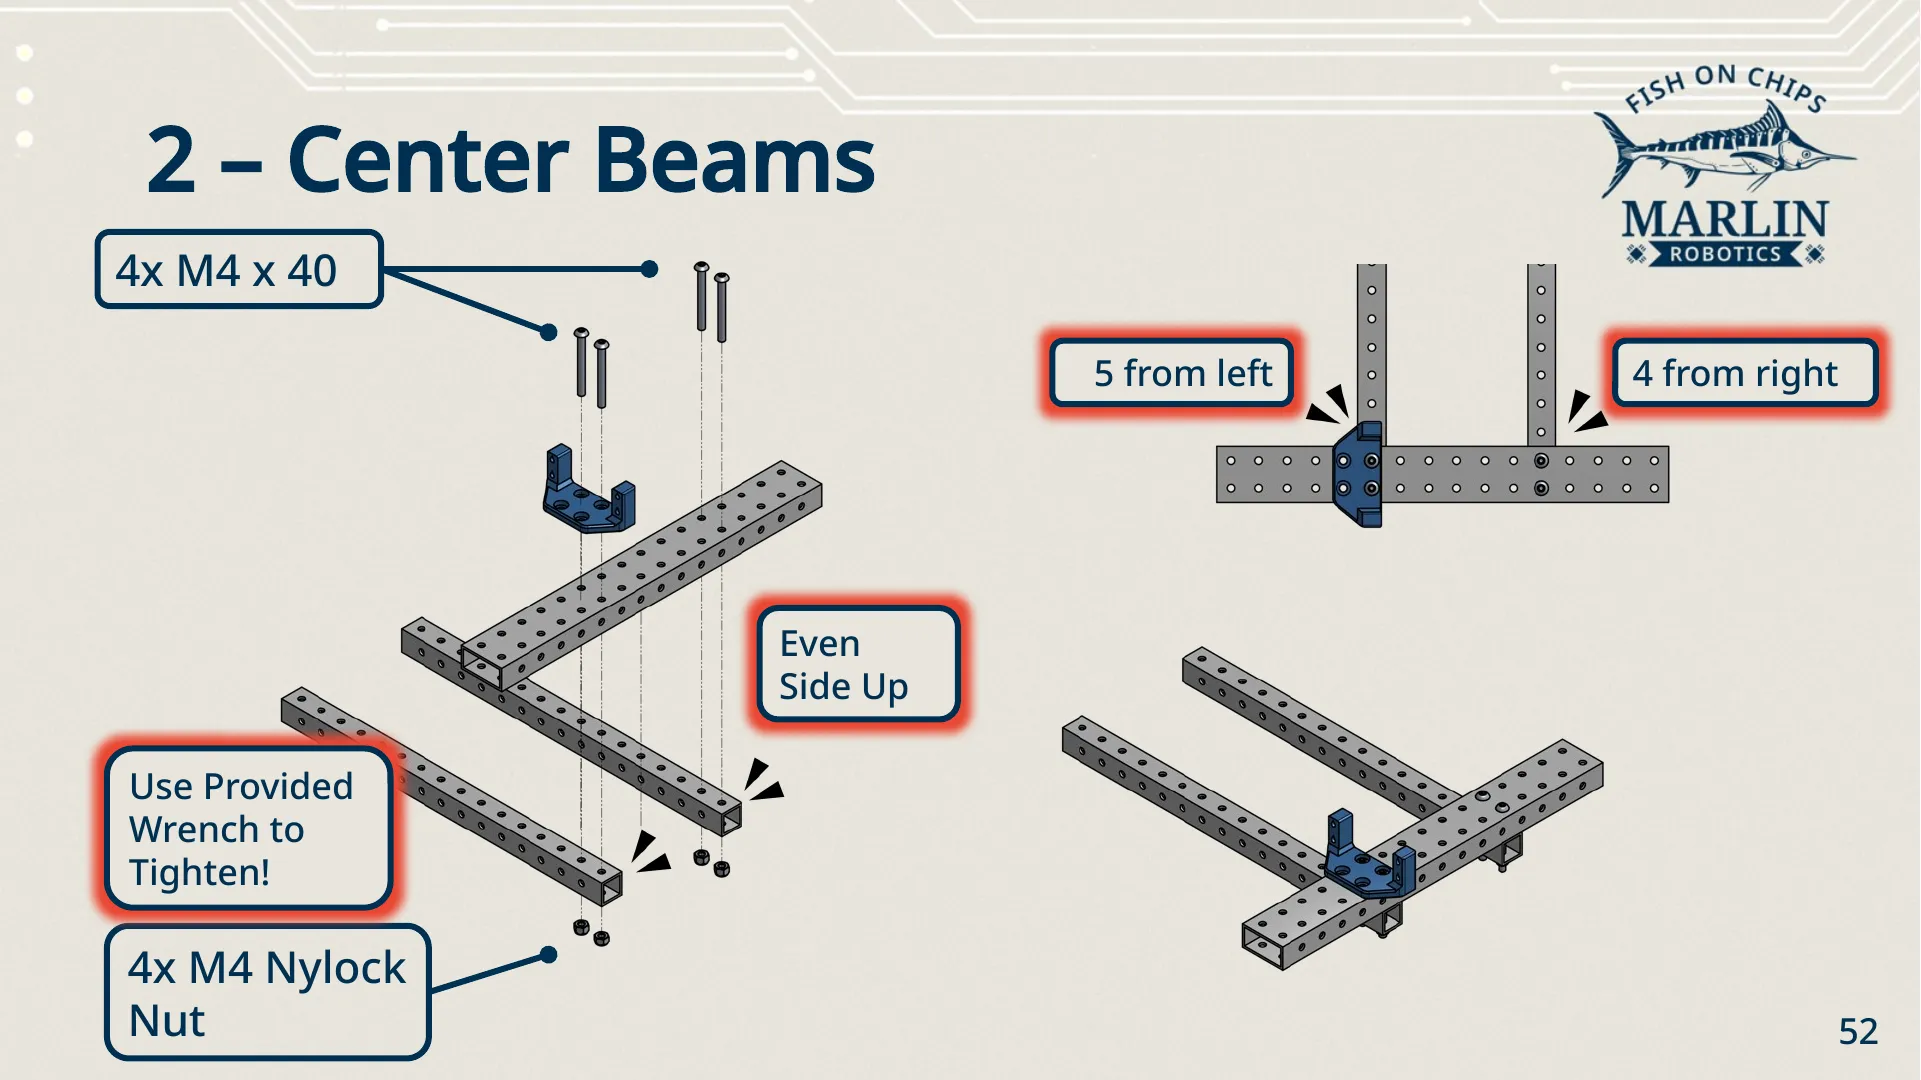
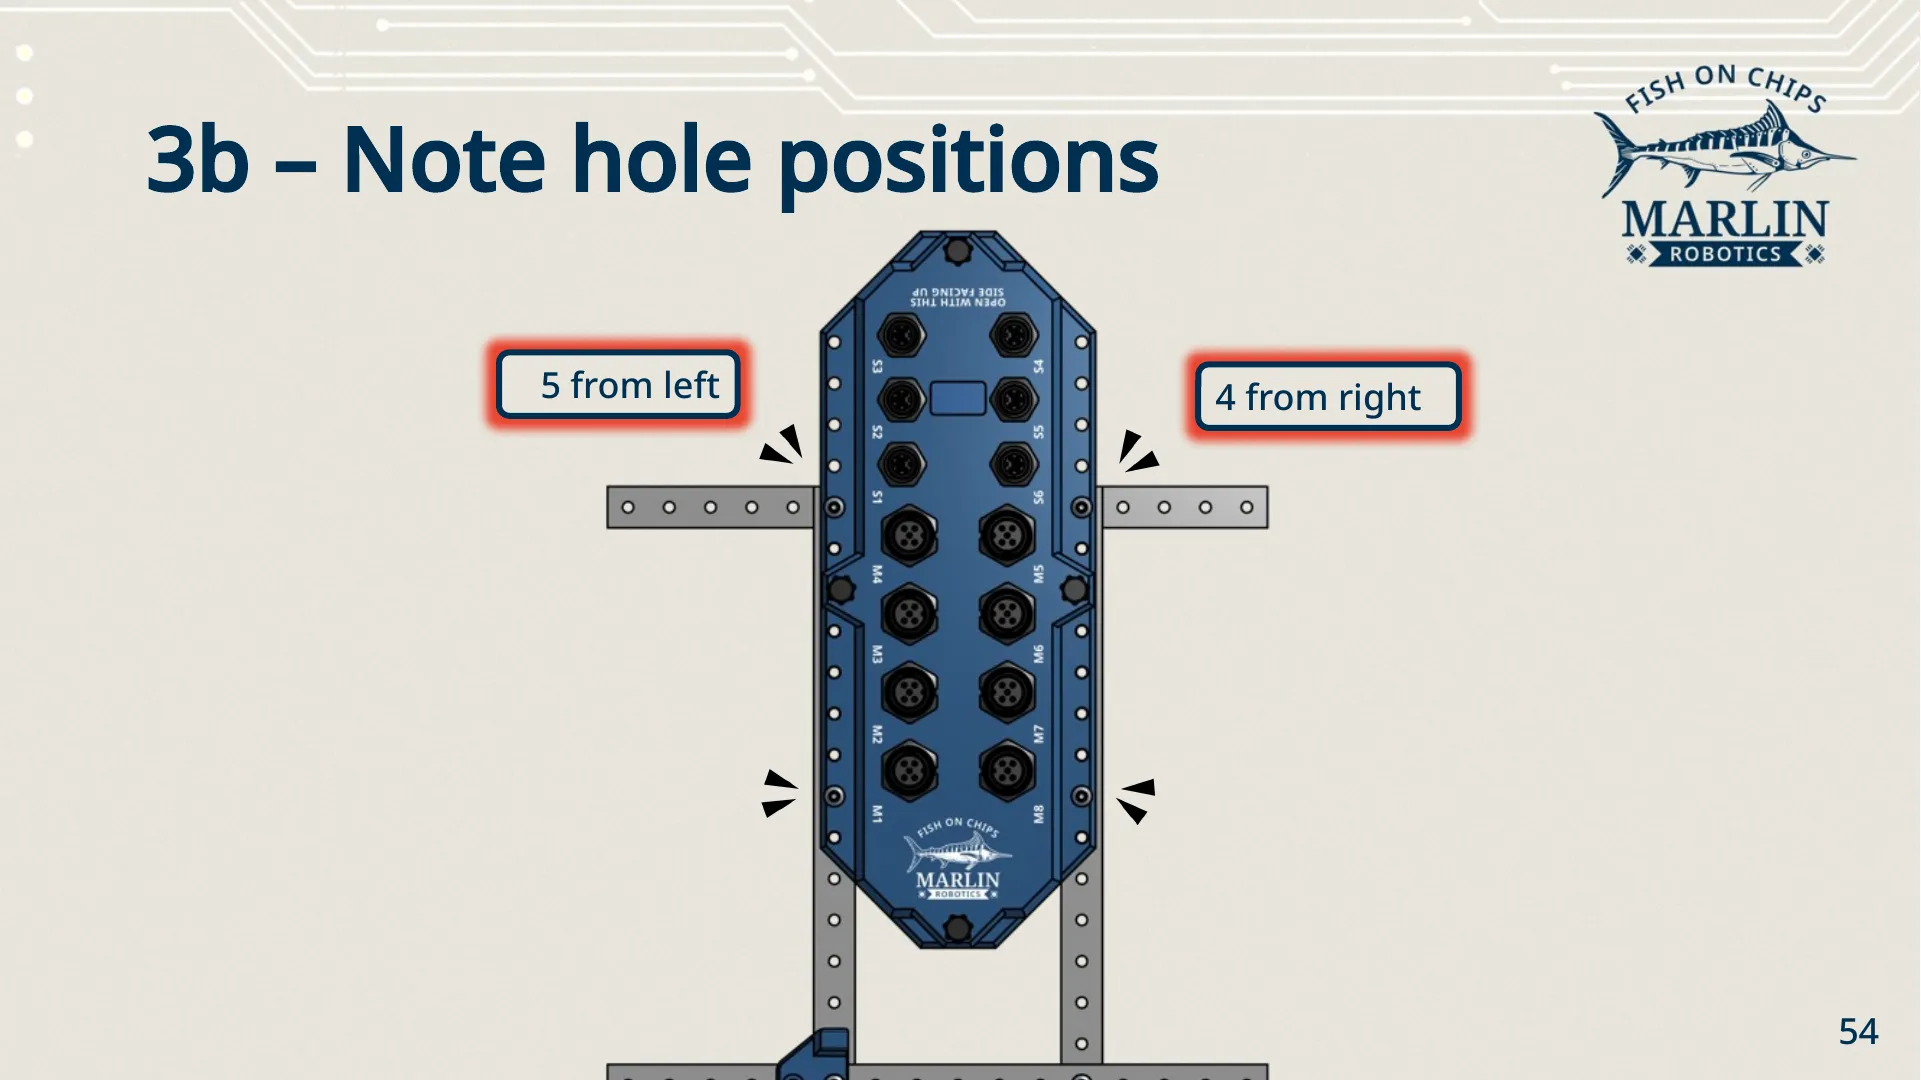
Section titled “Centre beams”- Lay two 1x full beams across the front beam, running fore and aft, even side up. Position them at the 5th hole from the left and the 4th hole from the right.
- Sit the Servo Mount over the left-hand junction.
- Fix everything with 4× M4 × 40 and 4× M4 nylock nuts — two screws per junction. Tighten with the provided wrench.
Aft beam and Robot Brain
Section titled “Aft beam and Robot Brain”- Lay the last 1x full beam across the back of the two centre beams.
- Sit the Robot Brain on top, its mounting feet over the beam holes, with
the port labels (
M1–M8,S1–S6) readable from above. - Fix it with 2× M4 × 50 at the forward feet and 2× M4 × 30 at the aft feet, into 4× M4 nylock nuts underneath.
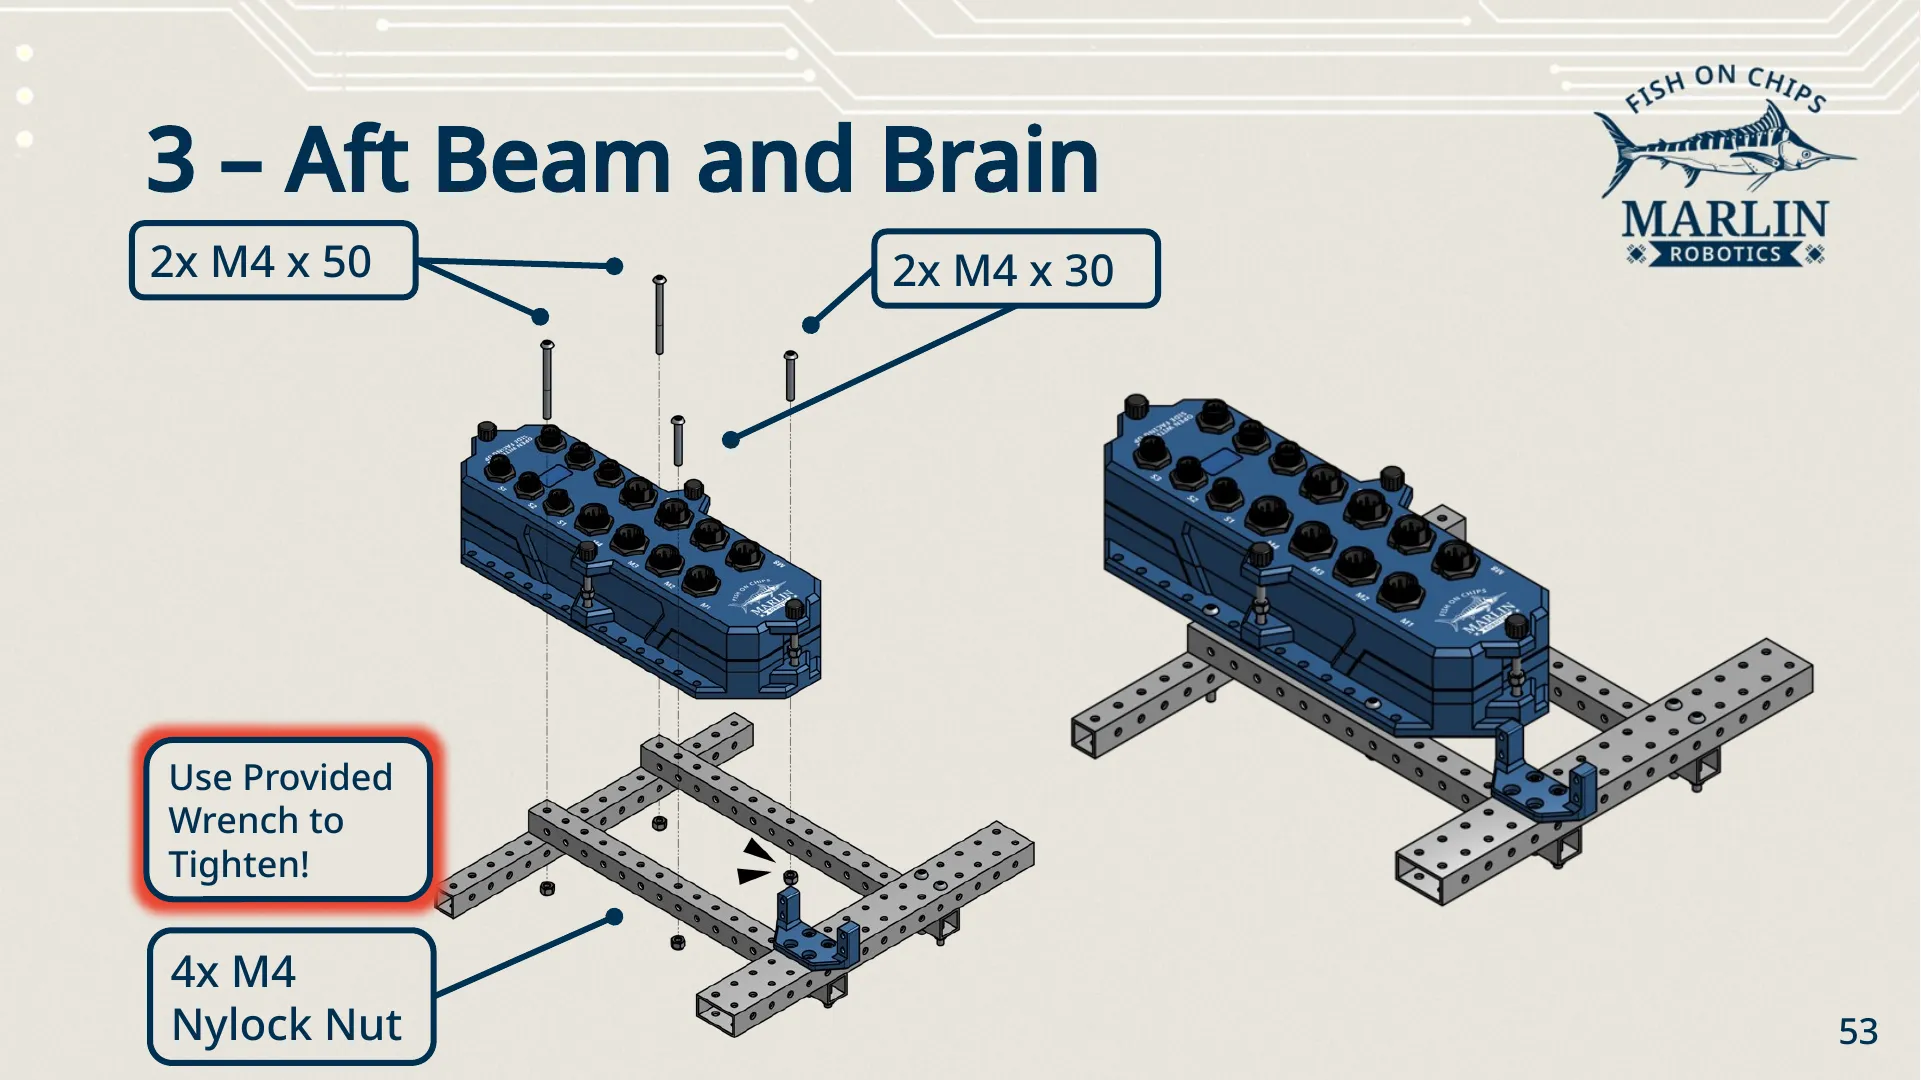
Check the hole positions from directly above before you tighten — the Brain should straddle the centre beams squarely, with the same 5 from the left, 4 from the right spacing as the beams themselves.
Left side
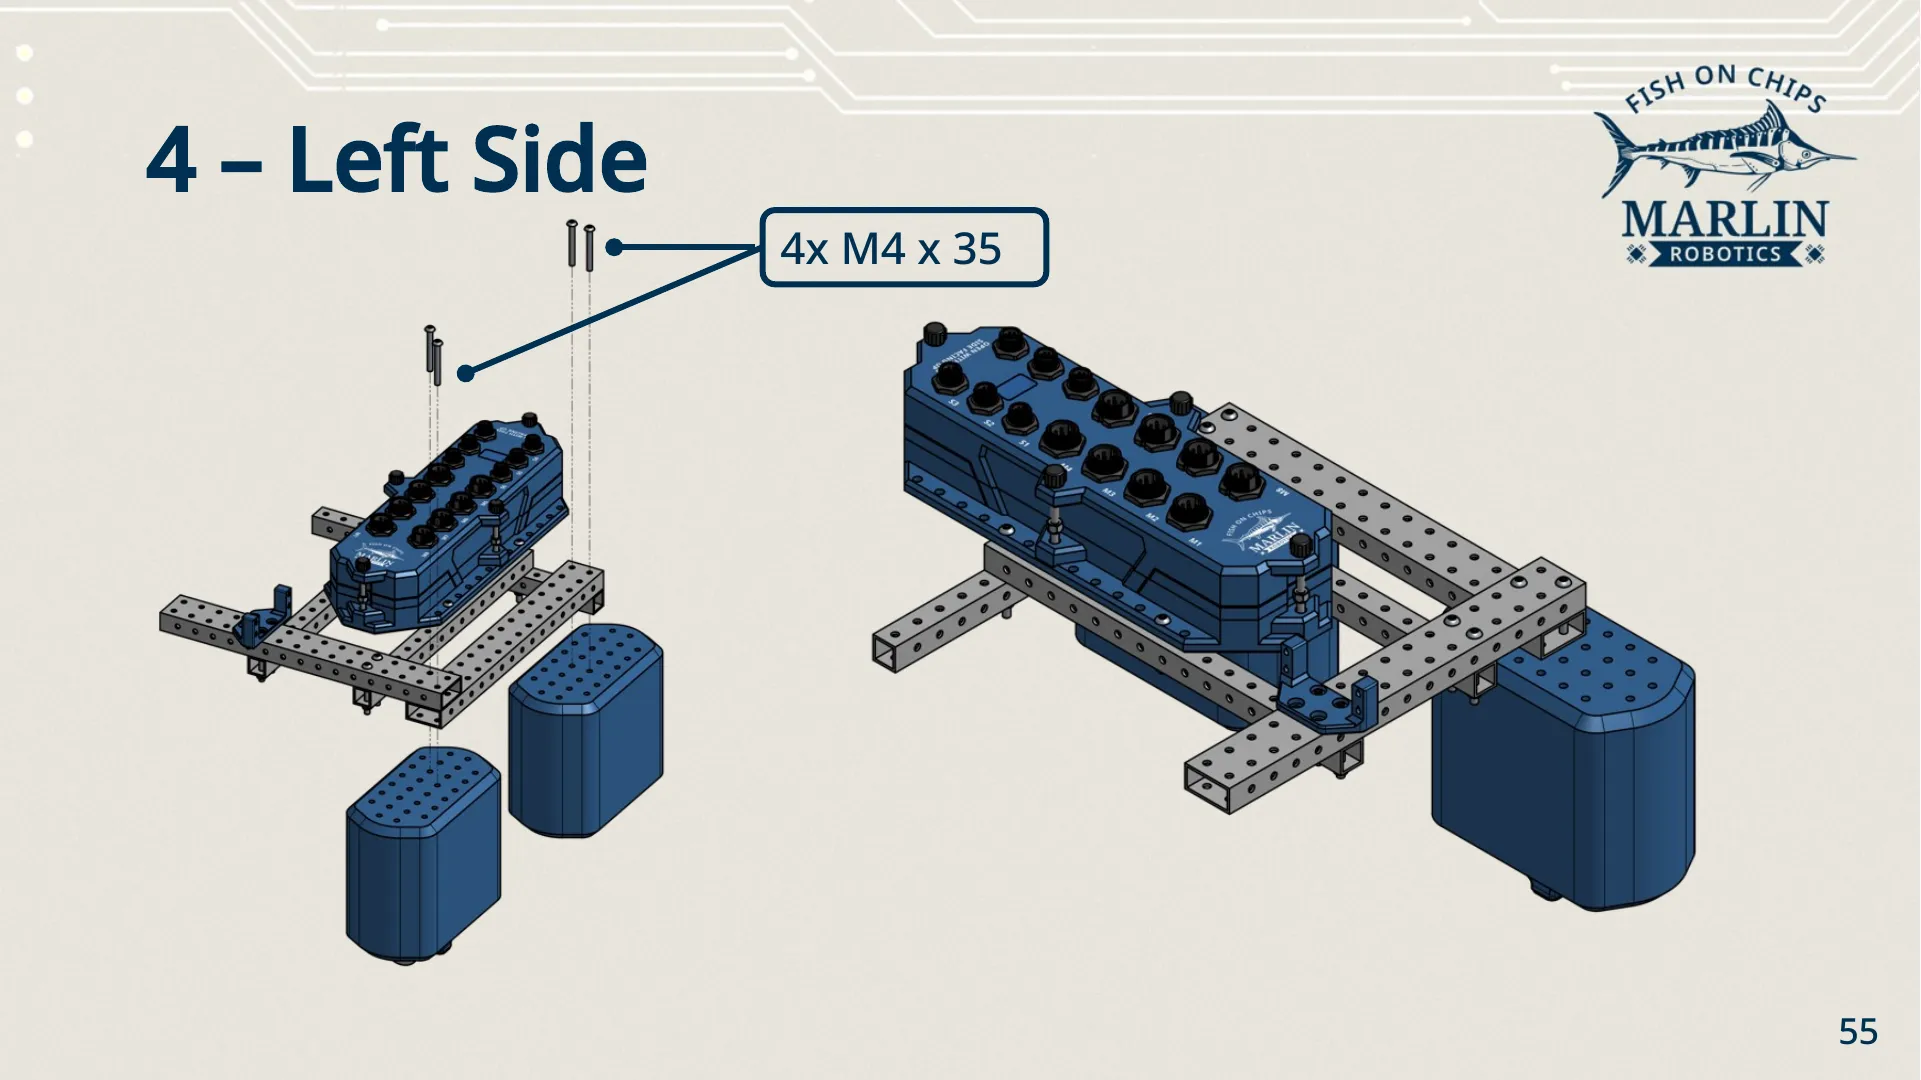
Section titled “Left side”- Lay a 2x full beam along the left side, bridging the front and aft beams.
- Bring one plain Hull and one Thruster Hull up underneath it.
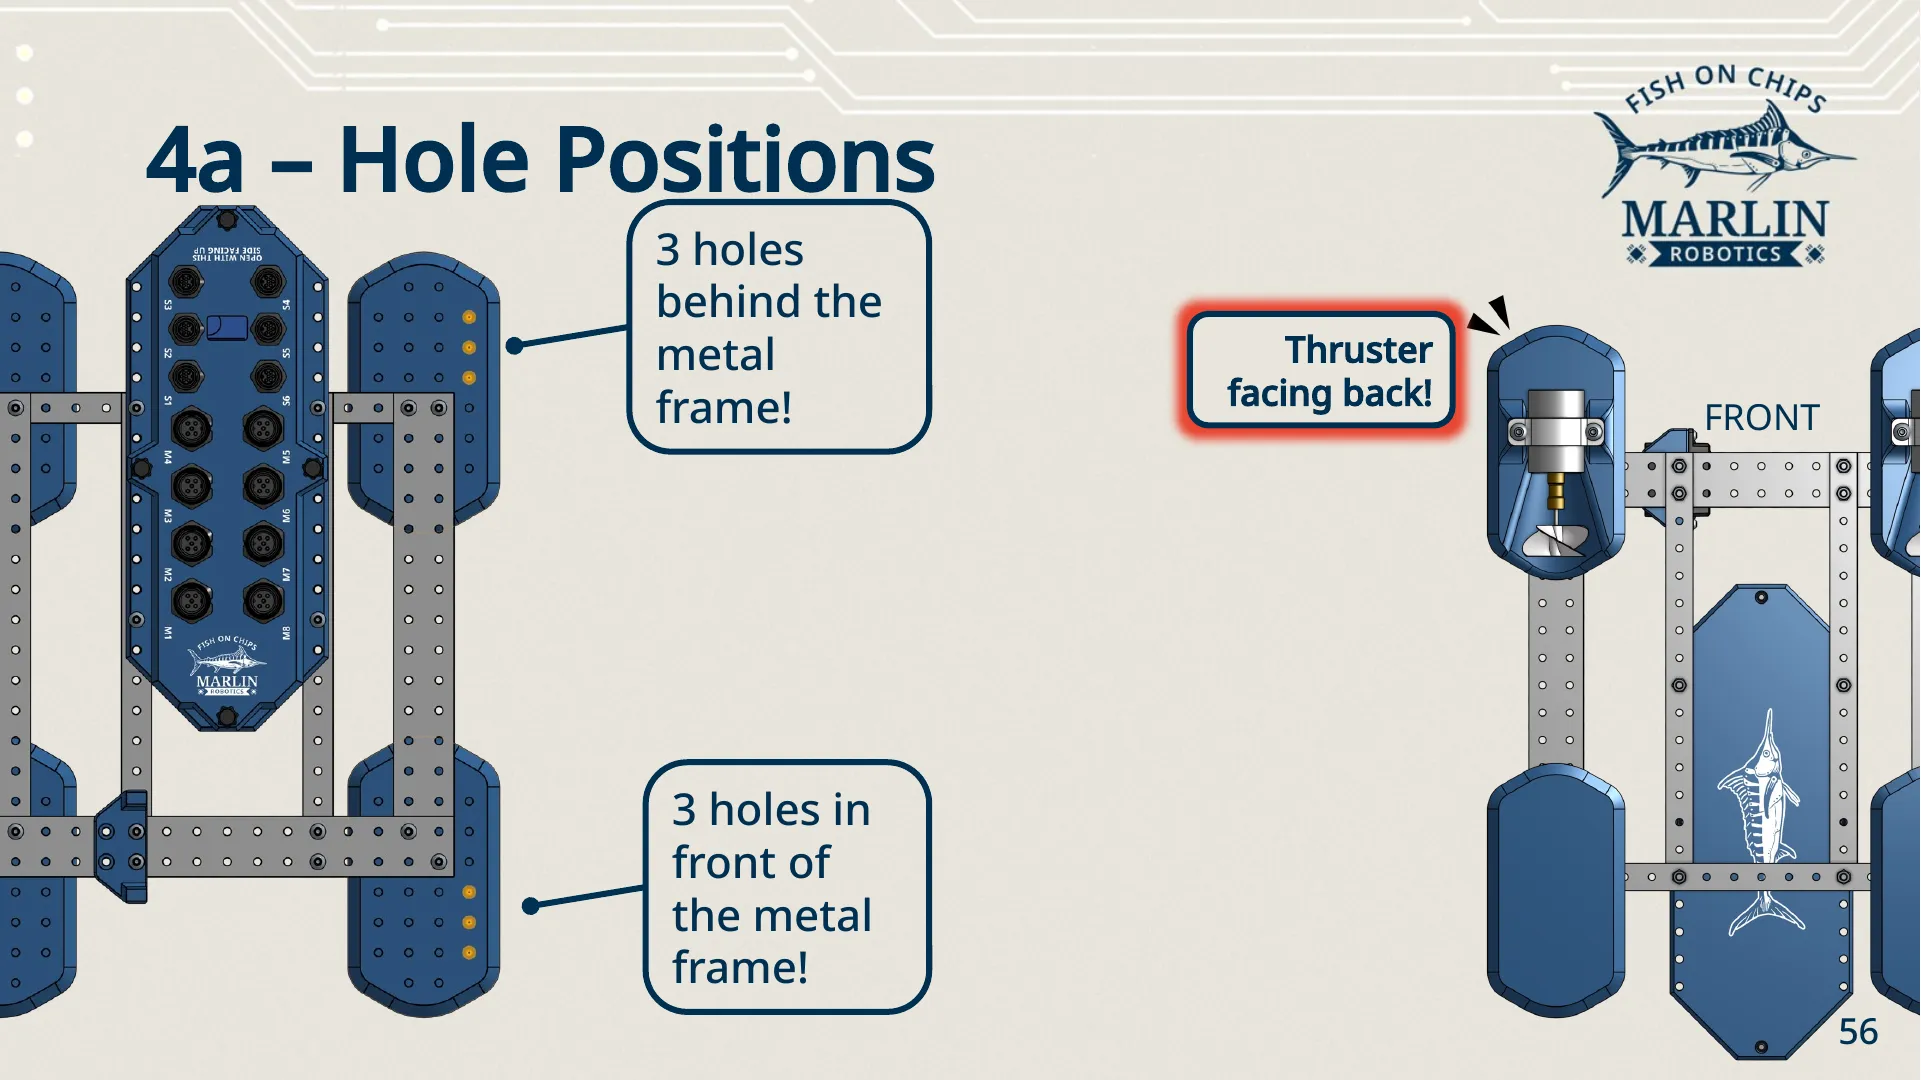
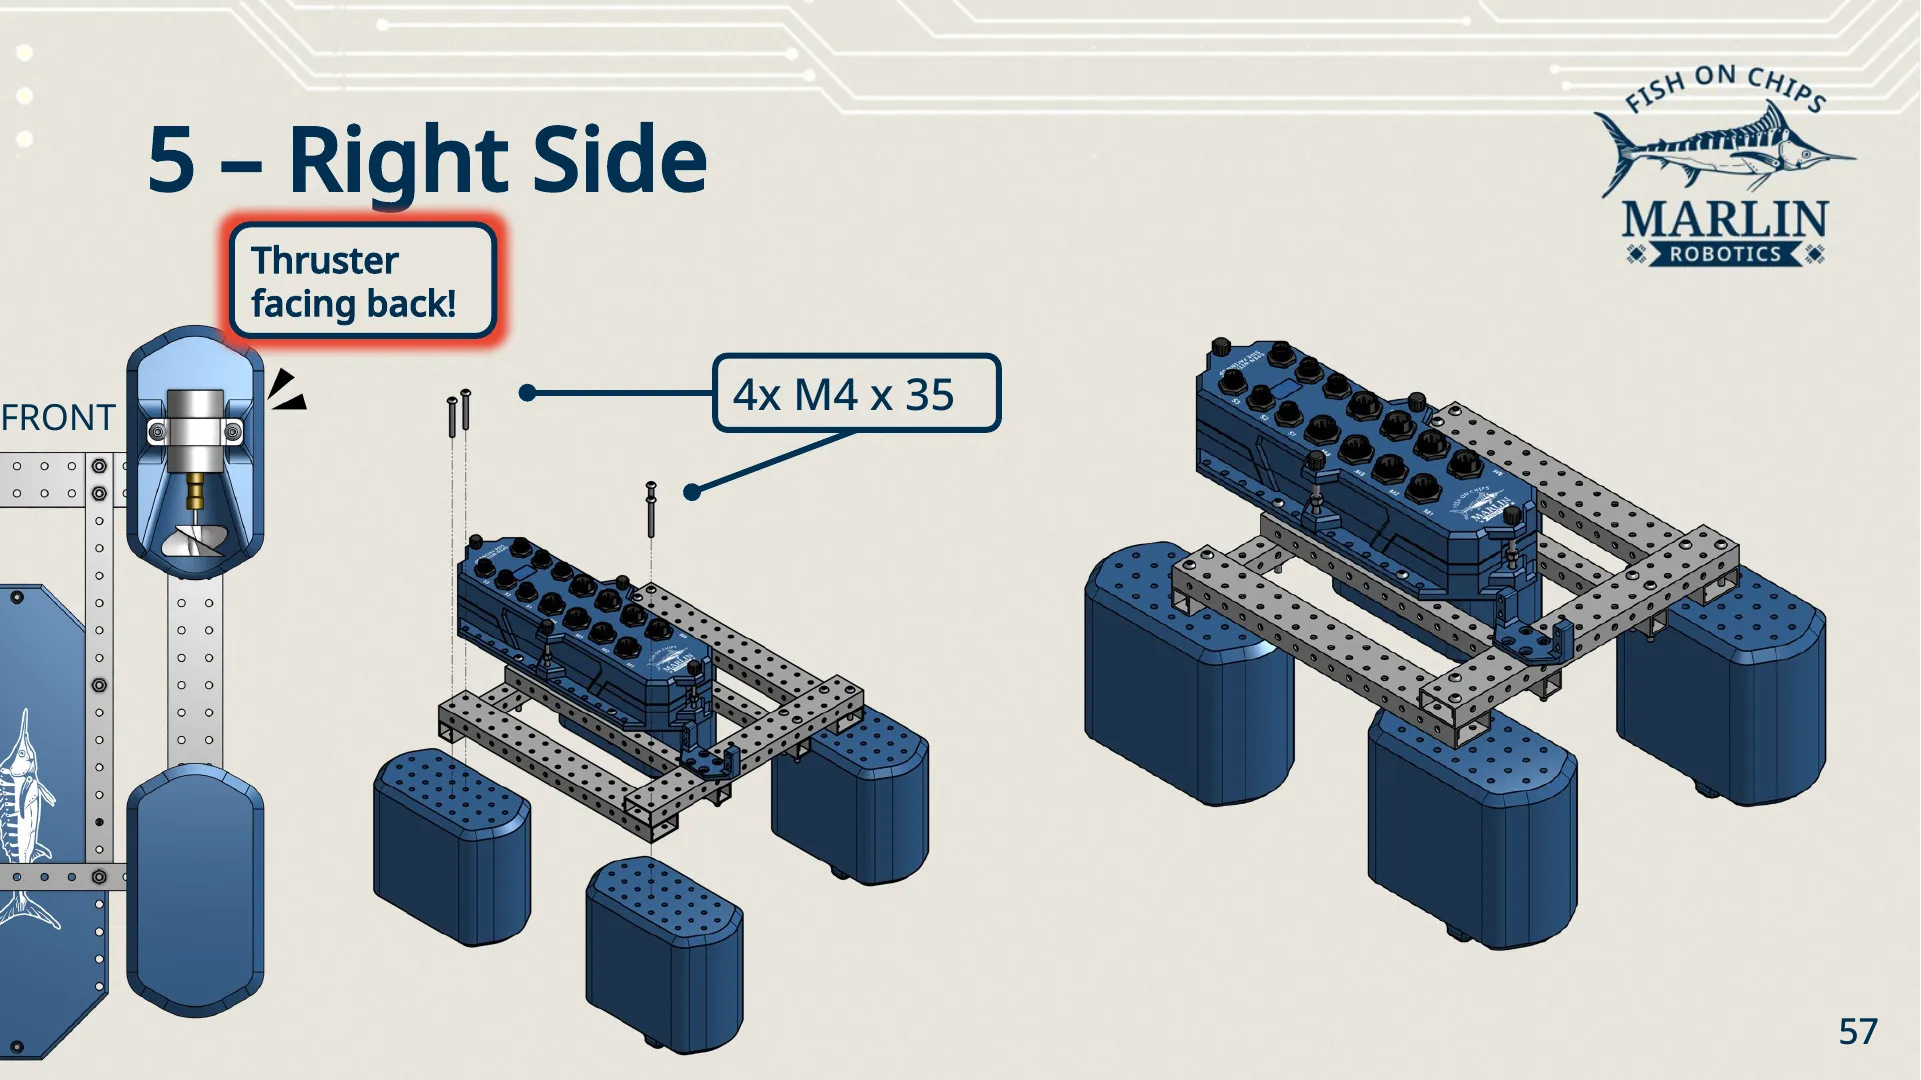
- Fix each Hull with 2× M4 × 35 down through the side beam — 4× M4 × 35 in total.
Right side
Section titled “Right side”Repeat step 4 on the right: one 2x full beam, one plain Hull, one Thruster Hull, 4× M4 × 35. Thruster facing back again, so the two propellers point the same way.
Keep the CW Thruster on one side and the CCW Thruster on the other.
Bolt the Servo into the Servo Mount on the front beam with 4× M3 × 12.
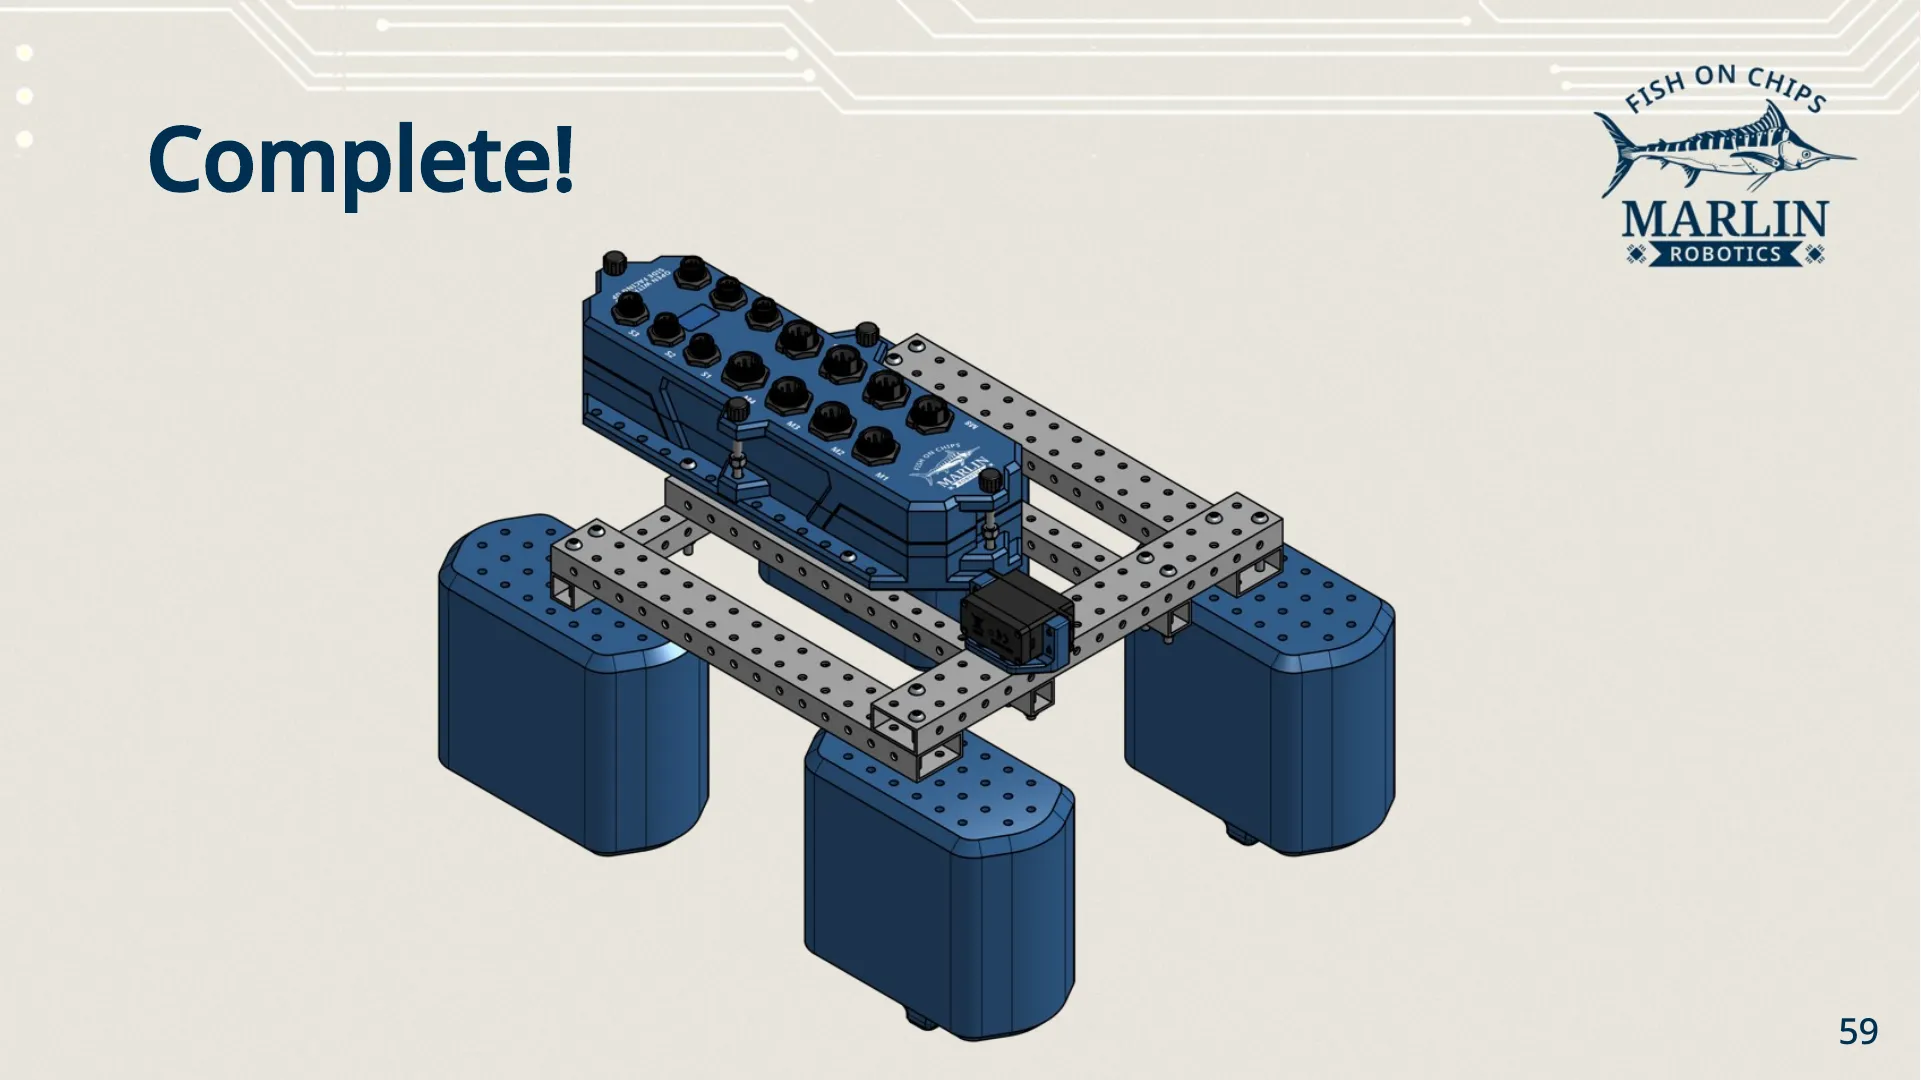
You should have: a frame standing on four Hulls, the Robot Brain bolted across the centre beams, and the Servo mounted on the front beam.
4. Sensors and cables
Section titled “4. Sensors and cables”| Part | Quantity | From |
|---|---|---|
| IMU | 1 | — |
| Beacon Receiver | 1 | — |
| M4 × 30 screw | 4 | Fastener Set |
| M4 nylock nut | 4 | Fastener Set |
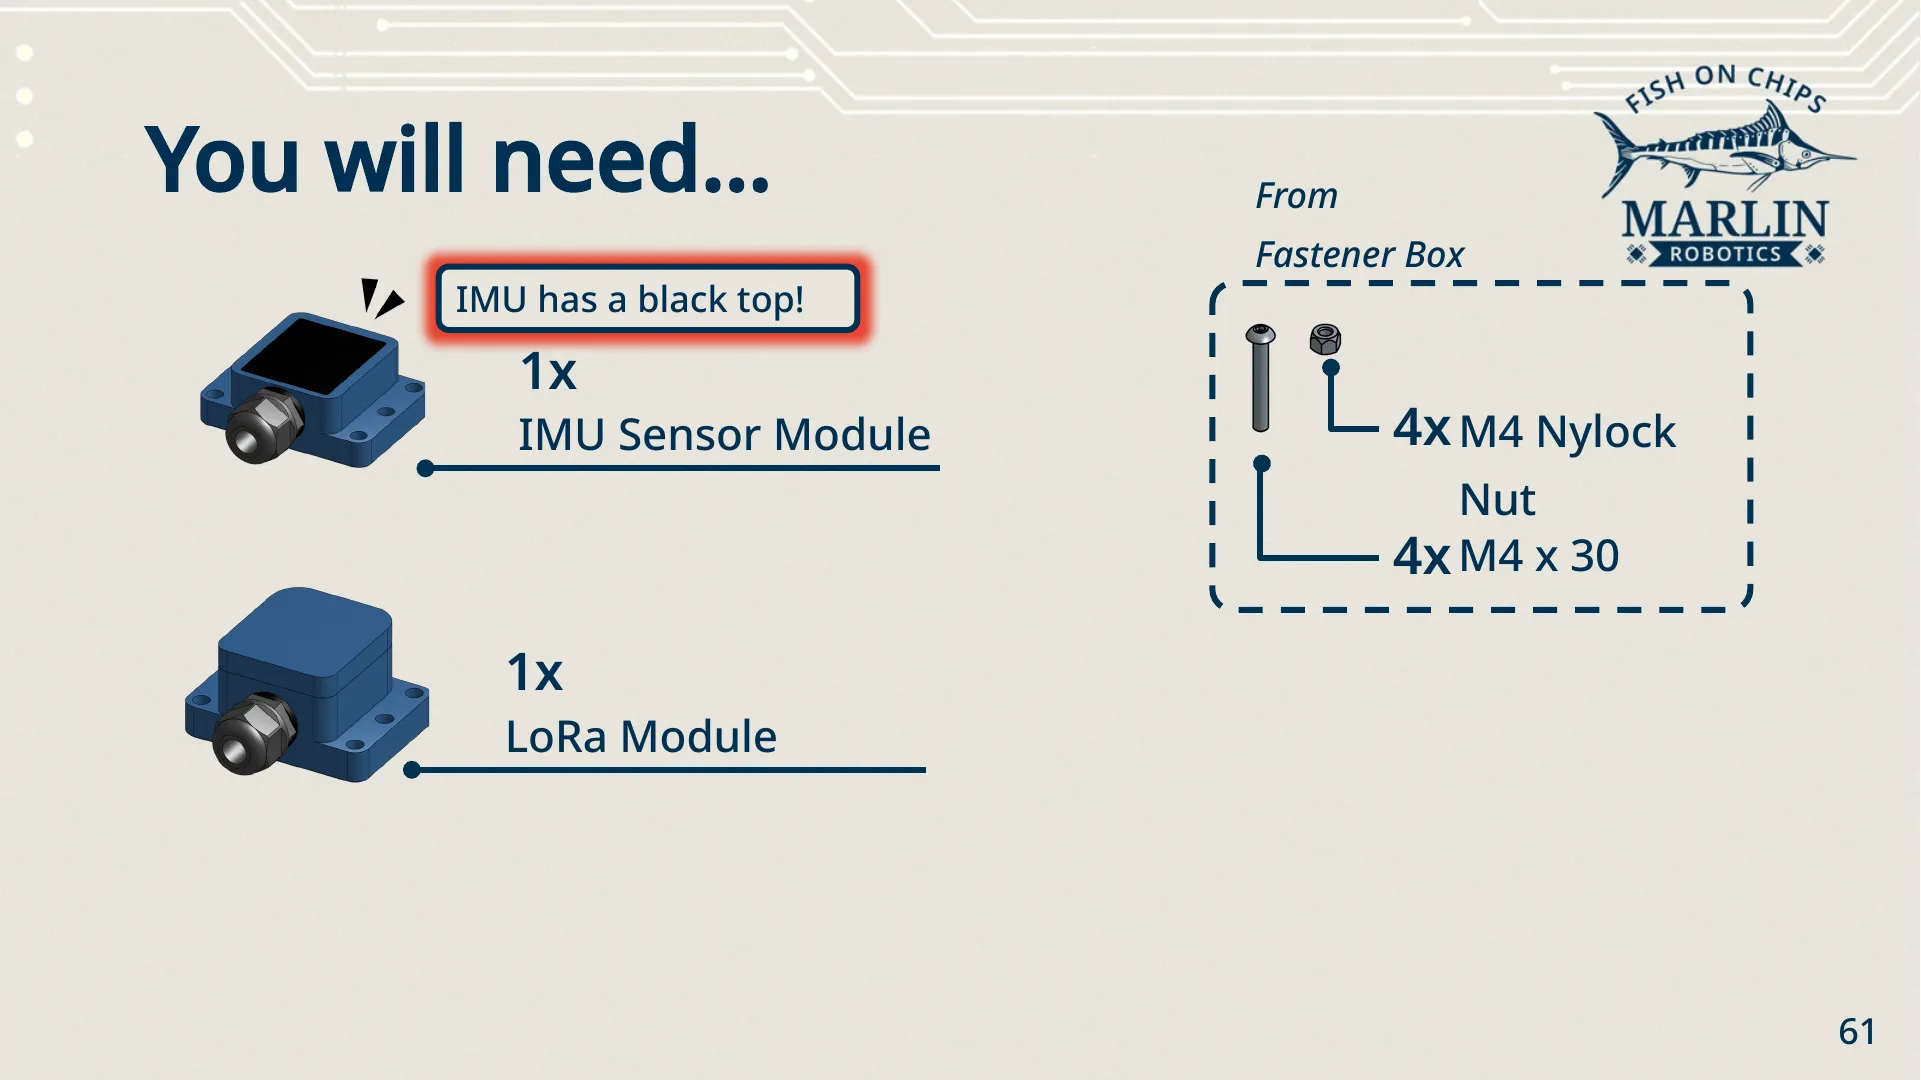
Beacon Receiver
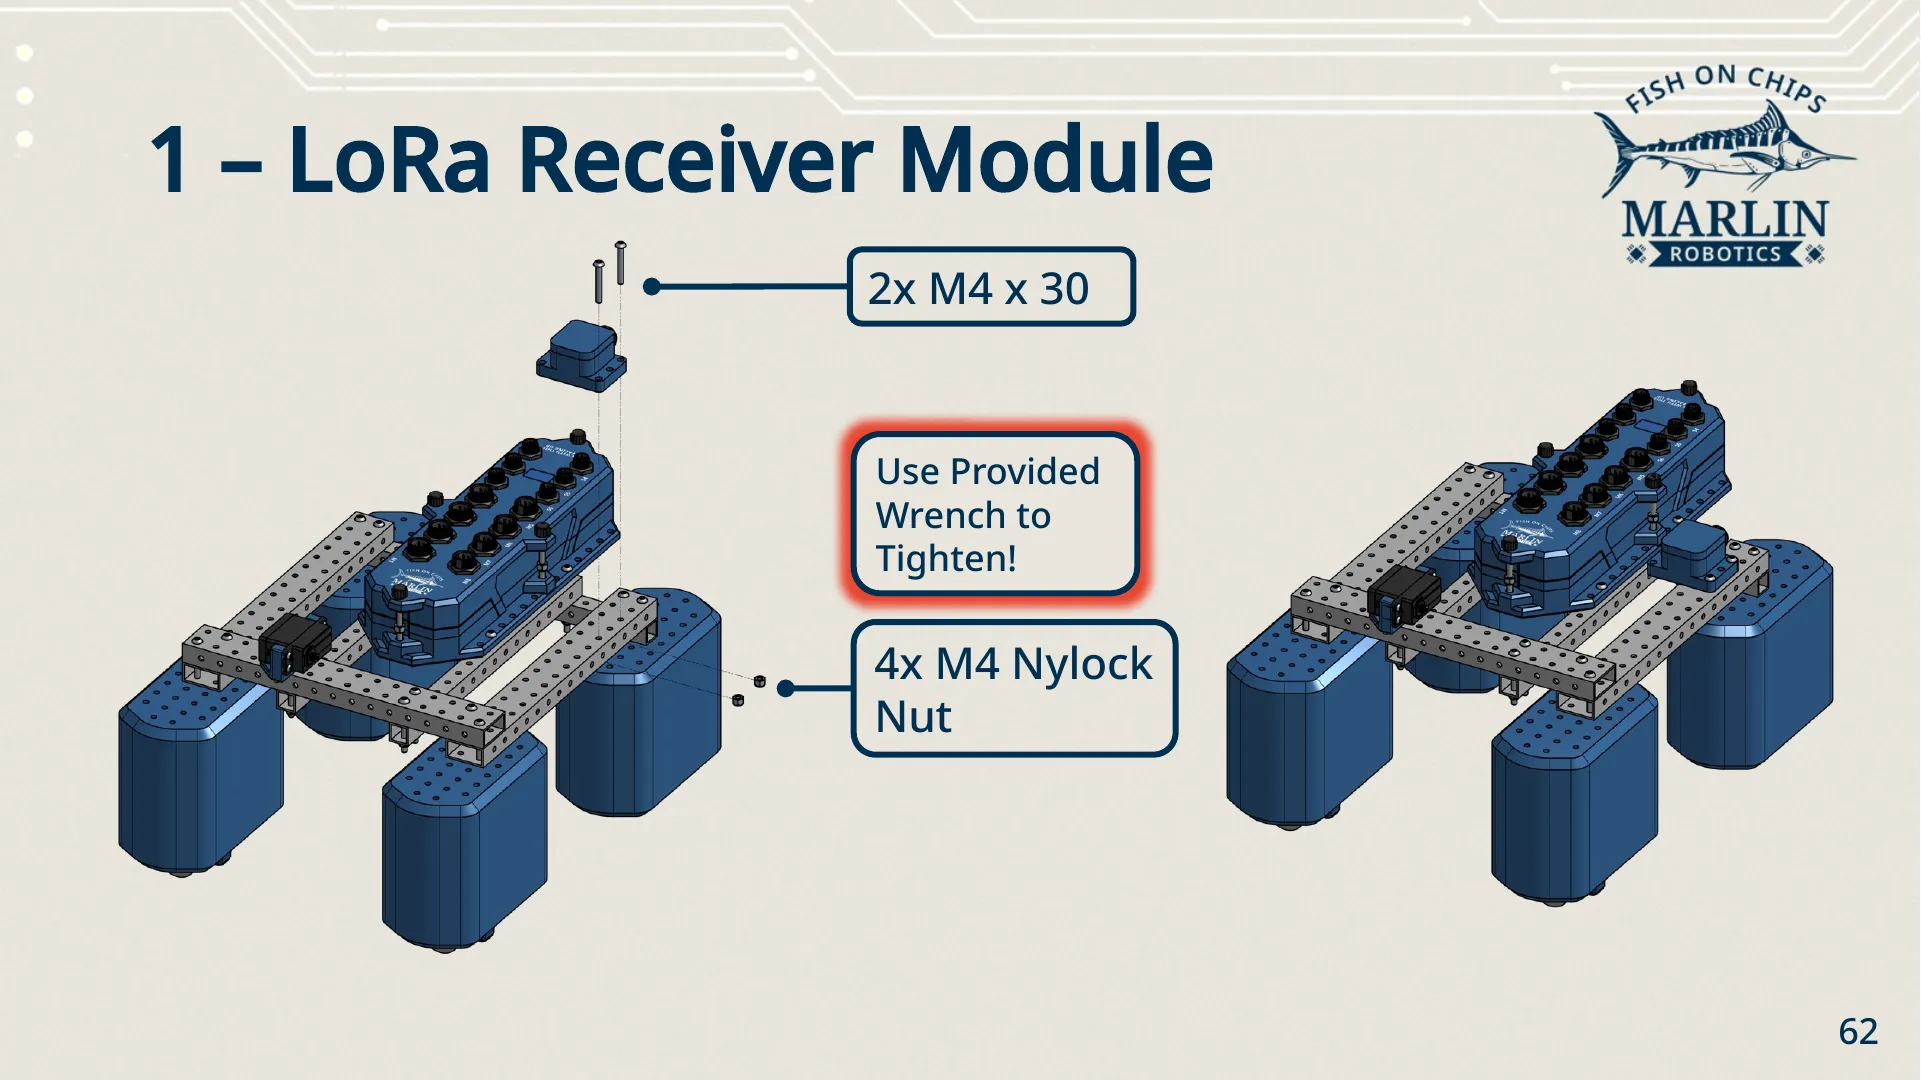
Section titled “Beacon Receiver”Sit the Beacon Receiver on the frame beside the Robot Brain, cable gland pointing towards the Brain, and fix it with 2× M4 × 30 and 2× M4 nylock nuts. Tighten with the provided wrench.
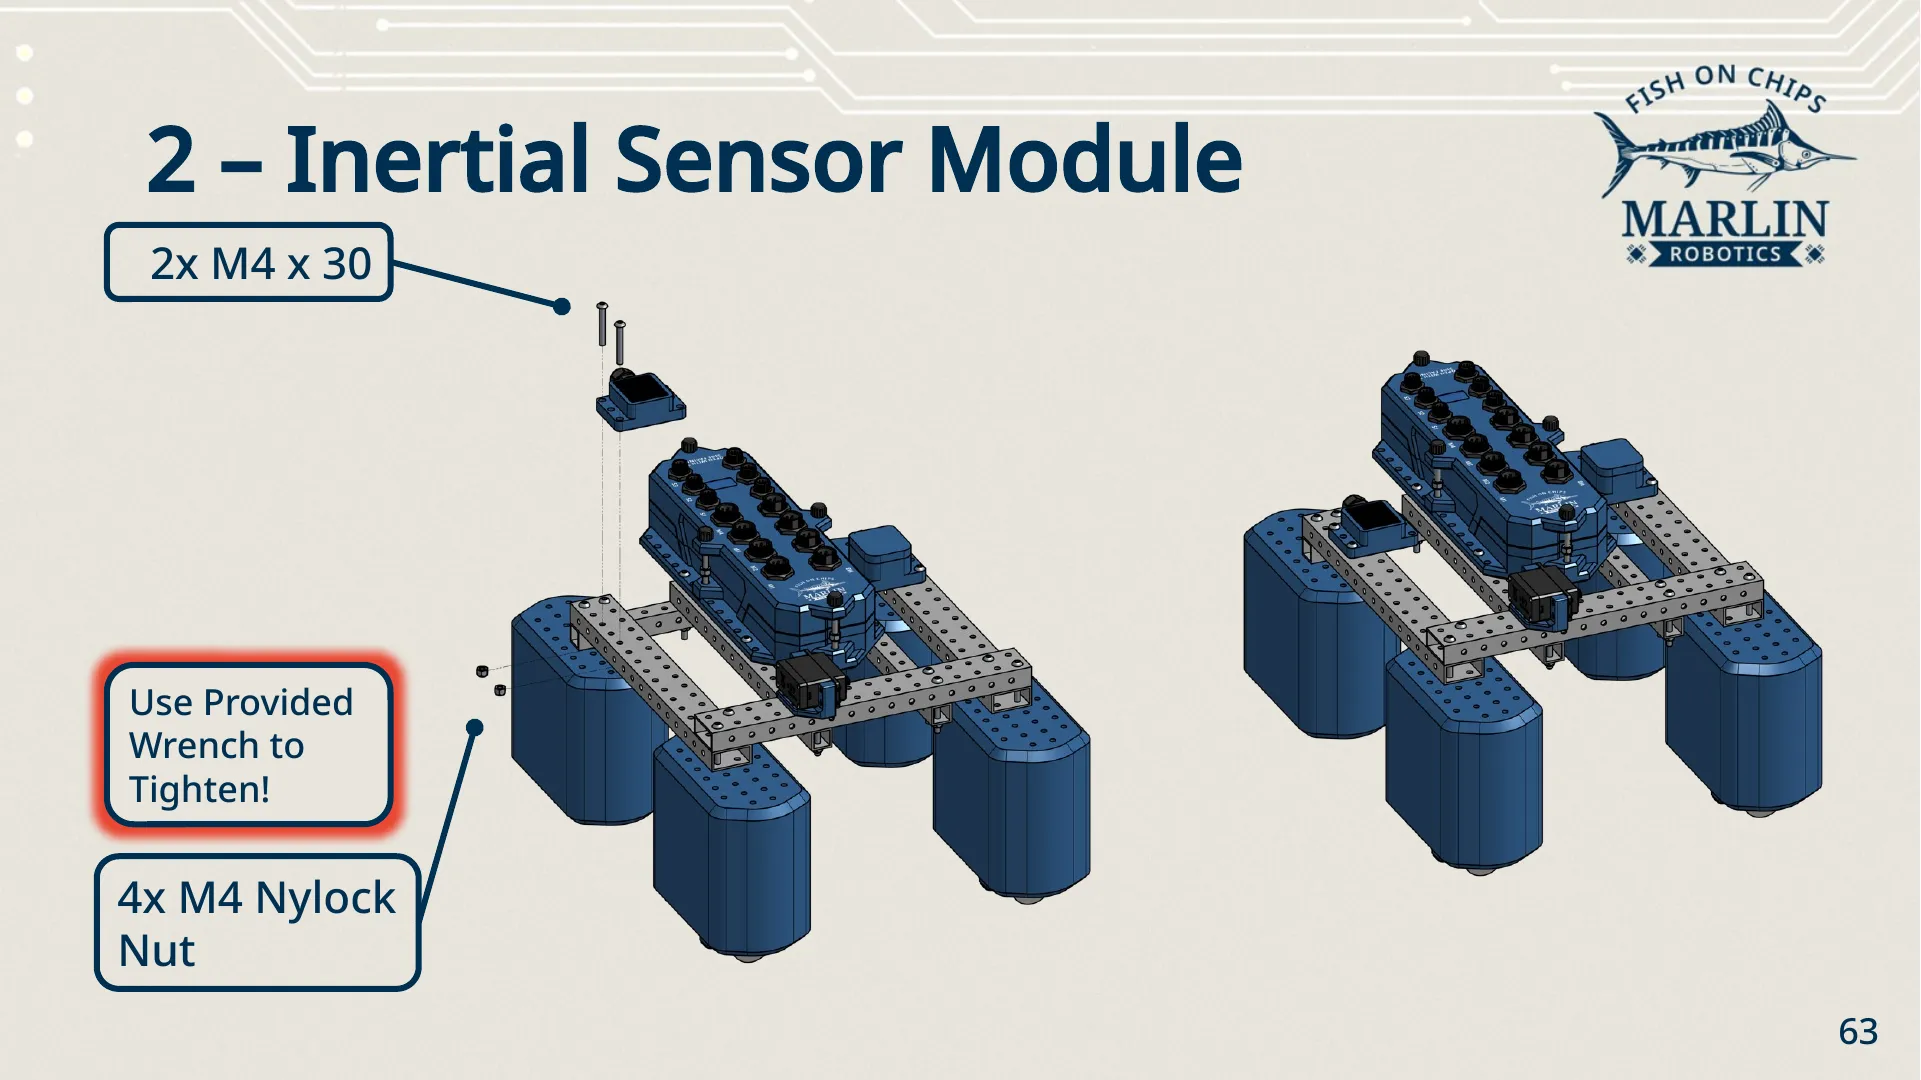
Mount the IMU on the opposite side of the Robot Brain the same way: 2× M4 × 30 and 2× M4 nylock nuts.
Cables
Section titled “Cables”Plug each device into the port your program will expect. The port names in your code have to match what you physically plugged in.
| Device | Port |
|---|---|
| IMU | S1 |
| Beacon Receiver | S6 |
| Servo | M2 |
| Right Thruster | M1 |
| Left Thruster | M8 |
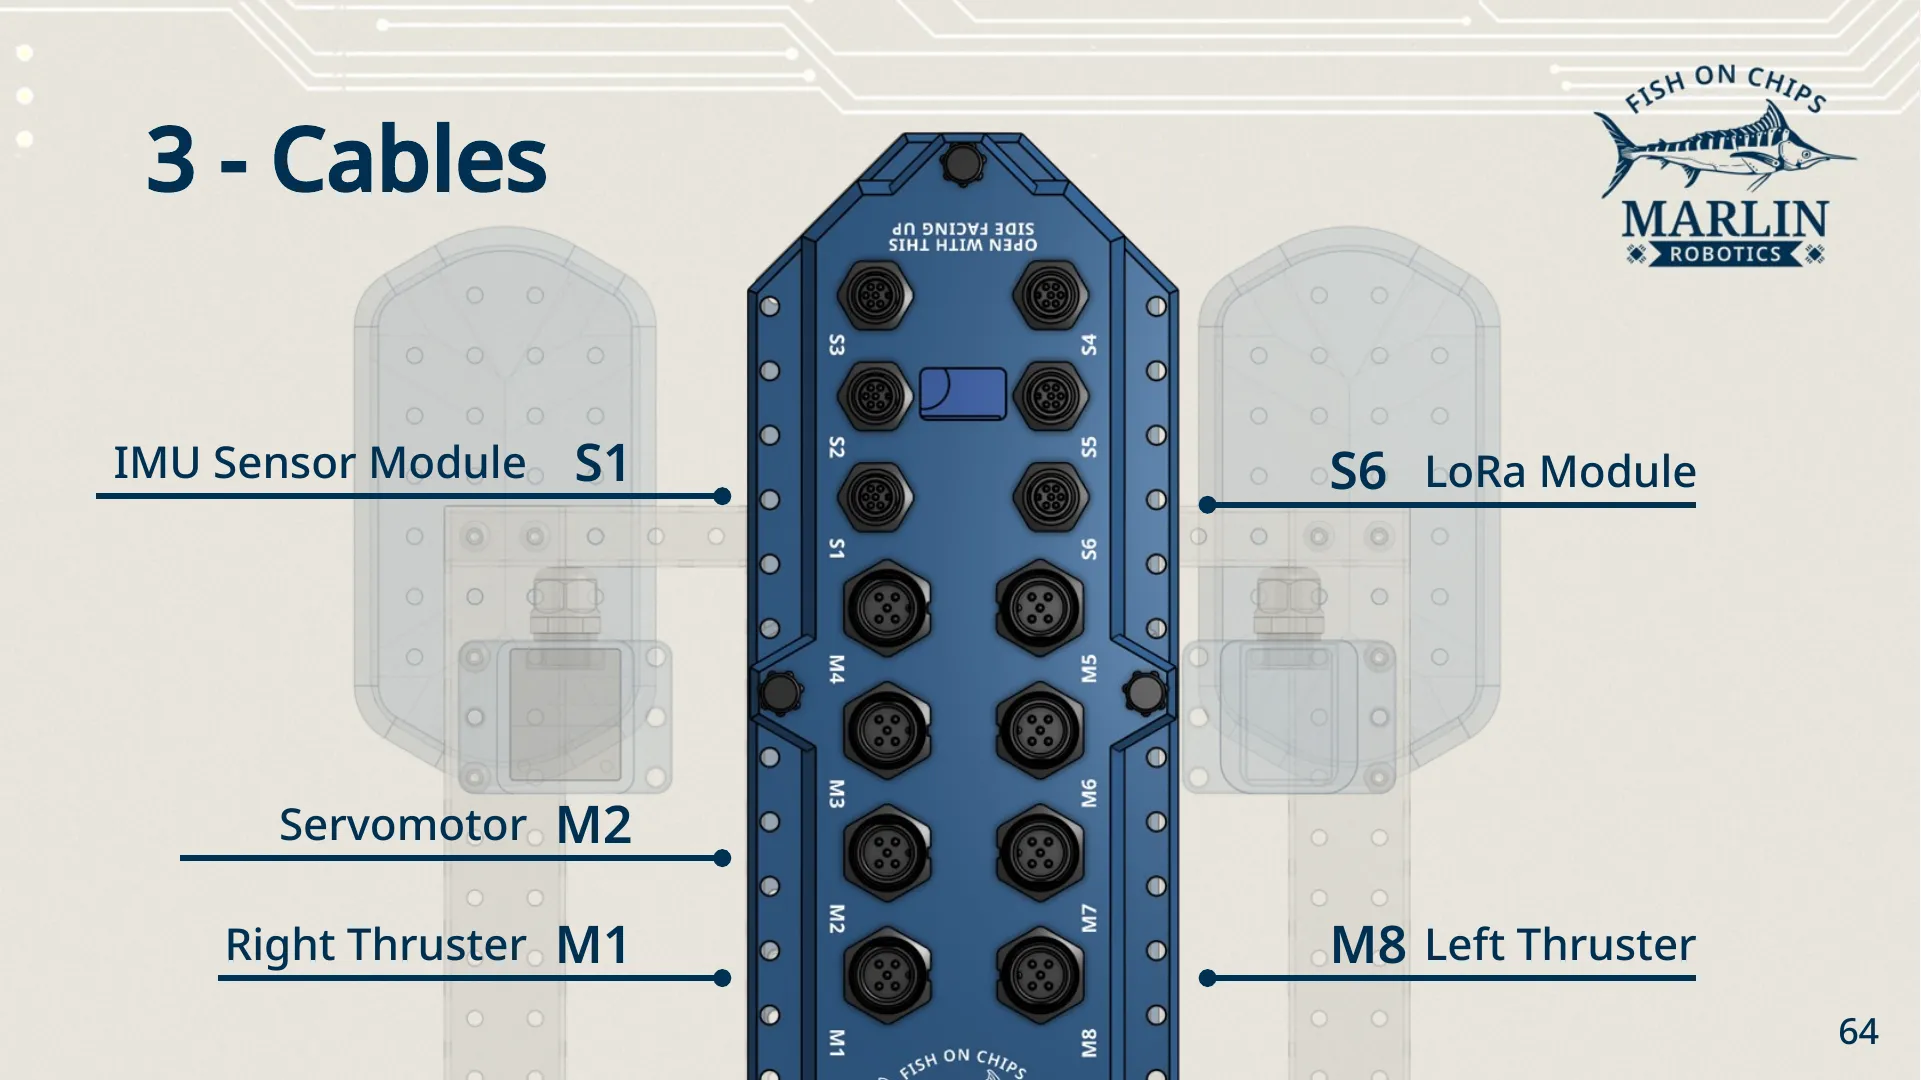
Screw each connector down finger-tight — they are sealed connectors, and a loose one lets water in.
5. Robot Brain battery
Section titled “5. Robot Brain battery”The Robot Brain ships sealed and empty. Open it once to fit the battery, then close it properly. Everything inside is electronics, and the seal is the only thing keeping the pool out.
| Part | Quantity |
|---|---|
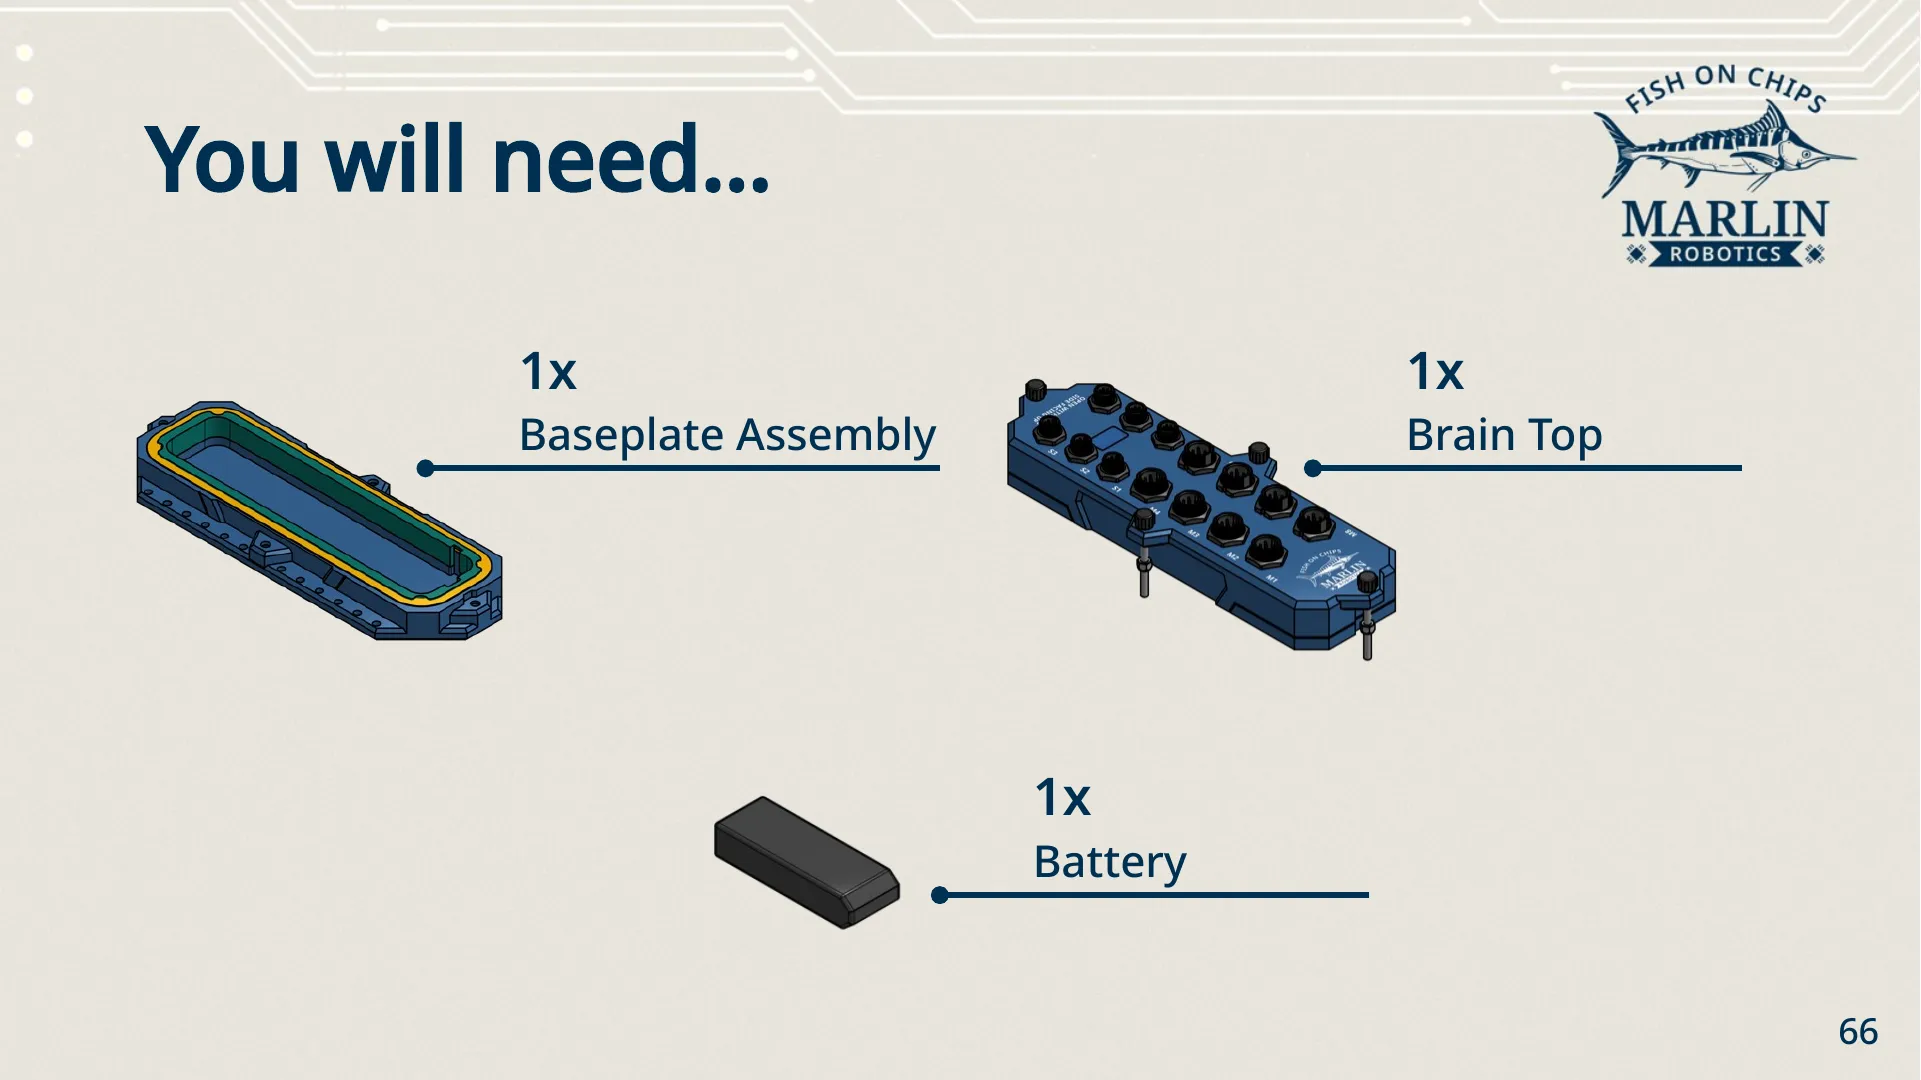
| Baseplate assembly | 1 |
| Brain top | 1 |
| Battery | 1 |
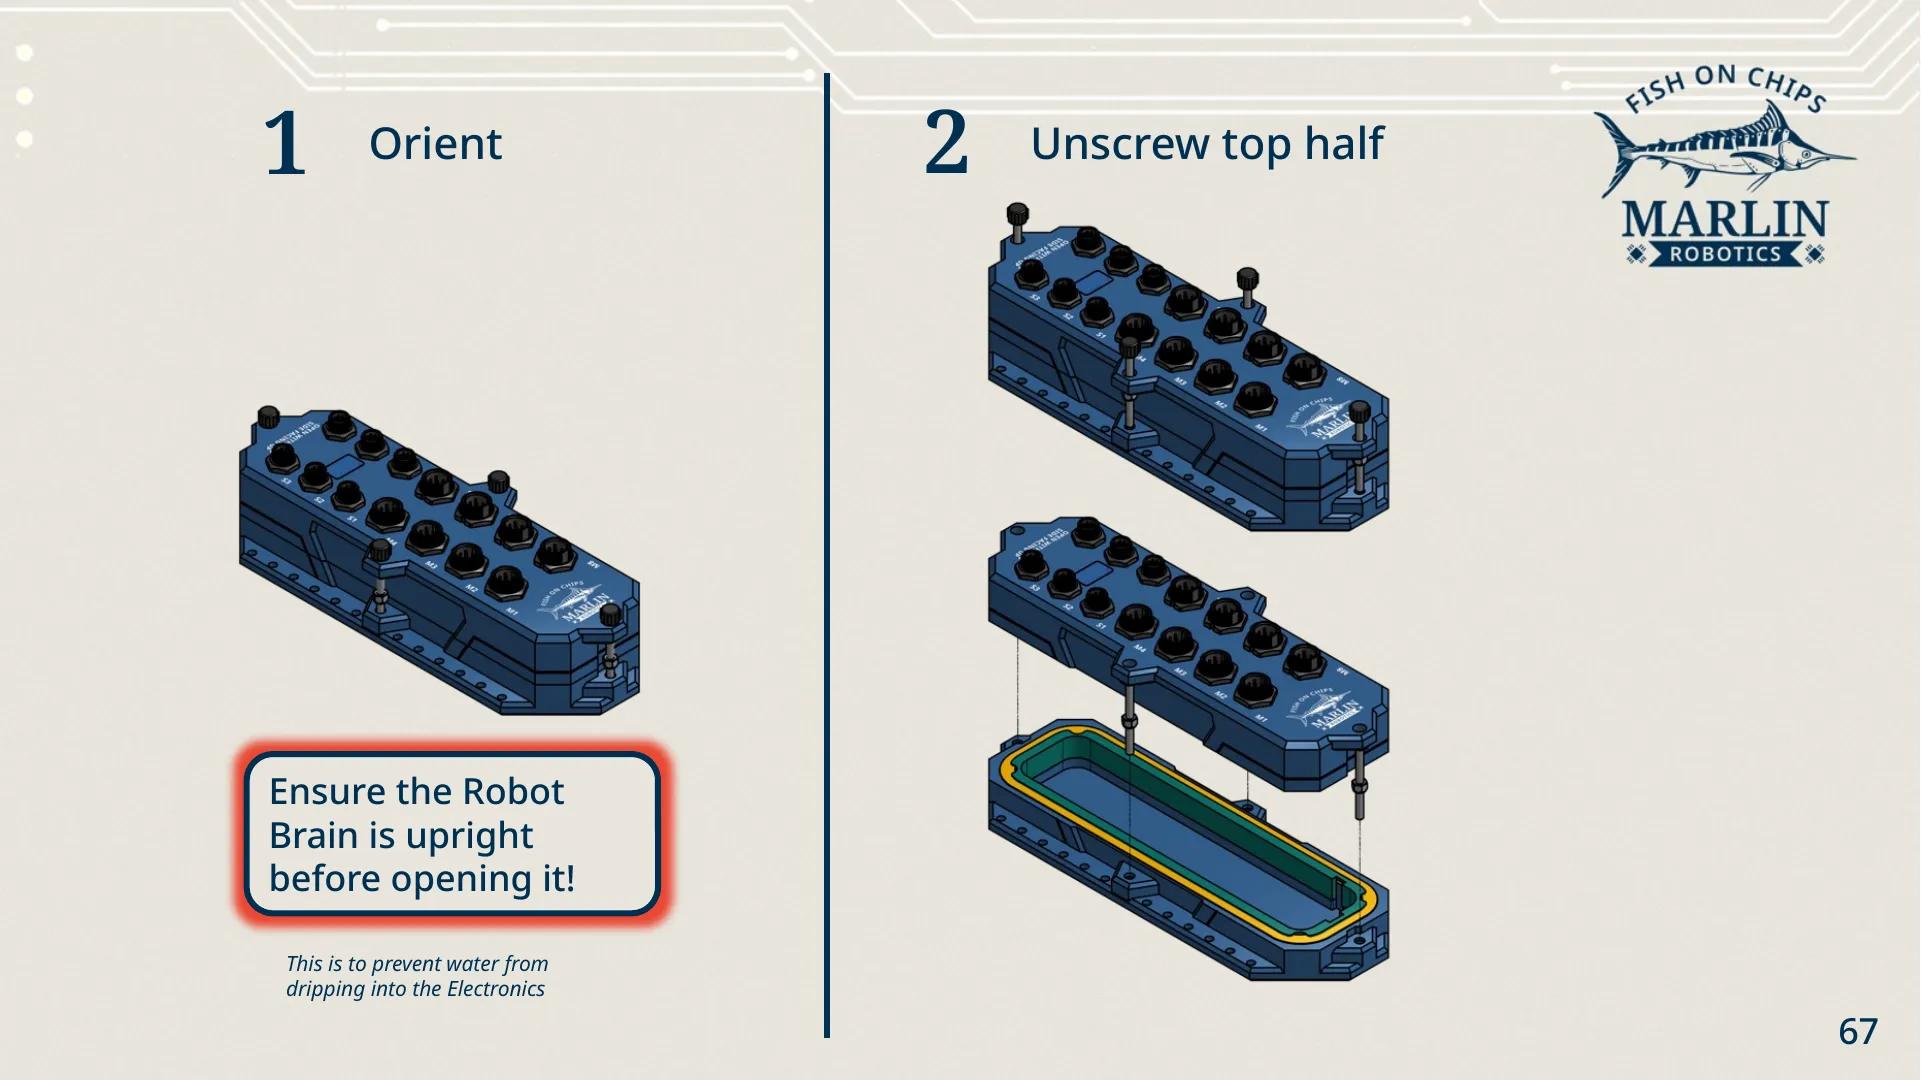
-
Orient. Set the Robot Brain upright on the bench.
-
Unscrew the top half. Loosen the lid thumbscrews and lift the top off the baseplate. Use the Thumbscrew Wrench only for loosening — tightening with it over-torques the screws.
-
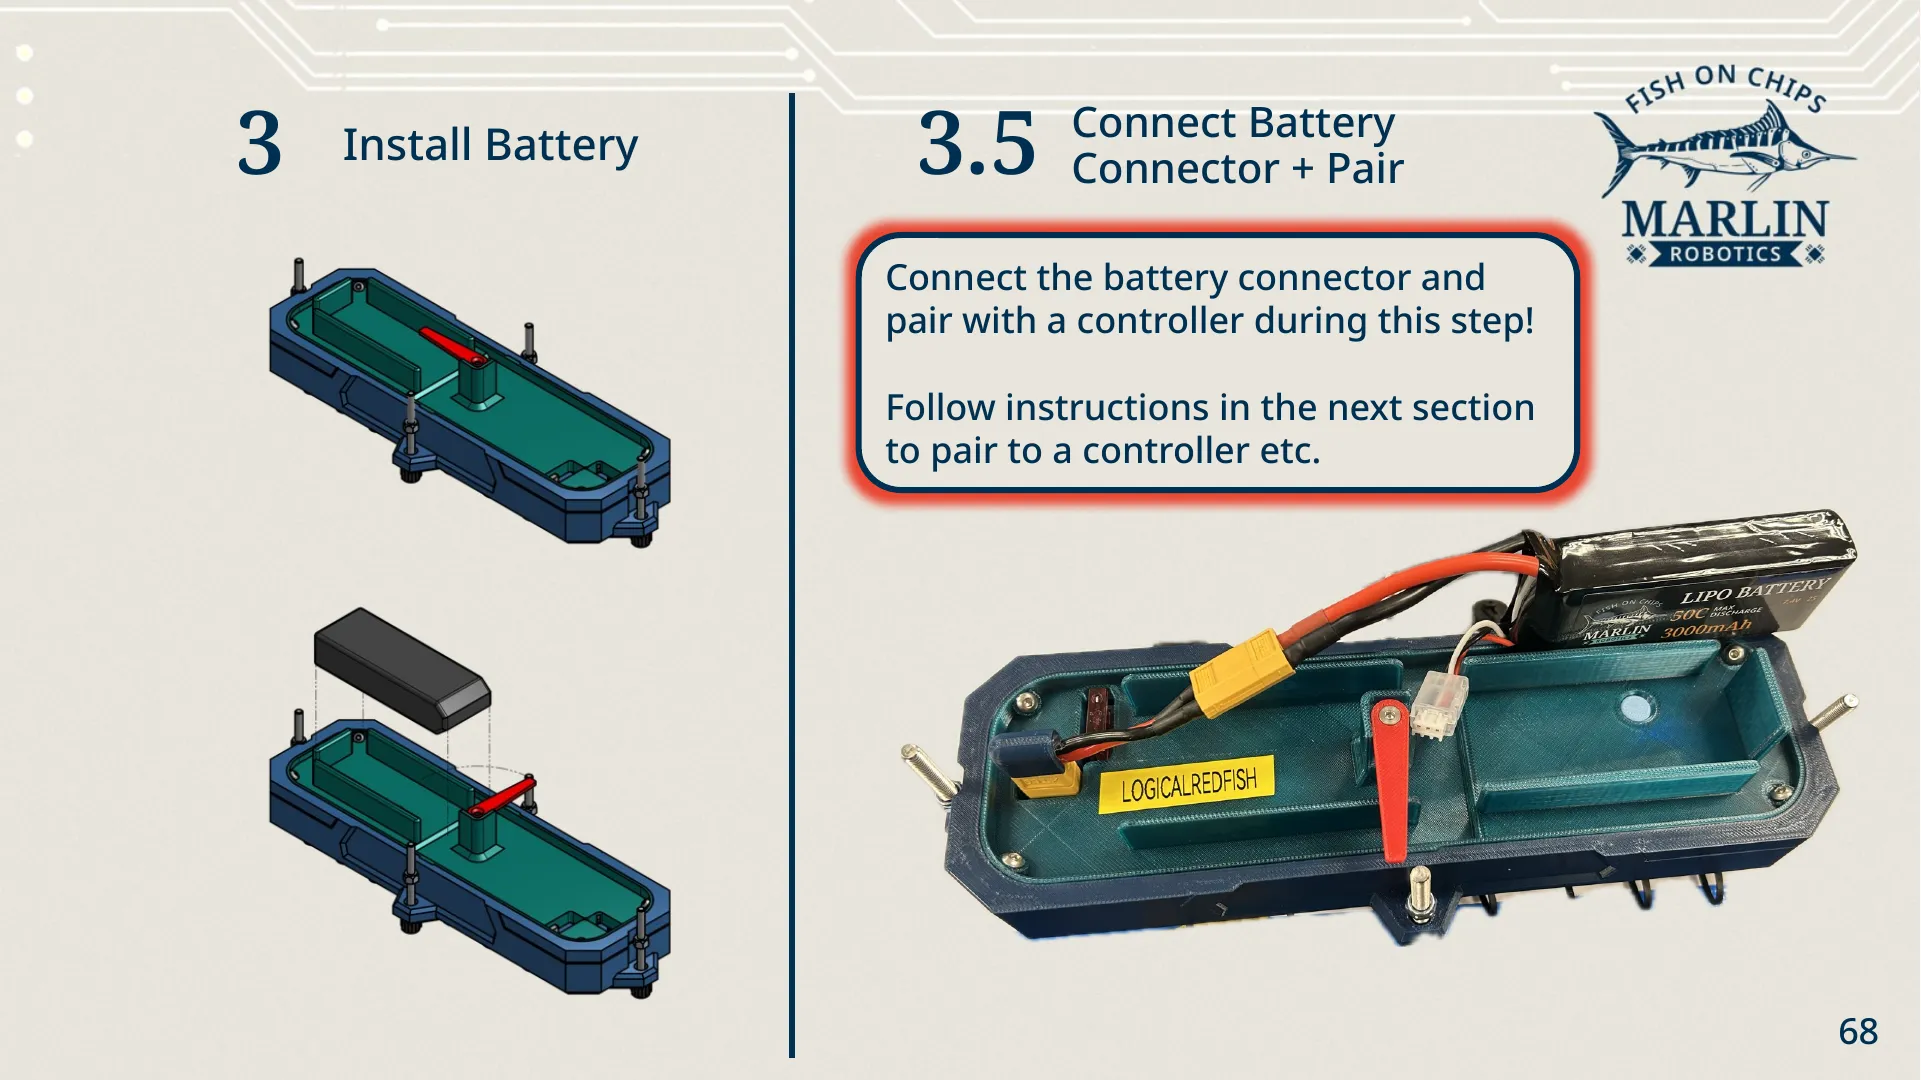
Install the battery. Drop the battery into the tray.
-
Connect the battery connector. The Brain powers up as soon as it is connected.
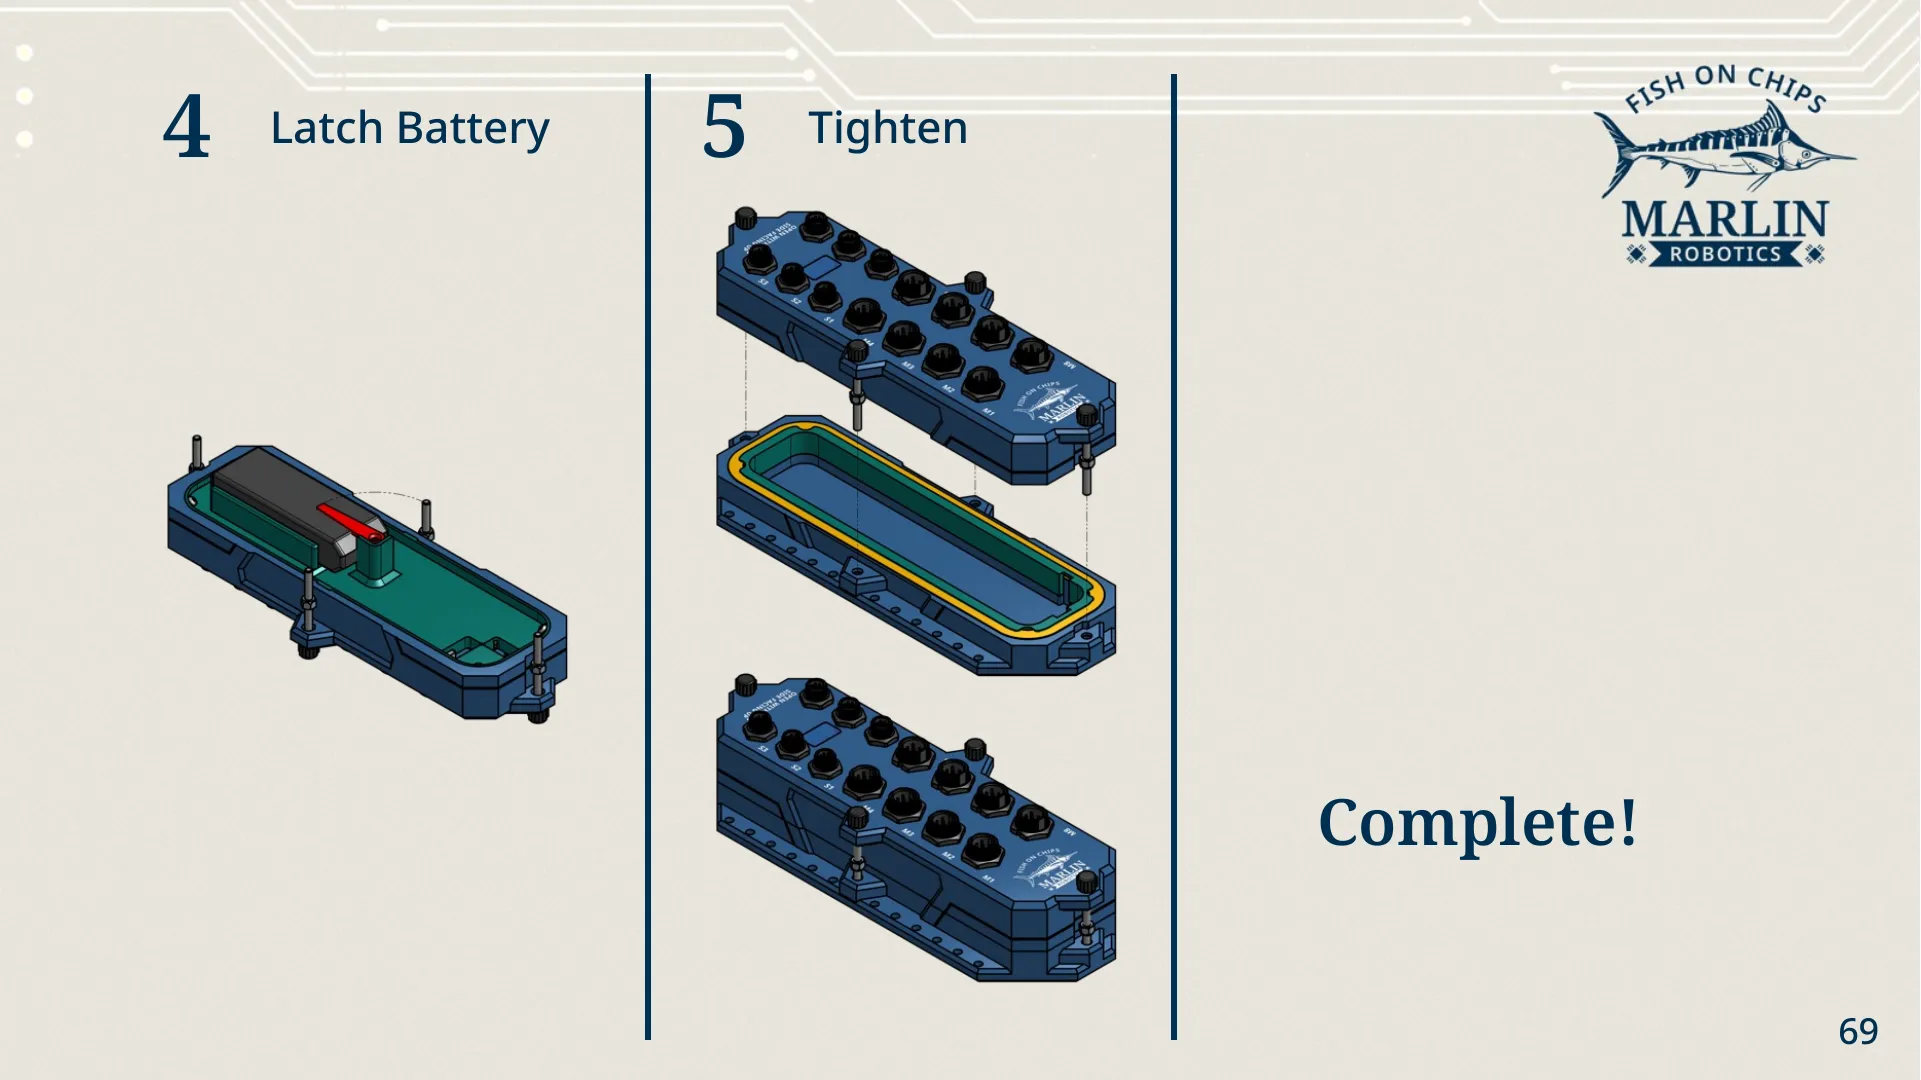
-
Latch the battery. Swing the red latch over the battery so it cannot slide around.
-
Tighten. Refit the top over the gasket and tighten the thumbscrews evenly by hand.
Before you move on
Section titled “Before you move on”Your starter Robot is built. Ensure that the electronics are connected to the ports shown in the build guide. If you chose other ports, change the port numbers in the example code respectively.
You should have: a Robot standing on four Hulls, Thrusters facing aft, sensors and Servo wired to the Brain, a closed and sealed Robot Brain with its battery in — and the T Flipper set aside with its clamp screws still loose, waiting for the Servo to be zeroed.
Next: Set up MARLIN on your laptop in Installing MARLIN.